September 13, 2026
Sunburst Bobble Blanket – A Textured & Cozy Crochet Project
Wrap yourself in warmth with this stunning Sunburst Bobble Blanket! Featuring a classic beige center with elegant radiating lines, a crisp sage green border, and a whimsical, fluffy pom-pom edge in shades of pink and white, this blanket is a masterpiece of texture and color. Perfect for adding a touch of modern boho charm to your living room or nursery.
Jump to pattern instructions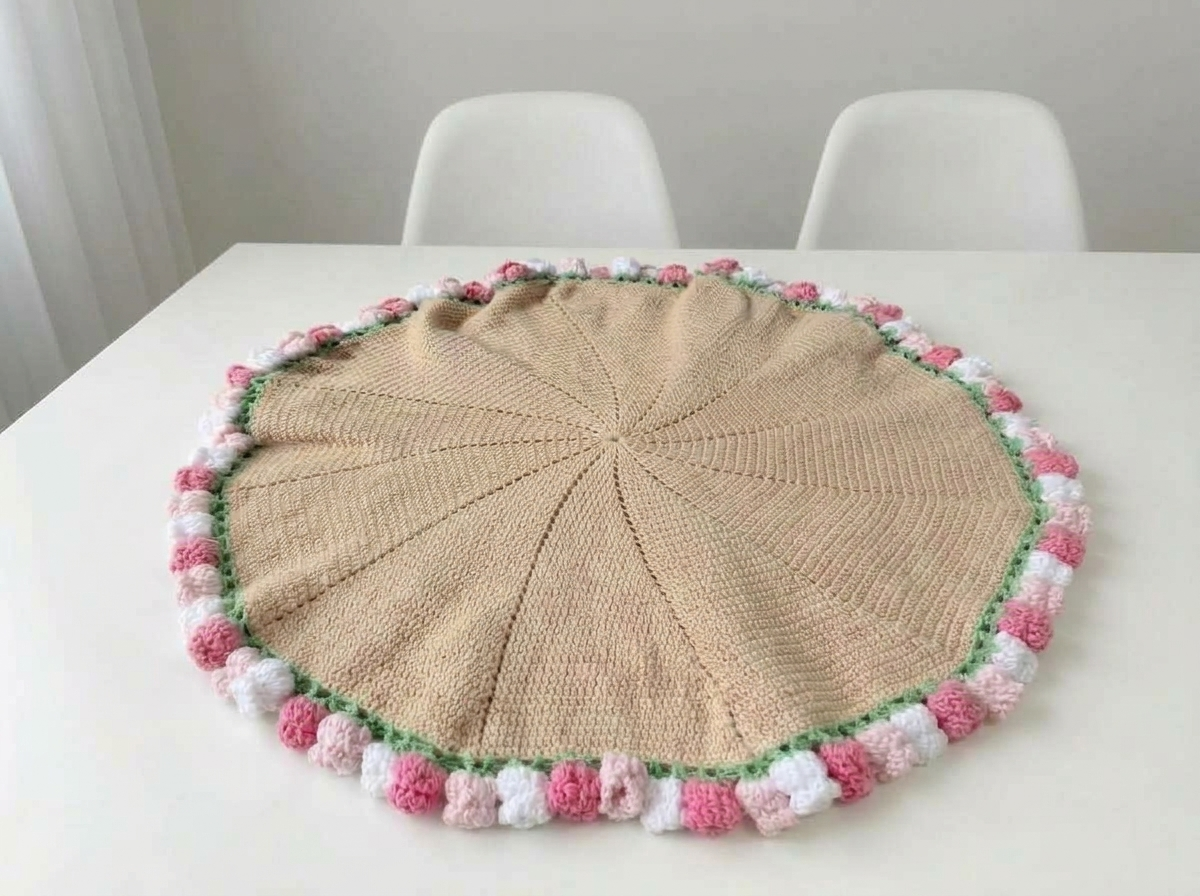
Sunburst Bobble Blanket – Complete Step-by-Step Pattern
1. Gathering Your Supplies
To achieve the beautiful contrast between the dense, structured center and the fluffy, cloud-like edge, we will use two different types of yarn.
- Yarn:
- Main Color (Beige): Worsted weight (Size 4) cotton or acrylic blend (e.g., YarnArt Jeans, Catania). You will need approx. 800g – 1000g for a throw-sized blanket.
- Border Color (Sage Green): Same weight as the main color. Approx. 100g.
- Bobble Color (Fluffy Pink/White Variegated): A fluffy, faux fur, or eyelash yarn (e.g., Himalaya Dolphin Baby, YarnArt Dolce). This creates the pom-pom effect. Approx. 200g.
- Hooks:
- 5.0 mm (US H/8) for the beige center and green border.
- 6.0 mm (US J/10) for the fluffy yarn (to make the bobbles easier to work).
- Notions: Tapestry needle for weaving in ends, scissors, and a stitch marker.
- Finished Size: Approximately 100 cm (40 inches) in diameter (can be adjusted by adding more rounds).
What you'll master: Creating a seamless circular fabric, working with fluffy yarns, and executing textured bobble stitches.
2. Abbreviations & Special Techniques
Let’s quickly review a few terms. The magic of this blanket lies in the "Bobble Stitch" at the end!
- MR: Magic ring
- ch: Chain
- sc: Single crochet
- hdc: Half double crochet
- dc: Double crochet
- inc: Increase (2 stitches in one stitch)
- sl st: Slip stitch
- Bobble St: Yarn over, insert hook into stitch, yarn over and pull up a loop (5 loops on hook). Repeat this 4 more times in the same stitch (9 loops on hook). Yarn over and pull through all 9 loops. Chain 1 to lock it.
3. The Sunburst Center (Beige)
We start with a magic ring and work in continuous rounds (or joined rounds, as preferred). The "sunburst" effect is created by the natural stacking of the increases in each round.
- R1: 12 hdc in MR. Join with a sl st to the first hdc. (12 sts)
- R2: Ch 2 (counts as first hdc). 2 hdc in the same stitch. 2 hdc in each stitch around. Join with sl st. (24 sts)
- R3: Ch 2. 2 hdc in the same stitch. (1 hdc, 2 hdc in next stitch) x 11. Join. (36 sts)
- R4: Ch 2. 2 hdc in the same stitch. (2 hdc, 2 hdc in next stitch) x 11. Join. (48 sts)
- R5: Ch 2. 2 hdc in the same stitch. (3 hdc, 2 hdc in next stitch) x 11. Join. (60 sts)
- R6: Ch 2. 2 hdc in the same stitch. (4 hdc, 2 hdc in next stitch) x 11. Join. (72 sts)
- R7-R15 (or desired size): Continue this pattern, adding one more hdc between the increases in each round (e.g., R7 is 5 hdc between increases, R8 is 6 hdc, etc.).
- Pro Tip: To keep the "spokes" visible, try to align your increases directly above the increases of the previous round.
What you'll master: Spiral increase sequences and maintaining a flat, circular shape.
4. The Green Border
This crisp green ring frames the beige center and provides a sturdy base for the fluffy edge.
- Instructions: Join the Sage Green yarn to any stitch on the outer edge of the beige center.
- R1: Ch 1. Sc in each stitch around. Join with a sl st to the first sc.
- Finishing: Fasten off and weave in the end.
What you'll master: Clean color changes and creating a defined edge.
5. The Fluffy Bobble Edge (Pink/White)
Now for the most fun part! Switch to your fluffy yarn and the larger 6.0 mm hook. Because the yarn is thick and fuzzy, we will work a simple pattern that lets the texture shine.
- Instructions: Join the Fluffy Yarn to any stitch on the green border round.
- R1: Ch 3 (counts as first dc).
- Pattern: [2 dc in the same stitch, ch 1, skip 1 stitch on the green border, sc in the next stitch] x repeat around.
- Alternative (for rounder pom-poms): [Bobble St in next stitch, sc in next stitch] x repeat around.
- Finishing: Join with a sl st to the top of the beginning ch-3. Fasten off securely. Because fluffy yarn can be slippery, weave in your ends very carefully, perhaps tying a small knot before weaving.
What you'll master: Working with challenging, textured yarns and creating 3D embellishments.
Final Section: Where to Go from Here
Congratulations! You’ve just crafted a stunning, tactile Sunburst Bobble Blanket. This project is a fantastic way to practice your circular crochet skills and experiment with mixing yarn weights and textures.
From here, try experimenting with different color palettes! You could make a "masculine" version with navy blue, grey, and charcoal bobbles, or a "sunset" version with oranges, yellows, and deep reds. You could even turn this pattern into a large floor rug by using t-shirt yarn or rope! Happy crocheting, and enjoy your cozy new masterpiece!