September 16, 2026
Cozy Striped Textured Blanket – A Warm & Inviting Crochet Pattern
Wrap yourself in comfort with this beautifully striped textured blanket! Featuring wide horizontal stripes in warm neutral tones and a plush, cozy texture, this project is perfect for adding warmth to your home. The simple yet elegant stitch pattern creates a lovely drape and makes this a relaxing, meditative make.
Jump to pattern instructions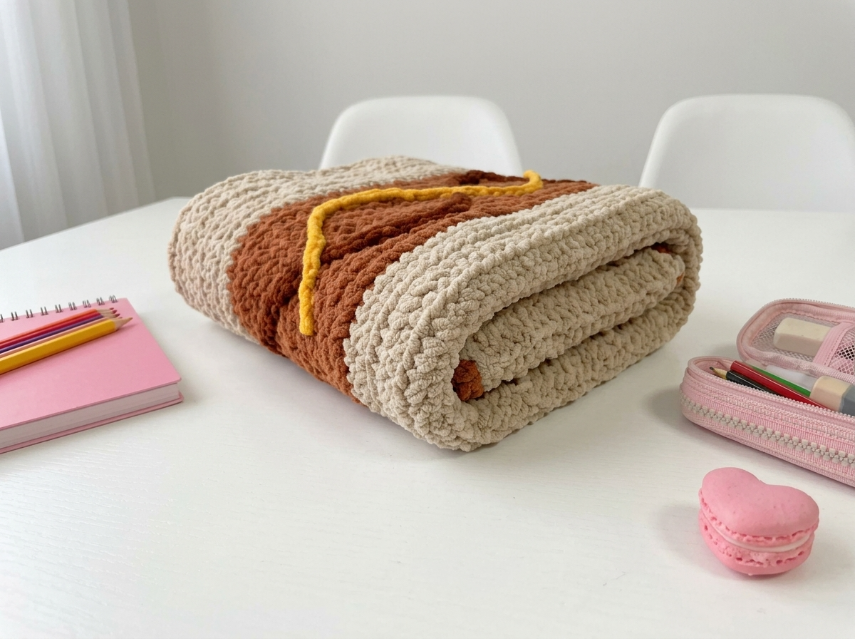
Cozy Striped Textured Blanket – Complete Step-by-Step Pattern
1. Gathering Your Supplies
To achieve that plush, cozy look with beautiful drape, a soft chunky or bulky yarn works beautifully.
- Yarn: Chunky/Bulky weight (Size 5-6) yarn.
- Color A (Cream/Beige): Approx. 600-800g
- Color B (Brown/Rust/Cinnamon): Approx. 400-600g
- Note: You can adjust colors as desired! The pattern uses wide stripes.
- Hook: 6.0 mm (US J/10) or 6.5 mm (US K/10.5) (choose the size that gives you a soft, drapey fabric).
- Notions:
- Tapestry needle for weaving in ends
- Scissors
- Stitch markers
- Optional: Yellow or contrasting yarn for the tie/cord (approx. 1 meter)
- Finished Size: Approximately 120 cm x 150 cm (48" x 60") - easily adjustable by adding/removing chains and rows.
What you'll master: Working textured stitches, changing colors for stripes, and creating a cozy, substantial blanket.
2. Abbreviations & Special Techniques
Let's quickly review a few terms. If you're new to any of these, don't worry—you'll be a pro by the time you're snuggled under this blanket!
- ch: Chain
- sc: Single crochet
- hdc: Half double crochet
- dc: Double crochet
- sl st: Slip stitch
- st(s): Stitch(es)
- Shell Stitch: (2 dc, ch 1, 2 dc) all in the same stitch - creates a lovely fan/texture
- V-Stitch: (dc, ch 1, dc) in the same stitch
3. The Foundation
We'll start with a foundation chain. The stitch pattern creates a beautiful texture that's not too complicated.
- Foundation Chain: With Color A (Cream), Ch 120 (or any multiple of 4 + 2 for your desired width).
- Pro Tip: Make a loose foundation chain for better drape!
- Row 1: Sc in the 2nd ch from the hook and each ch across. (119 sc)
- This creates a solid base row.
What you'll master: Creating a stable foundation for a large project.
4. The Textured Stitch Pattern
This pattern uses a simple but beautiful textured stitch that repeats every 2 rows.
Row 2 (Color A):
- Ch 3 (counts as first dc), turn.
- Pattern: Skip 1 st, (2 dc, ch 1, 2 dc) in next st (shell made), skip 1 st, dc in next st.
- Repeat from * across, ending with dc in last st.
- You should have shells separated by single dc stitches.
Row 3 (Color A):
- Ch 1, turn.
- Sc in first st and each st across (including ch-1 spaces of shells).
- This row "smooths out" the shells and prepares for the next textured row.
Row 4 (Color A or B - your choice!):
- Ch 3, turn.
- Pattern: Skip 1 st, (2 dc, ch 1, 2 dc) in next st, skip 1 st, dc in next st.
- Repeat from * across.
Row 5:
- Ch 1, turn. Sc across.
Continue alternating between Shell rows (dc pattern) and Sc rows.
What you'll master: Creating rhythmic texture with shell stitches and maintaining even tension.
5. Color Stripe Pattern
To create those beautiful wide stripes seen in the photo, change colors every 8-10 rows (4-5 textured pattern repeats).
Suggested Stripe Pattern:
- Rows 1-8: Color A (Cream)
- Rows 9-16: Color B (Brown/Rust)
- Rows 17-24: Color A (Cream)
- Rows 25-32: Color B (Brown/Rust)
- Rows 33-40: Color A (Cream)
- Continue until desired length is reached.
How to Change Colors:
- On the last stitch of the row before the color change, complete the final yarn over with the new color.
- Carry the old color loosely up the side if you're only changing every few rows, or cut it and weave in later if you prefer.
- Pro Tip: For cleaner edges, always start and end color changes on the same side (RS or WS).
What you'll master: Clean color changes and planning a striped design.
6. Continuing the Blanket
- Continue working the textured pattern (alternating Shell rows and Sc rows) in your stripe pattern.
- Work until the blanket measures approximately 150 cm (60 inches) from the foundation chain, or to your desired length.
- Pro Tip: Lay the blanket flat periodically to check that it's lying flat and the stripes are even.
What you'll master: Maintaining consistency over a large project.
7. The Final Row
For a clean, finished edge:
- Final Row: With your last color, Ch 1, turn. Sc evenly across the entire top edge.
- Work 3 sc in each corner to keep it flat.
- Finishing: Fasten off and weave in all ends securely.
What you'll master: Creating a polished, professional finish.
8. The Decorative Tie/Cord (Optional)
The yellow cord adds a charming finishing touch!
Instructions:
- With Yellow (or contrasting color) yarn, Ch 150 (or desired length).
- Row 1: Sc in the 2nd ch from the hook and each ch across. (149 sc)
- Finishing: Fasten off, leaving long tails at both ends.
Alternative Braided Cord:
- Cut 6 strands of yarn, each 3 meters long.
- Braid them together tightly.
- Knot both ends securely.
- Trim evenly.
Attaching the Tie:
- Weave the cord through the ch-1 spaces of the shell stitches, about 15-20 cm from the top edge.
- You can weave it in a straight line across, or create a decorative pattern.
- Tie the ends in a bow or knot.
What you'll master: Creating decorative elements and finishing touches.
9. Blocking & Finishing
-
Weave in Ends: Take your time weaving in all those loose ends on the back of the work. This is the most time-consuming part but essential for a professional finish!
-
Blocking (Highly Recommended):
- Gently hand wash the blanket in cool water with mild detergent.
- Roll in a clean towel to remove excess water (never wring!).
- Lay flat on a clean, dry surface or blocking mats.
- Gently stretch and shape to your desired measurements.
- Pin the edges if needed to keep it straight.
- Allow to dry completely (this may take 24-48 hours).
-
Final Touches:
- Once dry, give the blanket a gentle shake to fluff up the fibers.
- Trim any stray fibers for a clean look.
- Attach the decorative tie if you haven't already.
What you'll master: Professional finishing techniques for large projects.
Final Section: Where to Go from Here
Congratulations! You've just crafted a beautiful, cozy Striped Textured Blanket. This project is incredibly rewarding and creates a cherished heirloom piece that will provide warmth and comfort for years to come.
From here, try experimenting with different color combinations! You could make a "Sunset" version with oranges, pinks, and purples, a "Ocean" version with blues and teals, or a "Monochrome" version using different shades of grey. You could also adapt this pattern to make matching pillow covers, a smaller throw for the couch, or even a baby blanket. Happy crocheting, and enjoy your cozy new creation!