September 19, 2026
Cozy Plush Moose – A Soft & Cuddly Crochet Pattern
Meet this adorable plush moose! Featuring a soft brown body, a cream-colored muzzle, chunky antlers, and the sweetest expression with big safety eyes, this project is made with plush yarn for maximum cuddliness. It's a perfect intermediate project that results in an incredibly huggable friend.
Jump to pattern instructions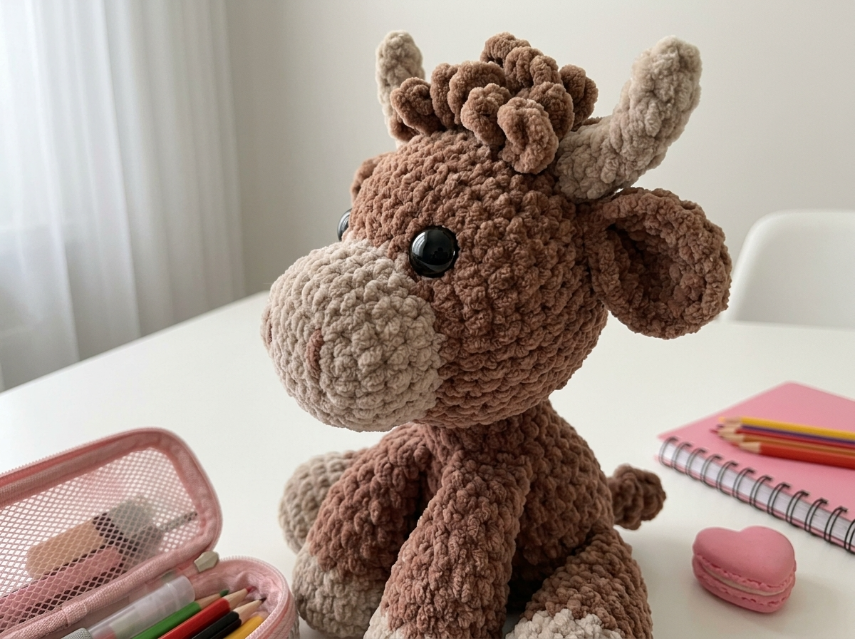
Cozy Plush Moose – Complete Step-by-Step Pattern
1. Gathering Your Supplies
The secret to this moose's irresistible softness is plush/chenille yarn!
- Yarn: Plush/Velvet yarn (e.g., Himalaya Dolphin Baby, YarnArt Dolce, Bernat Blanket).
- Brown (Medium/Dark): Main body color (approx. 300-400g).
- Cream/Light Beige: For muzzle, inner ears, and hooves (approx. 100g).
- Light Brown/Tan: For antlers (approx. 50g).
- Hook: 4.0 mm or 4.5 mm (check yarn label; plush yarn often needs a larger hook).
- Notions:
- Large Safety Eyes: 15-18mm black safety eyes (preferably with a glossy finish).
- Poly-fil stuffing.
- Tapestry needle (large eye for plush yarn).
- Scissors.
- Stitch markers (essential for plush yarn as stitches are hard to see!).
- Optional: Black embroidery floss for nostrils.
What you'll master: Working with plush yarn, creating a stable sitting figure, and assembling a complex character.
2. Abbreviations & Special Techniques
- MR: Magic ring
- ch: Chain
- sc: Single crochet
- inc: Increase (2 sc in one stitch)
- dec: Decrease (2 sc crocheted together)
- sl st: Slip stitch
- st(s): Stitch(es)
Pro Tip for Plush Yarn: Use stitch markers liberally! It's harder to see stitches with plush yarn. Work slowly and count stitches frequently.
3. The Head & Body (Brown)
We'll work the head and body as one continuous piece for stability.
- R1: 6 sc in MR (6)
- R2: 6 inc (12)
- R3: (1 sc, inc) x 6 (18)
- R4: (2 sc, inc) x 6 (24)
- R5: (3 sc, inc) x 6 (30)
- R6: (4 sc, inc) x 6 (36)
- R7-11: 36 sc (36) [5 rows]
- Eye Placement: Insert large safety eyes between R8 and R9, spaced about 8-10 stitches apart.
- R12: (4 sc, dec) x 6 (30)
- R13: (3 sc, dec) x 6 (24)
- Note: This begins the neck area.
- R14: (2 sc, inc) x 6 (30) - Slight increase for shoulders.
- R15-25: 30 sc (30) [11 rows]
- Note: This creates the body. Adjust rows for desired height.
- R26: (3 sc, dec) x 6 (24)
- R27: (2 sc, dec) x 6 (18)
- Stuffing: Stuff the body and head firmly now.
- R28: (1 sc, dec) x 6 (12)
- Finishing: Fasten off, weave tail through remaining stitches to close.
What you'll master: Shaping a head-to-body transition in plush yarn.
4. The Muzzle (Cream)
This prominent snout gives the moose its character.
- R1: 6 sc in MR (6)
- R2: 6 inc (12)
- R3: (1 sc, inc) x 6 (18)
- R4: (2 sc, inc) x 6 (24)
- R5: (3 sc, inc) x 6 (30)
- R6-8: 30 sc (30) [3 rows]
- R9: (3 sc, dec) x 6 (24)
- R10: 24 sc (24)
- Stuffing: Stuff firmly to make it round and prominent.
- Finishing: Fasten off, leaving a long tail. Sew to the front of the face, centered below the eyes.
What you'll master: Creating a 3D facial feature.
5. The Ears (Brown & Cream, Make 2)
Outer Ear (Brown):
- R1: 6 sc in MR (6)
- R2: 6 inc (12)
- R3: (1 sc, inc) x 6 (18)
- R4: 18 sc (18)
- Finishing: Fasten off.
Inner Ear (Cream):
- R1: 4 sc in MR (4)
- R2: 4 inc (8)
- R3: 8 sc (8)
- Finishing: Fasten off.
Assembly: Sew the cream circle onto the center of the brown ear. Pinch the bottom slightly and sew to the top sides of the head, just above the eyes.
What you'll master: Layering colors for detail.
6. The Antlers (Light Brown/Tan, Make 2)
These chunky antlers are the moose's signature feature!
- Base:
- R1: 6 sc in MR (6)
- R2: 6 inc (12)
- R3: (1 sc, inc) x 6 (18)
- R4: 18 sc (18)
- Branches:
- R5: Sc 4, ch 5, sc in 2nd ch from hook, hdc, dc, sl st in next ch, skip 2 sts. Repeat 3 times around.
- R6: Sc around, working into branches.
- Finishing: Fasten off, leaving a tail. Stuff lightly. Sew to the top of the head, above the ears.
Alternative Simpler Antler:
- Make a flat oval shape and add small bobble stitches for texture.
What you'll master: Creating textured, branching shapes.
7. The Legs (Brown & Cream, Make 4)
- R1 (Brown): 6 sc in MR (6)
- R2: 6 inc (12)
- R3-10: 12 sc (12) [8 rows]
- Switch to Cream for Hoof:
- R11-12 (Cream): 12 sc (12)
- Finishing: Fasten off. Stuff firmly. Flatten the top for sewing.
What you'll master: Color changing for hooves.
8. The Tail (Brown, Optional)
- Instructions: MR 4 sc. R2: 4 sc. R3-5: 4 sc.
- Finishing: Fasten off. Stuff lightly and sew to the back.
9. Assembly & The Magic of Details
Now for the most rewarding part: bringing your moose to life!
- Attach Legs: Sew the four legs to the bottom of the body, positioning them so the moose sits in a relaxed pose (two in front, two in back).
- Attach Ears: Sew the ears to the top of the head, spacing them evenly.
- Attach Antlers: Sew the antlers to the top of the head, just above and behind the ears. Angle them slightly outward.
- Face Details:
- If your safety eyes don't have a glossy finish, you can add a tiny white French knot to each pupil for a sparkle!
- Using black embroidery floss, embroider two small nostrils on the cream muzzle.
- Optional: Add a tiny smile with black thread.
- Final Touches:
- Fluff the plush yarn with your fingers to hide any seams.
- Adjust the stuffing to ensure the moose sits upright nicely.
What you'll master: Multi-step assembly and posing a plush figure.
Final Section: Where to Go from Here
Congratulations! You've just crafted an incredibly soft and cuddly Plush Moose. This project is incredibly satisfying because the plush yarn works up fast and hides any imperfections in your stitching.
From here, try experimenting with different colors! You could make a "Reindeer" version with a red nose, or a "White-Tailed Deer" with lighter brown and white spots. You could even add accessories like a tiny scarf or bow. Happy crocheting, and enjoy your new best friend!