September 19, 2026
Sage Green Forest Elf Doll – A Tall & Slender Amigurumi Pattern
Meet this whimsical Forest Elf! With its long, slender limbs, cozy sage-green bodysuit, and a cute dragon-style hood, this doll is full of quiet charm. Featuring a warm mustard scarf and tiny wings, this intermediate project is perfect for creating a unique, huggable companion or a shelf sitter.
Jump to pattern instructions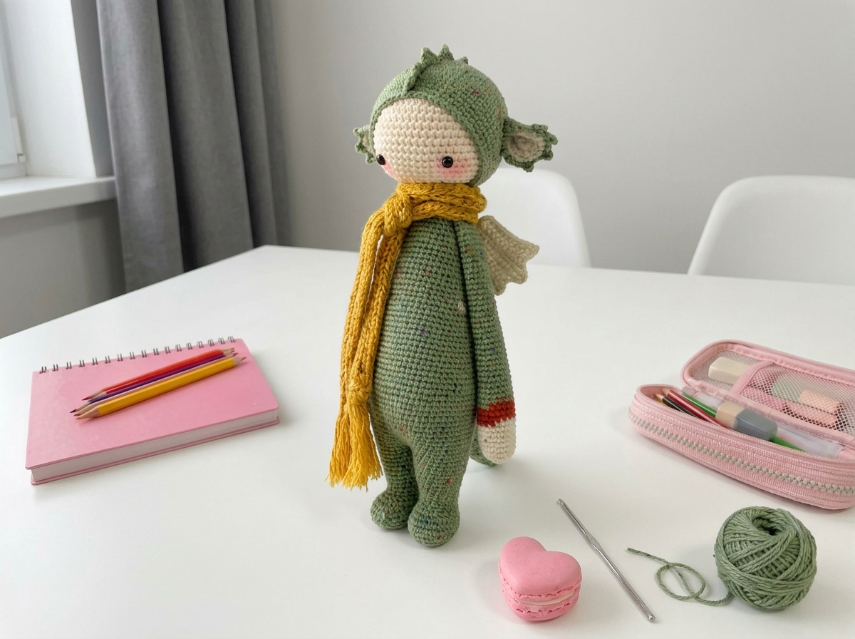
Sage Green Forest Elf Doll – Complete Step-by-Step Pattern
1. Gathering Your Supplies
To achieve the tall, slender look of this doll, a smooth cotton yarn is best. It holds the shape well without being too bulky.
- Yarn: Worsted weight or Sport weight cotton yarn (e.g., YarnArt Jeans, Catania).
- Sage Green: Main color for the body, legs, arms, and hood (approx. 100g).
- Cream/Beige: For the face and hands (approx. 30g).
- Mustard Yellow: For the scarf (approx. 30g).
- Red: For the wrist cuff (tiny amount).
- Light Beige/Off-White: For the wings (tiny amount).
- Hook: 2.5 mm or 3.0 mm (choose a size that gives you a tight, firm fabric).
- Notions:
- 8-10 mm black safety eyes.
- Poly-fil stuffing (you will need a lot for the long body!).
- Tapestry needle.
- Scissors.
- Stitch markers.
- Pink blush or yarn for cheeks.
What you'll master: Creating a tall, slender doll structure, working long continuous rounds, and assembling modular accessories.
2. Abbreviations & Special Techniques
- MR: Magic ring
- ch: Chain
- sc: Single crochet
- inc: Increase (2 sc in one stitch)
- dec: Decrease (2 sc crocheted together invisibly)
- sl st: Slip stitch
- BLO: Back loop only
- st(s): Stitch(es)
3. The Legs & Body (Sage Green)
This doll is worked from the feet up in one continuous piece to create that long, elegant silhouette.
-
Leg 1 (Sage Green):
- R1: 6 sc in MR (6)
- R2: 6 inc (12)
- R3-20: 12 sc (12) [18 rows] - This creates a long, thin leg.
- Finishing: Do not fasten off.
-
Leg 2 (Sage Green):
- Make identical to Leg 1. Fasten off.
-
Joining the Body:
- Take Leg 1 (with yarn attached). Ch 3 (bridge).
- Sc around Leg 2 (12 sc).
- Sc across the bridge (3 sc).
- Sc around Leg 1 (12 sc).
- Sc across the remaining bridge stitches (3 sc).
- Total: 30 stitches.
-
Body (Sage Green):
- R1-30: 30 sc (30) [30 rows] - This creates the long torso. Adjust row count for desired height.
- R31: (3 sc, dec) x 6 (24)
- R32: 24 sc (24)
- Finishing: Fasten off, leaving a long tail. Stuff the body and legs firmly.
What you'll master: Joining limbs and creating a tall, stable torso.
4. The Arms (Sage Green & Cream)
-
Arm (Sage Green):
- R1: 6 sc in MR (6)
- R2-20: 6 sc (6) [19 rows] - Long, thin arm.
- Switch to Cream for Hand:
- R21: 6 sc in Cream (6)
- R22: (1 sc, inc) x 3 (9) - Slight flare for the hand.
- R23: 9 sc (9)
- Finishing: Fasten off. Stuff lightly. Make 2.
-
Red Cuff (Optional):
- Join Red yarn to the wrist (where green meets cream). Sc around for 2 rows to create a little band.
What you'll master: Color changing and creating slender limbs.
5. The Head (Cream)
- R1: 6 sc in MR (6)
- R2: 6 inc (12)
- R3: (1 sc, inc) x 6 (18)
- R4: (2 sc, inc) x 6 (24)
- R5: (3 sc, inc) x 6 (30)
- R6-11: 30 sc (30) [6 rows]
- Eye Placement: Insert safety eyes between R8 and R9, spaced about 6-8 stitches apart.
- R12: (3 sc, dec) x 6 (24)
- R13: (2 sc, dec) x 6 (18)
- Stuffing: Stuff the head firmly.
- R14: (1 sc, dec) x 6 (12)
- Finishing: Fasten off, leaving a tail. Weave tail through front loops to close.
What you'll master: Standard amigurumi head shaping.
6. The Dragon/Elf Hood (Sage Green)
This hood sits on top of the head and has little spikes/ears.
-
Base Cap:
- R1: 6 sc in MR (6)
- R2: 6 inc (12)
- R3: (1 sc, inc) x 6 (18)
- R4: (2 sc, inc) x 6 (24)
- R5-8: 24 sc (24) [4 rows]
- Finishing: Fasten off. This fits over the top half of the head.
-
The Spikes/Ears (Make 3-5):
- Ch 6. Sc in 2nd ch, hdc, dc, hdc, sc. Fasten off.
- Sew these along the top ridge of the hood.
What you'll master: Creating a fitted hat/hood.
7. The Accessories
The Mustard Scarf:
- Instructions: Ch 60 (or desired length).
- Row 1: Sc in 2nd ch from hook and across.
- Row 2: Ch 1, turn. Sc across.
- Fringe: Cut strands of yellow yarn (10 cm long). Tie them in groups of 3 to the ends of the scarf.
The Wings (Light Beige):
- Instructions: Ch 10.
- Row 1: Sc in 2nd ch, hdc in next 2, dc in next 3, hdc in next 2, sc in last.
- Row 2: Ch 1, turn. Work a border of sc around the whole shape to make it neat.
- Finishing: Fasten off. Make 2.
8. Assembly & The Magic of Details
Now for the most rewarding part: bringing your Elf to life!
- Head to Body: Sew the cream head securely to the top of the green body.
- Arms: Sew the arms to the upper sides of the body.
- Hood: Place the green hood over the top of the head. Sew it down around the forehead/ears area so it stays in place.
- Wings: Sew the wings to the back of the doll, just below the neck/shoulders.
- Scarf: Wrap the mustard scarf around the neck. Tie it loosely or let it hang.
- Face:
- Embroider pink cheeks below the eyes.
- Add a tiny nose if desired (though the photo shows a very minimal face).
What you'll master: Multi-step assembly and styling a character.
Final Section: Where to Go from Here
Congratulations! You’ve just crafted a beautiful Sage Green Forest Elf Doll. This project is incredibly satisfying and results in a unique, heirloom-quality toy.
From here, try experimenting with different colors! You could make a "Winter Elf" with a white suit and blue scarf, or a "Autumn Elf" with brown and orange. You could even add a little bag or staff for the elf to hold. Happy crocheting!