September 19, 2026
Magical Pastel Sea Dragon – A Whimsical Crochet Pattern
Bring a touch of underwater magic to your desk with this adorable Pastel Sea Dragon! Featuring a long, coiling body made with beautiful gradient yarn, glittery wings, and a sweet face with big eyes, this project is a stunning display piece. It’s an intermediate-friendly project that combines amigurumi techniques with wire shaping for a dynamic pose.
Jump to pattern instructions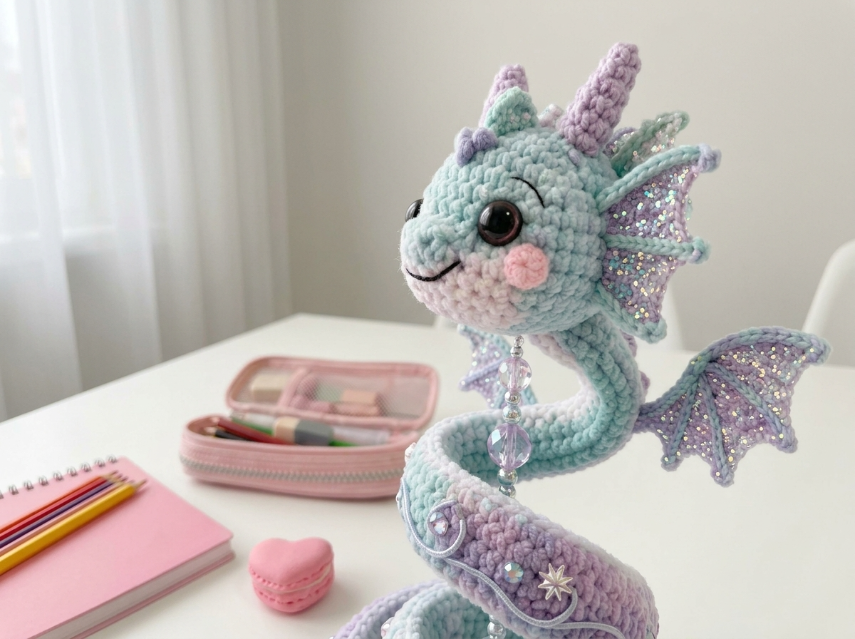
Magical Pastel Sea Dragon – Complete Step-by-Step Pattern
1. Gathering Your Supplies
To achieve that beautiful color transition from blue to purple, a "cake" or gradient yarn is perfect.
- Yarn: Worsted weight gradient/faded yarn (e.g., YarnArt Jeans in a gradient colorway, or a self-striping yarn).
- Main Color: Approx. 150-200g (Blue/Purple/Pink mix).
- Glitter Yarn: For the wings (approx. 20g).
- Hook: 3.0 mm or 3.5 mm (choose a size that gives you a tight fabric so stuffing doesn't show).
- Notions:
- 12-14 mm large black safety eyes.
- Craft Wire: Thick wire (approx. 30-40 cm long) to pose the body.
- Beads: Large crystal beads for the necklace, small seed beads or pearls for body decoration.
- Poly-fil stuffing.
- Tapestry needle, scissors, stitch markers.
- Pink yarn or blush for cheeks.
What you'll master: Working with gradient yarn, inserting wire for posing, and adding jewelry-like embellishments.
2. Abbreviations & Special Techniques
- MR: Magic ring
- ch: Chain
- sc: Single crochet
- hdc: Half double crochet
- dc: Double crochet
- sl st: Slip stitch
- inc: Increase (2 sc in one stitch)
- dec: Decrease (2 sc crocheted together invisibly)
3. The Head
We start with a round, cute head.
- R1: 6 sc in MR (6)
- R2: 6 inc (12)
- R3: (1 sc, inc) x 6 (18)
- R4: (2 sc, inc) x 6 (24)
- R5-9: 24 sc (24) [5 rows]
- Eye Placement: Insert safety eyes between R6 and R7, spaced about 6-8 stitches apart.
- R10: (2 sc, dec) x 6 (18)
- R11: (1 sc, dec) x 6 (12)
- Stuffing: Stuff the head firmly.
- Finishing: Fasten off, leaving a long tail. Do not close the hole completely yet; we will attach the body.
What you'll master: Shaping a standard amigurumi head.
4. The Long Body (The "Noodle")
This is the most important part! We need a long tube that can be coiled.
- R1: 6 sc in MR (6)
- R2: 6 inc (12)
- R3-60 (or longer): 12 sc (12) [58 rows]
- Note: This creates a long, snake-like tube. The length depends on how many coils you want.
- Pro Tip: As you crochet, you can insert your craft wire into the center of the tube to make it poseable later. Alternatively, crochet the tube, stuff it, and then thread the wire through afterwards (like a needle).
- Finishing: Fasten off. Stuff the body firmly (but leave it flexible enough to bend if using wire).
What you'll master: Creating a long, uniform tube.
5. The Glitter Wings
These add the magical touch!
- Instructions: With Glitter Yarn, Ch 10.
- Row 1: Sc in 2nd ch from hook, hdc in next 2, dc in next 3, tr (treble crochet) in next 2, dc in next 2. (Creates a wing shape).
- Row 2: Ch 1, turn. Work a border of sc around the entire edge to make it neat.
- Finishing: Fasten off. Make 2 wings.
What you'll master: Creating flat, shaped appliqués with specialty yarn.
6. The Fins & Horns
Fins (Make 2):
- Similar to wings but smaller. Ch 6, work a small fin shape. Sew to the sides of the head/neck.
Horns/Ears (Make 2):
- R1: 4 sc in MR (4)
- R2: 4 inc (8)
- R3: 8 sc (8)
- Finishing: Fasten off. Sew to the top of the head.
7. Assembly & The Magic of Details
Now for the most rewarding part: bringing your dragon to life!
-
Pose the Body:
- If you haven't already, thread your craft wire through the long body tube.
- Coil the body into a spiral shape (like a cinnamon roll or a snake sitting up).
- Twist the ends of the wire at the bottom to secure the coil shape.
-
Attach the Head:
- Sew the head to the top end of the coiled body. Make sure it sits securely.
-
Attach Wings:
- Sew the glitter wings to the back of the body, just below the head/neck area.
-
The Necklace:
- Thread your large crystal beads onto a piece of yarn or thin wire.
- Tie it around the "neck" of the dragon (where the head meets the body) so it hangs down the front.
-
Face Details:
- Use pink yarn or fabric blush to add cute round cheeks under the eyes.
- Embroider a small, sweet smile with black thread.
-
Body Decor:
- Sew small pearls, beads, or even a small star charm onto the side of the coiled body for extra sparkle (as seen in the photo).
What you'll master: Complex assembly, wiring, and adding jewelry details.
Final Section: Where to Go from Here
Congratulations! You’ve just crafted a stunning Magical Pastel Sea Dragon. This project is a beautiful centerpiece that combines soft textures with sparkling details.
From here, try experimenting with different color gradients! You could make a "Sunset Dragon" with orange and pink yarn, or an "Ocean Dragon" with deep blues and greens. You could even make a tiny version as a keychain! Happy crocheting, and enjoy your magical new friend!