September 19, 2026
Floating Otter Belly Tray – A Cute & Functional Crochet Project
Keep your desk organized with this adorable Floating Otter Tray! Featuring a happy otter face, little paws reaching for the sky, and a spacious belly for holding small items like jewelry, keys, or office supplies, this project combines amigurumi charm with practical home decor. It’s a fun, intermediate-friendly make that brings joy to any surface.
Jump to pattern instructions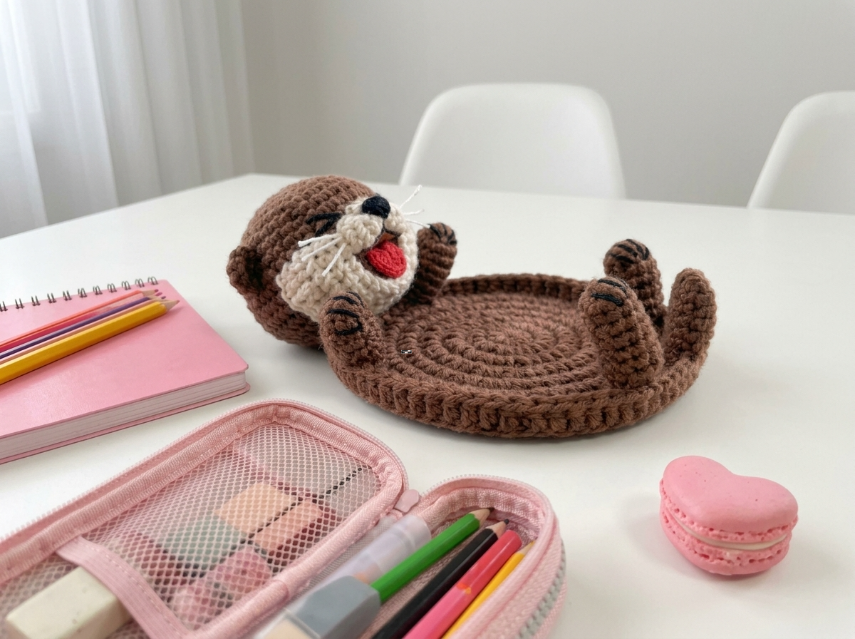
Floating Otter Belly Tray – Complete Step-by-Step Pattern
1. Gathering Your Supplies
To make the tray sturdy enough to hold items, a firm cotton yarn is best.
- Yarn: Worsted weight cotton yarn (e.g., YarnArt Jeans, Catania).
- Brown: Main color for the body, head, and limbs (approx. 100g).
- Cream/Beige: For the muzzle (small amount).
- Black: For the nose and eyes (tiny amount).
- Red/Pink: For the tongue (tiny amount).
- White: For the whiskers (tiny amount).
- Hook: 3.5 mm or 4.0 mm (choose a size that gives you a firm fabric).
- Notions:
- Poly-fil stuffing (for the head and limbs).
- Tapestry needle.
- Scissors.
- Stitch markers.
- Optional: A small piece of cardboard or plastic canvas to insert into the bottom of the tray for extra stability.
What you'll master: Creating a functional container, assembling 3D character parts, and detailed facial embroidery.
2. Abbreviations & Special Techniques
- MR: Magic ring
- ch: Chain
- sc: Single crochet
- hdc: Half double crochet
- sl st: Slip stitch
- inc: Increase (2 sc in one stitch)
- dec: Decrease (2 sc crocheted together invisibly)
- BLO: Back loop only (creates a sharp ridge for the tray edge).
- st(s): Stitch(es)
3. The Tray Base (The Belly)
This is the main container part of the otter.
- R1 (Brown): 6 sc in MR (6)
- R2: 6 inc (12)
- R3: (1 sc, inc) x 6 (18)
- R4: (2 sc, inc) x 6 (24)
- R5: (3 sc, inc) x 6 (30)
- R6: (4 sc, inc) x 6 (36)
- R7: (5 sc, inc) x 6 (42)
- R8: (6 sc, inc) x 6 (48)
- Note: This creates a flat circle approx. 15-18 cm wide.
- R9 (The Rim): 48 sc in BLO (48).
- Pro Tip: Working in the back loop only creates a sharp 90-degree turn upwards, forming the wall of the tray.
- R10-12: 48 sc (48) [3 rows].
- Note: This creates the height of the tray wall.
- Finishing: Sl st to join. Fasten off. (If you want a smoother edge, you can do a round of slip stitches or sc on the top rim).
What you'll master: Creating a sturdy, open container shape.
4. The Head (Brown & Cream)
The head is a small 3D sphere attached to the side of the tray.
- R1 (Brown): 6 sc in MR (6)
- R2: 6 inc (12)
- R3: (1 sc, inc) x 6 (18)
- R4: (2 sc, inc) x 6 (24)
- R5-8: 24 sc (24) [4 rows]
- R9: (2 sc, dec) x 6 (18)
- Stuffing: Stuff the head firmly now.
- R10: (1 sc, dec) x 6 (12)
- Finishing: Fasten off, leaving a long tail. Do not close the hole completely; we will sew it to the tray.
The Muzzle (Cream):
- Instructions: Ch 6. Sc in 2nd ch from hook, hdc, dc, 2 dc in last ch. Working down opposite side: dc, hdc, sc. Sl st to join. (Creates an oval).
- Finishing: Fasten off, leaving a tail. Sew this onto the front of the brown head.
What you'll master: Shaping a head and adding a contrasting muzzle patch.
5. The Limbs (Brown, Make 4)
These are the little arms and legs sticking up.
- R1: 6 sc in MR (6)
- R2: 6 sc (6)
- R3: 6 sc (6)
- R4: 6 sc (6)
- Finishing: Fasten off, leaving a long tail. Stuff very lightly (just enough to hold shape). Flatten the bottom end for sewing.
What you'll master: Creating small, uniform appendages.
6. Facial Details (The Magic Moment!)
This is where the otter gets its personality.
- Nose: Using black yarn, embroider a small triangle or oval on the top of the cream muzzle.
- Mouth & Tongue:
- Embroider a black "W" shape or a wide smile below the nose.
- Using red yarn, fill in the center of the smile to create a little tongue sticking out (as seen in the photo!).
- Eyes: Using black yarn, embroider two curved lines (like upside-down U's) above the muzzle to show happy, closed eyes.
- Whiskers: Using white yarn, cut 6 short strands (approx. 3 cm). Thread them onto a needle and poke them through the muzzle area (3 on each side) to create whiskers. Knot them on the inside or use a tiny dot of fabric glue to secure.
What you'll master: Expressive surface embroidery.
7. Assembly
- Attach the Head: Position the brown head on the outer edge of the tray rim. Sew it securely so it looks like the otter is leaning back.
- Attach the Limbs:
- Sew two limbs to the sides of the tray (near the head) to look like arms reaching up.
- Sew two limbs to the opposite side of the tray rim to look like feet sticking up.
- Detail: You can embroider little black lines on the paws for toes/claws.
- Final Touches: Weave in all loose ends. If the tray bottom is too floppy, cut a circle of cardboard to fit inside the base (R1-R8) to make it rigid.
What you'll master: Multi-step assembly and creating a functional character object.
Final Section: Where to Go from Here
Congratulations! You’ve just crafted a delightful Floating Otter Tray. This project is incredibly satisfying because it’s both cute and useful.
From here, try experimenting with other animals! You could make a "Floating Cat" tray with paws reaching up, or a "Frog" tray with legs splayed out. You could also change the yarn colors to make a "Panda" or "Bear" version. Happy crocheting, and enjoy your new desk companion!