October 5, 2026
Harvest Pumpkin Square
This sweet little square looks like a slice of autumn. A plump, ribbed orange pumpkin sits on a soft cream granny frame, with a lumpy brown stem and a leafy green leaf. A thin sage green line and a bright orange border finish it off. It works up quickly from a flat center and a few simple oval pieces, so it is perfect for a hot pad, trivet, placemat, coaster set, or even a blanket square. Pour something warm, pick your favorite fall colors, and let us stitch a pumpkin.
Jump to pattern instructions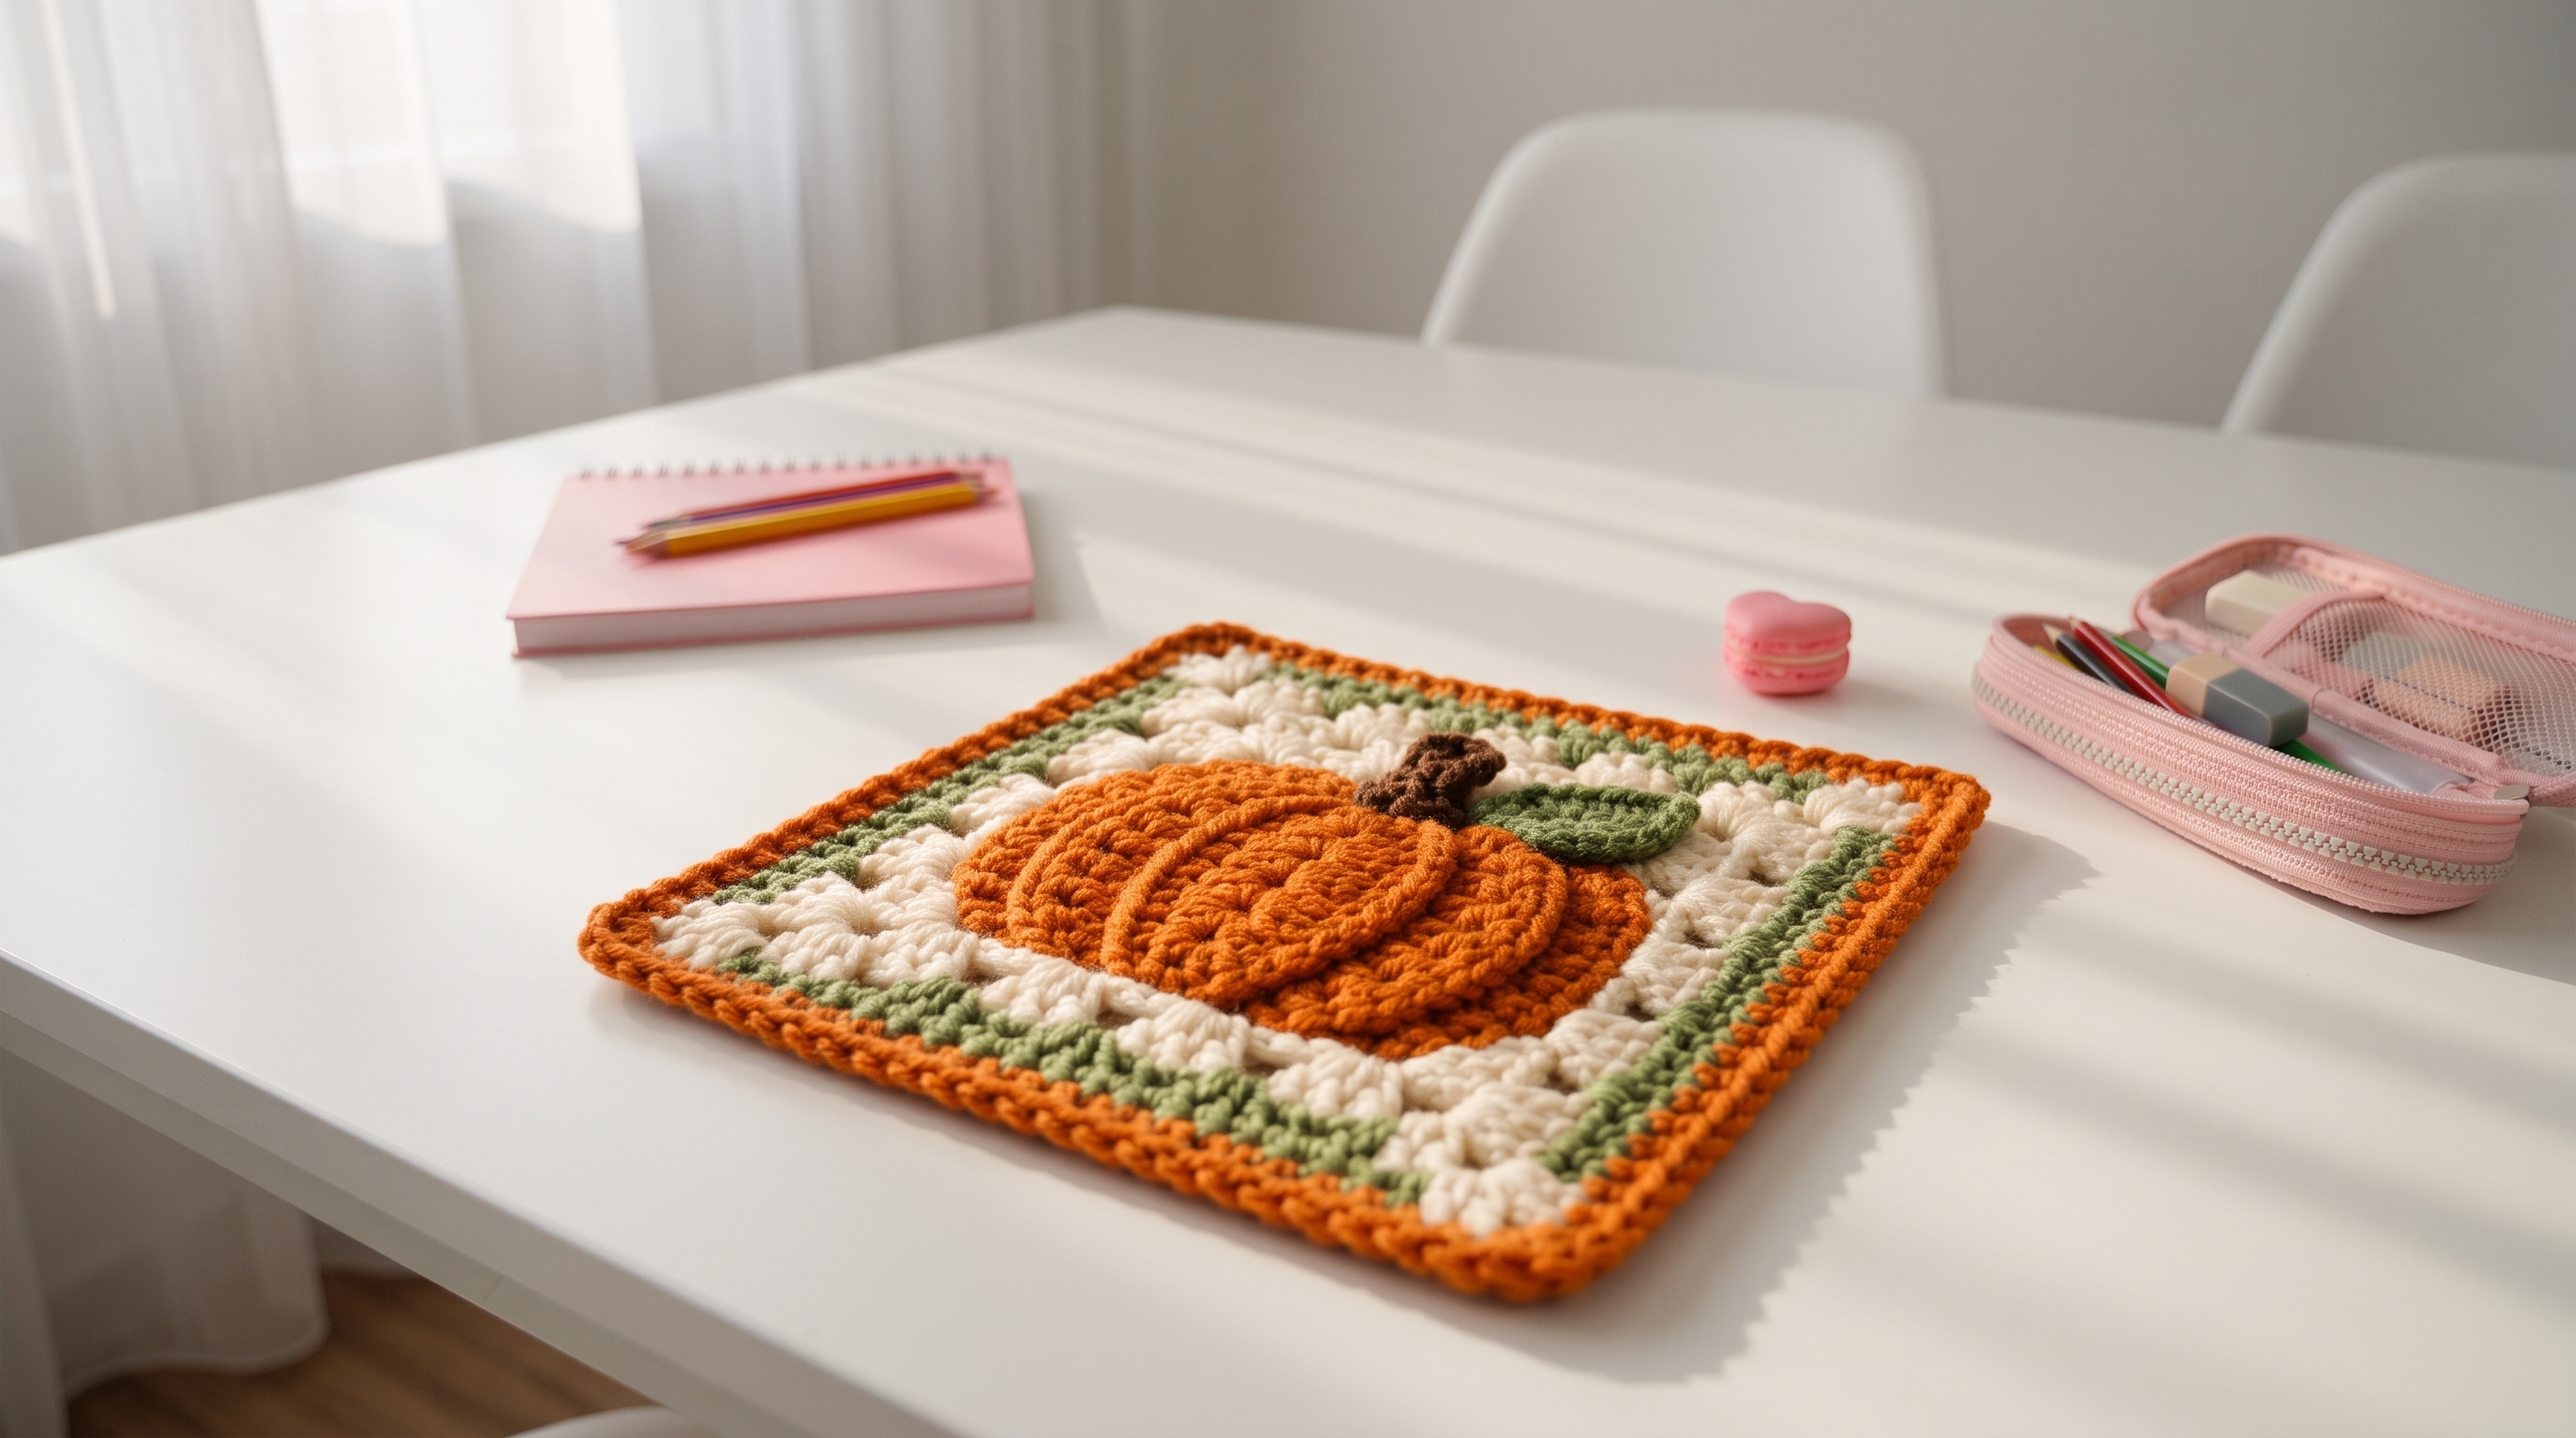
Harvest Pumpkin Square
Difficulty: Easy (basic stitches, a granny frame, and a few little appliqué pieces)
Finished Size: About 10 inches (25 cm) square.
Time to Complete: 3 to 4 hours.
What You Will Need
Yarn:
- Cream (C), about 90 yards (82 m)
- Orange (O), about 100 yards (91 m)
- Sage green (G), about 40 yards (37 m)
- Brown (N), a small scrap of about 5 yards (4.5 m)
- Tip: Use a DK weight 100% cotton yarn. Cotton is heat resistant, washes well, and gives the pumpkin ribs crisp definition. Avoid acrylic if you plan to use the square around hot dishes.
Tools:
- 3.5 mm (E/4) crochet hook. Use a smaller hook for a denser, sturdier fabric.
- Yarn needle with a large eye for sewing and weaving in ends
- Stitch markers
- Sharp scissors
- Straight pins
- Blocking mats and pins (optional but helpful)
The Basics (US Terms)
- ch = chain
- sc = single crochet
- hdc = half double crochet
- dc = double crochet
- inc = increase (work 2 single crochets into the same stitch)
- sl st = slip stitch
- BLO = back loop only
- MR = magic ring
- sp = space
- cluster = 3 dc worked in the same place
- corner = (3 dc, ch 2, 3 dc) worked in the same place
- C, O, G, N = cream, orange, green, brown
- The square is worked flat in rows for the center, then in rounds for the frame and border. Ch 1 at the start of each sc row does not count as a stitch.
Let Us Get Started
We will make the square first, then the pumpkin pieces, then sew everything together.
Part 1: The Cream Center
Worked with cream yarn.
- Foundation: Ch 30.
- Row 1: Sc in the 2nd ch from the hook and in each chain across. (29 stitches)
- Rows 2 to 29: Ch 1, turn. Sc in each stitch across. (29 stitches)
- Do not fasten off. You should now have a flat square, about 6 inches (15 cm) on each side.
Part 2: The Granny Frame
Worked with cream yarn, in rounds.
Round 1:
- Do not turn. Work 1 more sc in the last stitch, then work evenly down the side edge, working 1 sc in each row end (about 29 sc). In the corners, work 3 sc in the corner stitch. Join with a sl st to the first sc and fasten off. This round makes a neat, even edge for the granny clusters to sit on. You should have about 29 sc on each side, plus one corner stitch at each corner.
Round 2:
- Join cream in any corner stitch. Ch 3 (counts as a dc), then work (2 dc, ch 2, 3 dc) in the same stitch for the first corner.
- Skip 2 stitches, 3 dc in the next stitch. Repeat from * 8 more times (9 clusters along the side).
- Work a corner (3 dc, ch 2, 3 dc) in the next corner stitch. Then work 9 clusters along the next side the same way.
- Repeat for all 4 sides. Join with a sl st to the top of the beginning ch 3. Do not fasten off. (9 clusters on each side)
Round 3:
- Sl st across the next 2 dc and into the first corner space. Ch 3 (counts as a dc), then work (2 dc, ch 2, 3 dc) in the same space.
- Work 3 dc in each space between clusters along the side (10 clusters). Work a corner (3 dc, ch 2, 3 dc) in the next corner space. Repeat for all 4 sides. Join with a sl st and fasten off. (10 clusters on each side) This is the same stitch you learn in a traditional granny square.
Part 3: The Green and Orange Borders
Round 4 (green):
- Join green in any corner space. Ch 1, then work 3 sc in the corner space.
- Sc in each dc and 1 sc in each space between clusters along the side. Work 3 sc in the next corner space. Repeat for all 4 sides. Join with a sl st and fasten off. (about 200 stitches)
Round 5 (orange):
- Join orange in the center stitch of any corner. Ch 1, then work 3 sc in the same stitch.
- Sc in each stitch along the side. Work 3 sc in the center stitch of the next corner. Repeat for all 4 sides. Join with a sl st. (about 208 stitches)
Round 6 (orange):
- Ch 1. Sc in each stitch around, with 3 sc in the center stitch of each corner. Join with a sl st. (about 216 stitches)
Round 7 (orange, optional rope edge):
- Ch 1, do not turn. Work 1 reverse sc (working left to right) in each stitch around. Join with a sl st and fasten off.
- Weave in all ends.
Part 4: The Pumpkin Pieces
Worked with orange yarn. Each piece is a ribbed oval. Make 5 pieces in total, as follows.
Outer pumpkin segment (make 2):
- Foundation: Ch 10.
- Round 1: 3 sc in the 2nd ch from the hook, sc in the next 7 chains, 3 sc in the last chain. Turn to work along the other side of the chain, and sc in the next 7 loops. Join with a sl st. (20 stitches)
- Round 2: Inc in each of the next 3 stitches, sc in the next 7 stitches, inc in each of the next 3 stitches, sc in the next 7 stitches. (26 stitches)
- Round 3: Sc in the BLO of every stitch around. Join with a sl st and fasten off, leaving a long tail for sewing. (26 stitches) The back loop round makes a ridge, which gives the pumpkin its ribbed look.
Middle pumpkin segment (make 2):
- Foundation: Ch 12.
- Round 1: 3 sc in the 2nd ch from the hook, sc in the next 9 chains, 3 sc in the last chain. Turn to work along the other side of the chain, and sc in the next 9 loops. Join with a sl st. (24 stitches)
- Round 2: Inc in each of the next 3 stitches, sc in the next 9 stitches, inc in each of the next 3 stitches, sc in the next 9 stitches. (30 stitches)
- Round 3: Sc in the BLO of every stitch around. Join with a sl st and fasten off, leaving a long tail for sewing. (30 stitches)
Center pumpkin segment (make 1):
- Foundation: Ch 14.
- Round 1: 3 sc in the 2nd ch from the hook, sc in the next 11 chains, 3 sc in the last chain. Turn to work along the other side of the chain, and sc in the next 11 loops. Join with a sl st. (28 stitches)
- Round 2: Inc in each of the next 3 stitches, sc in the next 11 stitches, inc in each of the next 3 stitches, sc in the next 11 stitches. (34 stitches)
- Round 3: Sc in the BLO of every stitch around. Join with a sl st and fasten off, leaving a long tail for sewing. (34 stitches)
Part 5: The Stem
Worked with brown yarn.
- Round 1: Work 6 sc into a magic ring. (6 stitches)
- Rounds 2 to 5: Work 1 sc in every stitch around. (6 stitches)
- Cut the yarn, leaving a long tail for sewing. Do not stuff. Pinch it flat. For the bumpy, lumpy stem in the photo, work 3 sc in the front loop of one stitch in Round 3, then continue as written.
Part 6: The Leaf
Worked with green yarn.
- Foundation: Ch 10.
- Top side: Sc in the 2nd ch from the hook, hdc in the next ch, dc in the next 4 chains, hdc in the next ch, sc in the next ch. Work 3 sc in the last chain.
- Bottom side: Turn to work along the other side of the chain. Sc in the next ch, hdc in the next ch, dc in the next 4 chains, hdc in the next ch, sc in the next ch. Sl st in the first stitch.
- Fasten off, leaving a long tail for sewing.
Assembly and Finishing
This is where your pumpkin comes together. Take your time pinning before you sew.
Blocking:
- Pin the square flat on blocking mats, and gently steam or spray it with water. Let it dry fully.
- Blocking evens out the frame and makes the corners crisp.
Making the Pumpkin:
- Lay the square flat with the cream center facing you. Place the center segment in the middle, slightly below the exact center of the square, with the long side running up and down.
- Place a middle segment on each side of the center segment, overlapping it slightly and tilted outward a little.
- Place an outer segment on each side of the middle segments, overlapping them slightly and tilted outward even more. This makes the curved, rounded shape of the pumpkin. The finished pumpkin should be about 5 inches (13 cm) wide and 3.5 inches (9 cm) tall.
- Pin all five segments in place. Check that the pumpkin sits nicely in the cream center, with space around it.
- Using the tails, whip stitch each segment to the square around its edge, working under the ridge so the stitches do not show. Sew the center segment last, since it sits on top.
Adding the Stem and Leaf:
- Pin the stem at the top of the center segment, tilted slightly to the right, so it sticks up and out over the cream.
- Sew the stem on with the tail, going around the base.
- Pin the leaf to the right of the stem, with the pointed tip facing out and slightly up. Sew the base of the leaf to the square with the tail.
- Weave in all remaining ends.
Optional Backing for a Hot Pad:
- Make a second plain square in cream, or cut a piece of cotton batting and cotton fabric to the same size.
- Place the pieces together with the wrong sides facing, and join them with sc through both layers along the border, working into the last round.
- For extra heat protection, add a layer of insulated batting between them.
A Few Friendly Tips
- Keep it snug: Keep your tension tight and even. Tight stitches make a sturdy, flat square that does not curl.
- Count the clusters: In the granny rounds, count the clusters on each side at the end of each round. This keeps the sides even and the corners square.
- Flat edges: If the square curls, block it, or add one more round of sc in cream before the green. If it ruffles, switch to a smaller hook for the borders.
- Pumpkin shape: Lay out the pumpkin pieces before you sew, and take a photo. Seeing them from above makes it easy to adjust the tilt and overlap.
- Different sizes: For a coaster, make the center 15 stitches wide with 15 rows, work only 1 granny round, and use one orange border round. For a placemat, make the center 49 stitches wide with 35 rows, and add a third granny round.
- Blanket squares: Make 12 or 20 squares, and join them to make a seasonal throw. Use a different fall shape on each one, such as an acorn, a leaf, or a sunflower.
- Make it your own: Try a white pumpkin on a cream square, a black cat on an orange one, or a little face on the pumpkin for a jack-o'-lantern.
- Care: Machine wash gently on a cool setting, and lay flat to dry.
I hope you enjoy making this cozy little pumpkin. It is such a quick and satisfying project, and it makes a wonderful handmade gift or a cheerful touch for your autumn table.
If you run into any trouble or just want to share how your square turned out, please reach out. I love seeing what you create.
Happy crocheting!