October 5, 2026
Pumpkin Patch Cardigan
Every pumpkin in this cozy cardigan has a big jack-o'-lantern grin, and together they look like a whole patch ready for Halloween. Soft cream granny squares each hold one fuzzy orange pumpkin with a little green leaf, and the sweater is finished with chunky ribbed bands and warm wooden buttons. It is made from simple squares, so you can stitch it a little at a time and take it anywhere. Pour something warm, put on a good movie, and let us grow a pumpkin patch you can wear.
Jump to pattern instructions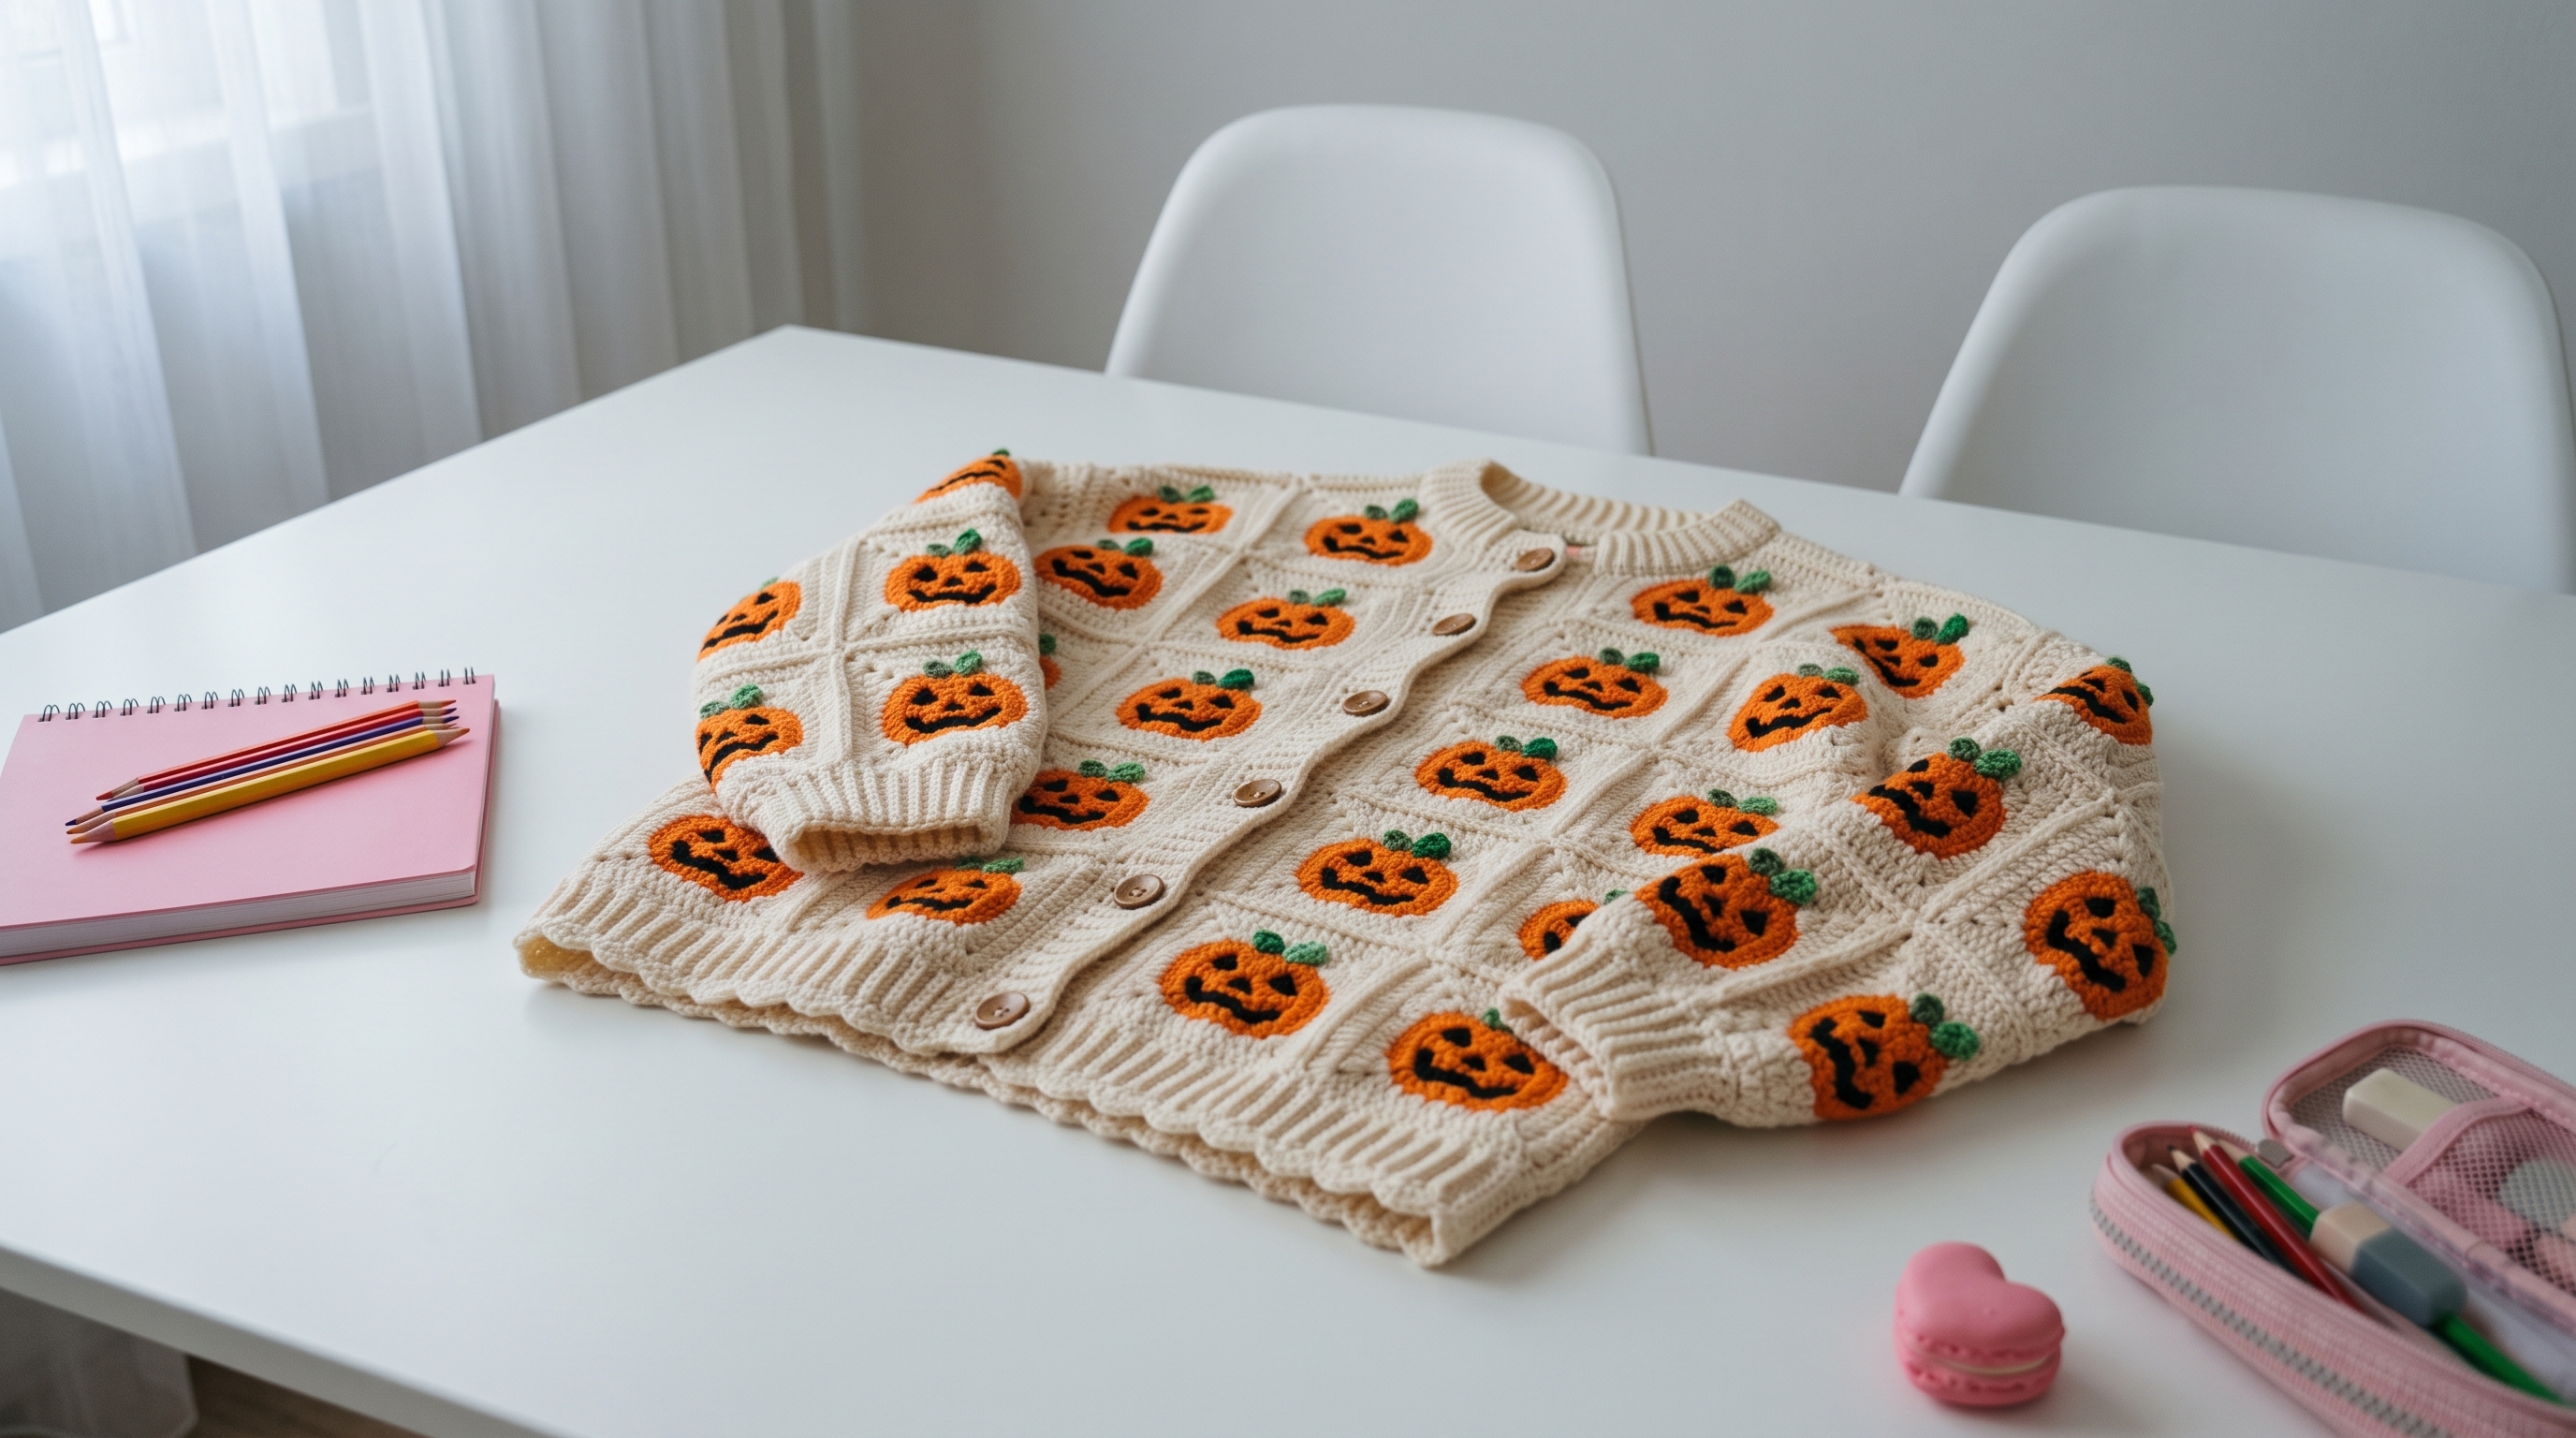
Pumpkin Patch Cardigan
Difficulty: Intermediate (basic stitches, but it needs patience for the squares and the seaming)
Finished Size: Adult medium. About 40 inches (101 cm) around the chest, 19 inches (48 cm) long, with a 15 inch (38 cm) sleeve. Easy to adjust, see the tips at the end.
Time to Complete: 50 to 60 hours, in easy, relaxing sessions.
What You Will Need
Yarn:
- Cream (C), about 1,300 yards (1,190 m)
- Orange (O), about 150 yards (140 m). A fuzzy, brushed, or chenille style yarn gives the soft, plush pumpkins in the photo.
- Black (K), about 50 yards (46 m)
- Green (G), about 40 yards (37 m)
- Tip: Use a DK weight cotton or cotton blend yarn for the cream. Cotton gives the squares crisp stitches and keeps the cardigan light. If your orange yarn is thicker or thinner than the cream, adjust the hook size for the pumpkins only.
Tools:
- 3.5 mm (E/4) crochet hook
- 5 wooden buttons, about 3/4 inch (18 to 20 mm)
- Yarn needle with a large eye for sewing and embroidering
- Stitch markers
- Sharp scissors
- Straight pins and a measuring tape
- Blocking mats and pins
- Sewing needle and thread for the buttons
Gauge: One finished granny square = 4 x 4 inches (10 x 10 cm) after blocking. Please make a test square, since the gauge decides how the cardigan fits. If your square is too small, go up a hook size. If it is too big, go down.
The Basics (US Terms)
- MR = magic ring
- ch = chain
- sc = single crochet
- hdc = half double crochet
- dc = double crochet
- inc = increase (work 2 single crochets into the same stitch)
- sl st = slip stitch
- BLO = back loop only
- sp = space
- cluster = 3 dc worked in the same space
- corner = (3 dc, ch 2, 3 dc) worked in the same space
- C, O, K, G = cream, orange, black, green
Let Us Get Started
You will make 60 cream granny squares, each with one pumpkin, then join them into panels, add the ribbed bands, and sew on the buttons.
- 20 squares for the back (5 across, 4 down)
- 16 squares for the fronts (2 fronts, each 2 across and 4 down)
- 24 squares for the sleeves (2 sleeves, each 4 across and 3 down)
Part 1: The Granny Square (Make 60)
Worked with cream yarn.
- Round 1: Make a magic ring. Ch 3 (counts as a dc), 2 dc in the ring, ch 2. 3 dc in the ring, ch 2. Repeat from * 2 more times. Join with a sl st to the top of the beginning ch 3. (4 clusters)
- Round 2: Sl st across the next 2 dc and into the first corner space. Ch 3, (2 dc, ch 2, 3 dc) in the same space. Ch 1. Work a corner in the next corner space, ch 1. Repeat from * 2 more times. Join with a sl st to the top of the beginning ch 3. (4 corners)
- Round 3: Sl st to the first corner space. Ch 3, (2 dc, ch 2, 3 dc) in the same space. Ch 1, then 3 dc in the next ch-1 space, ch 1. Work a corner in the next corner space, ch 1, 3 dc in the next ch-1 space, ch 1. Repeat from * 2 more times. Join with a sl st. (1 cluster on each side)
- Round 4: Sl st to the first corner space. Work a corner there. Ch 1, 3 dc in the next ch-1 space, ch 1, 3 dc in the next ch-1 space, ch 1, then work a corner in the next corner space. Repeat from * 2 more times. Finish with ch 1, 3 dc in each of the last two ch-1 spaces, ch 1. Join with a sl st. (2 clusters on each side)
- Round 5: Sl st to the first corner space. Work a corner there. Ch 1, then 3 dc in each of the next 3 ch-1 spaces, with ch 1 between each cluster, then ch 1 and work a corner in the next corner space. Repeat from * 2 more times. Finish the last side the same way. Join with a sl st and fasten off. (3 clusters on each side)
- Weave in the ends. Each square should measure about 4 inches (10 cm). Block it to size if needed.
Part 2: The Pumpkin (Make 60)
Worked with orange yarn.
- Round 1: Work 6 sc into a magic ring. (6 stitches)
- Round 2: Inc in every stitch around. (12 stitches)
- Round 3: (1 sc, inc) repeat 6 times. (18 stitches)
- Round 4: (2 sc, inc) repeat 6 times. (24 stitches)
- Round 5: (3 sc, inc) repeat 6 times. (30 stitches)
- Round 6: (4 sc, inc) repeat 6 times. (36 stitches)
- Join with a sl st to the next stitch and fasten off, leaving a long tail for sewing. Flatten the pumpkin. It should be about 2 inches (5 cm) across.
Part 3: The Leaves (Make 120, 2 per pumpkin)
Worked with green yarn.
- Ch 5. Sl st in the 2nd ch from the hook, sc in the next ch, hdc in the next ch, sl st in the last ch.
- Fasten off, leaving a long tail for sewing. Tip: Make the leaves in batches while watching a show. They are tiny and quick.
Adding the Pumpkin Faces
- Eyes: With black yarn and the yarn needle, embroider two small triangles on the pumpkin, about 3 stitches apart and a little above the center. Make each triangle with 3 short straight stitches, then fill it in with a few tiny stitches.
- Nose: Embroider a tiny triangle between the eyes, just below them, in the same way.
- Mouth: Embroider a wide, curved zigzag below the nose, about 5 points across, using small straight stitches. Make the smile slightly higher at the corners for a happy look.
- Pull the stitches snug, but not tight enough to pucker the pumpkin. Weave in the ends on the back.
Assembly and Finishing
This is where your patch comes together. Take your time pinning before you sew.
Attaching the Pumpkins:
- Place a pumpkin in the center of each square, with the face upright.
- Sew each pumpkin on with the long tail, going around the edge with small stitches.
- Sew two green leaves to the top of each pumpkin, tilted slightly outward, so they look like a little leafy stem. Turn a few pumpkins slightly to the side for a playful look, as in the photo.
Blocking:
- Pin all the squares flat on blocking mats, and gently steam or spray them with water. Let them dry fully.
- Blocking makes the squares the same size and makes joining much easier.
Joining the Squares:
- Lay out the squares in panels, keeping the pumpkins upright.
- Using cream yarn and the yarn needle, join the squares with a whip stitch through the back loops only, from corner to corner.
- Join the squares in rows first, and then join the rows to each other, making sure the corners meet neatly.
- Back: 5 squares across and 4 down.
- Fronts (make 2): 2 squares across and 4 down.
- Sleeves (make 2): 4 squares across and 3 down.
Joining the Shoulders:
- Place each front on the back with right sides together, matching the top edges at the outer corners.
- Seam the outer 6 inches (15 cm) of each shoulder. The rest of the top edge stays open for the neck.
Joining the Sides:
- Seam the sides from the bottom edge up for 2 squares (8 inches or 20 cm).
- The top 2 squares (8 inches or 20 cm) on each side stay open for the armholes.
Making and Attaching the Sleeves:
- Fold each sleeve in half with right sides together, and seam the 12 inch (30 cm) edge to make a tube. Turn it right side out.
- Match the sleeve seam to the underarm of the cardigan, and pin the top edge around the armhole, spreading it evenly.
- Sew each sleeve in with a whip stitch.
Part 4: The Ribbed Bands
Worked with cream yarn. All bands are made sideways, in long strips, then sewn on.
Hem band:
- Ch 13. Hdc in the 3rd ch from the hook and in each chain across. (11 stitches)
- Rows 2 and on: Ch 2, turn. Hdc in the BLO of every stitch across. (11 stitches)
- Work until the strip fits the bottom edge of the cardigan, about 36 inches (91 cm) or about 140 rows. Fasten off, leaving a long tail.
- Sew the strip to the bottom edge, easing it in evenly, with a whip stitch.
Cuffs (make 2):
- Ch 13. Hdc in the 3rd ch from the hook and in each chain across. (11 stitches)
- Rows 2 and on: Ch 2, turn. Hdc in the BLO of every stitch across. (11 stitches)
- Work for about 8 inches (20 cm), or about 32 rows. Fasten off, leaving a long tail.
- Seam the short ends together to make a ring, matching the ribs.
- Pin the cuff to the bottom edge of the sleeve with right sides together, spreading the sleeve evenly around the cuff, then sew it on with a whip stitch.
Front and neck band:
- Ch 9. Hdc in the 3rd ch from the hook and in each chain across. (7 stitches)
- Rows 2 and on: Ch 2, turn. Hdc in the BLO of every stitch across. (7 stitches)
- Buttonholes: On the band that will lie on top (the right front for women, or the left front for men), work a buttonhole on row 10 and every 12th row after it, for 5 buttonholes. To make one, ch 2, turn, hdc in the BLO of the first 2 stitches, ch 2, skip 2 stitches, hdc in the BLO of the last 3 stitches. On the next row, work 2 hdc in the ch-2 space.
- Work until the strip is long enough to go up one front, around the back neck, and down the other front, about 44 inches (112 cm) or about 176 rows. Fasten off, leaving a long tail.
- Sew the strip to the front edges and neck opening, starting at the top of the hem band, with a whip stitch. Ease it in evenly around the neck.
Final touches:
- Try on the cardigan or lay it flat, then pin the buttons opposite the buttonholes.
- Sew each button on firmly with a needle and thread.
- Weave in all remaining ends, and give the whole cardigan one last gentle steam.
A Few Friendly Tips
- Test square: Make one square before you start, and check that it measures 4 inches (10 cm). A cardigan is more fun when it fits.
- Make squares in batches: Work all the squares, then all the pumpkins, then all the leaves. It makes the project much less overwhelming.
- Weave as you go: Weave in the ends right after finishing each piece. It saves so much work at the end.
- Fuzzy pumpkins: If you cannot find a fuzzy orange yarn, use regular orange cotton and scratch the surface lightly with a pet brush or a stiff comb after sewing it on.
- Adjusting the fit: Each square adds 4 inches (10 cm). For a larger size, add one square to the back and half a square to each front, using a half-width ribbed band at the center front. For a longer cardigan, add a row of squares.
- Fewer pumpkins: For a simpler look, put pumpkins on every other square, and leave the rest plain cream.
- Make it your own: Try a black background with orange pumpkins, ghost faces with white yarn, or a different face on every pumpkin.
- Care: Machine wash gently on a cool setting and lay flat to dry. Turn the cardigan inside out first, so the fuzzy pumpkins stay soft.
I hope you enjoy making this happy little pumpkin patch. It takes patience, but every grinning pumpkin makes it more fun, and it makes a wonderful handmade gift.
If you run into any trouble or just want to share how your cardigan turned out, please reach out. I love seeing what you create.
Happy crocheting and happy Halloween!