September 26, 2026
Kawaii Ghost in a Pumpkin House Pattern
There is nothing quite as cozy as a little ghost finding a warm home for the autumn season. This sweet pumpkin basket with a peeking ghost friend is the perfect way to add a touch of kawaii charm to your fall decor. It is a wonderful project for practicing textured stitches and creating a character full of personality. Grab your orange yarn, and let us build this little autumn scene together.
Jump to pattern instructions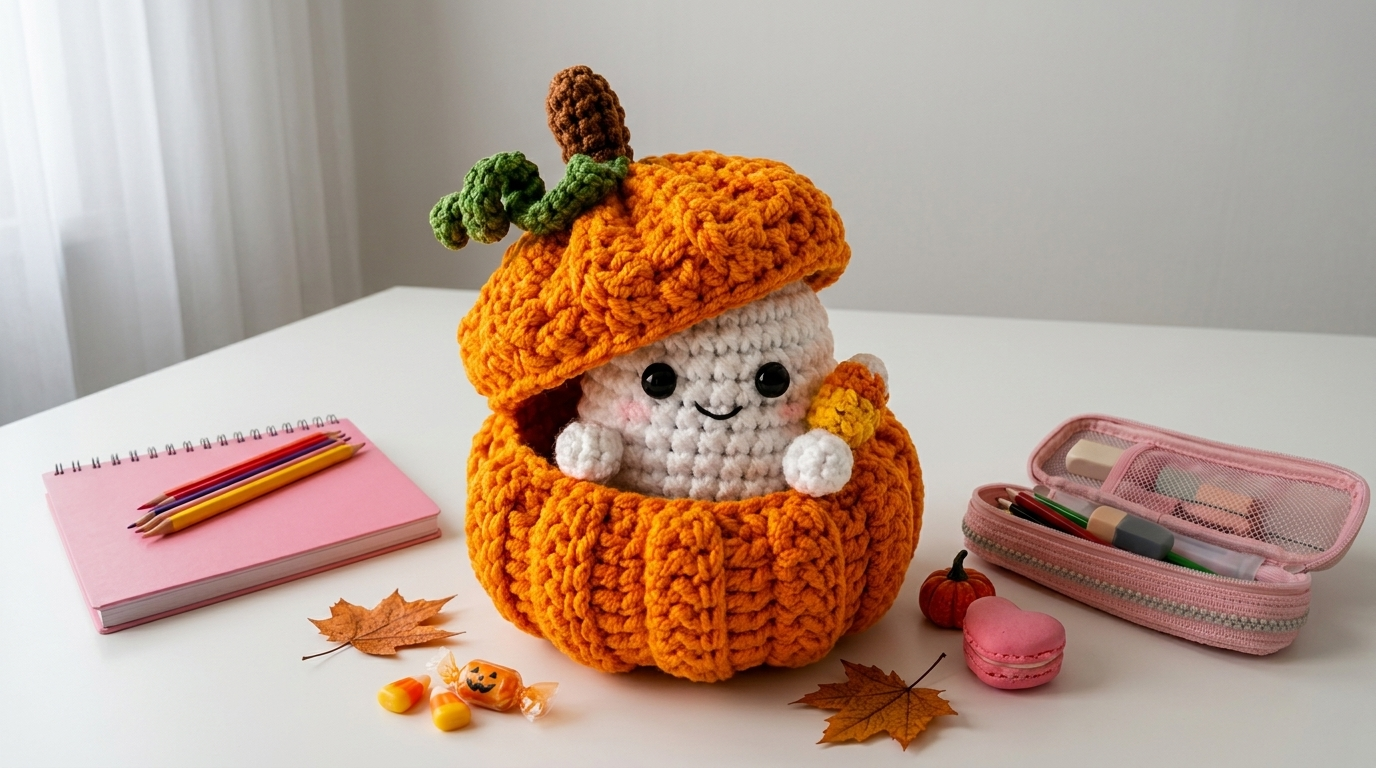
Kawaii Ghost in a Pumpkin House Pattern
Difficulty: Intermediate (requires working in the third loop and sewing parts together)
Finished Size: The pumpkin is about 5 inches tall and 4 inches wide. The ghost is about 3 inches tall.
Time to Complete: 4 to 5 hours of relaxed crocheting and assembly.
What You Will Need
Yarn:
- Bright orange (for the pumpkin base and lid). You will need about 150 yards.
- White (for the ghost). About 50 yards.
- Brown (for the stem). A small scrap.
- Green (for the vine). A small scrap.
- Yellow and light orange (for the tiny candy corn). Tiny scraps.
- Pink (for the ghost's cheeks). A tiny scrap.
- Tip: Using a soft, slightly chunky acrylic or cotton blend works beautifully for this. The texture of the yarn really makes the pumpkin ridges pop.
Tools:
- 5.0 mm (H/8) crochet hook for the pumpkin.
- 3.5 mm (E/4) crochet hook for the ghost and details.
- 10 mm or 12 mm black safety eyes for the ghost.
- Poly-fil or fiberfill stuffing.
- Yarn needle with a large eye for sewing.
- Stitch markers to keep track of your rounds.
- Sharp scissors.
- Optional: Pink felt or blush makeup for the cheeks.
The Basics (US Terms)
- MR = magic ring
- ch = chain
- sc = single crochet
- hdc = half double crochet
- hdc3lo = half double crochet in the third loop only (this creates the ribbed texture)
- inc = increase (work 2 stitches into the same stitch)
- dec = decrease (work 2 stitches together, invisible decrease is best)
- sl st = slip stitch
Let Us Get Started
We will build this project in a few separate pieces: the pumpkin base, the pumpkin lid, the stem and vine, and the little ghost.
Part 1: The Pumpkin Base
Worked with bright orange yarn and the larger hook.
To get those lovely vertical ridges, we will be working in the third loop of the half double crochet. If you are new to this, just look at the top of your hdc stitch; you will see two loops. The third loop is the horizontal bar just behind those two.
- Round 1: Work 6 hdc into a magic ring. (6 stitches)
- Round 2: Inc in every stitch around. (12 stitches)
- Round 3: (1 hdc, inc) repeat 6 times. (18 stitches)
- Round 4: (2 hdc, inc) repeat 6 times. (24 stitches)
- Round 5: (3 hdc, inc) repeat 6 times. (30 stitches)
- Round 6: (4 hdc, inc) repeat 6 times. (36 stitches)
- Round 7: Work 1 hdc3lo in every stitch around. (36 stitches)
- Round 8: Work 1 hdc3lo in every stitch around. (36 stitches)
- Round 9: Work 1 hdc3lo in every stitch around. (36 stitches)
- Round 10: Work 1 hdc3lo in every stitch around. (36 stitches)
- Round 11: Work 1 hdc3lo in every stitch around. (36 stitches)
- Round 12: Work 1 hdc3lo in every stitch around. (36 stitches)
- Round 13: (4 hdc, dec) repeat 6 times. (30 stitches)
- Round 14: Work 1 hdc3lo in every stitch around. (30 stitches)
- Round 15: (3 hdc, dec) repeat 6 times. (24 stitches)
- Round 16: Work 1 hdc3lo in every stitch around. (24 stitches)
Cut the yarn, leaving a long tail. The base should look like a little bowl with vertical ribs. Do not stuff the base yet.
Part 2: The Pumpkin Lid
Worked with bright orange yarn and the larger hook.
The lid is worked similarly to the base but shaped like a dome.
- Round 1: Work 6 hdc into a magic ring. (6 stitches)
- Round 2: Inc in every stitch around. (12 stitches)
- Round 3: (1 hdc, inc) repeat 6 times. (18 stitches)
- Round 4: (2 hdc, inc) repeat 6 times. (24 stitches)
- Round 5: (3 hdc, inc) repeat 6 times. (30 stitches)
- Round 6: (4 hdc, inc) repeat 6 times. (36 stitches)
- Round 7: Work 1 hdc3lo in every stitch around. (36 stitches)
- Round 8: Work 1 hdc3lo in every stitch around. (36 stitches)
- Round 9: Work 1 hdc3lo in every stitch around. (36 stitches)
- Round 10: Work 1 hdc3lo in every stitch around. (36 stitches)
- Round 11: (4 hdc, dec) repeat 6 times. (30 stitches)
- Round 12: (3 hdc, dec) repeat 6 times. (24 stitches)
- Round 13: (2 hdc, dec) repeat 6 times. (18 stitches)
Cut the yarn, leaving a long tail for sewing. The lid should fit snugly over the opening of the base.
Part 3: The Stem and Vine
Worked with brown and green yarn and the smaller hook.
The Stem:
- Round 1: Work 6 sc into a magic ring with brown yarn. (6 stitches)
- Round 2: (1 sc, inc) repeat 3 times. (9 stitches)
- Round 3: Work 1 sc in every stitch around. (9 stitches)
- Round 4: Work 1 sc in every stitch around. (9 stitches)
- Round 5: (1 sc, dec) repeat 3 times. (6 stitches)
Cut the yarn, leaving a tail for sewing. Stuff the stem lightly.
The Vine:
- Chain 15 with green yarn.
- Starting in the second chain from the hook, work 1 sc, 1 hdc, 1 dc, 1 hdc, 1 sc, 1 sl st.
- Continue working a mix of sc, hdc, and dc along the chain, varying the height to make it look organic and curly.
- Cut the yarn, leaving a long tail for sewing.
Part 4: The Ghost
Worked with white yarn and the smaller hook.
- Round 1: Work 6 sc into a magic ring. (6 stitches)
- Round 2: Inc in every stitch around. (12 stitches)
- Round 3: (1 sc, inc) repeat 6 times. (18 stitches)
- Round 4: (2 sc, inc) repeat 6 times. (24 stitches)
- Rounds 5 to 8: Work 1 sc in every stitch around. (24 stitches) Place your safety eyes between rounds 6 and 7, about 5 stitches apart. Secure them tightly.
- Round 9: (2 sc, dec) repeat 6 times. (18 stitches)
- Round 10: Work 1 sc in every stitch around. (18 stitches) Start stuffing the ghost firmly now.
- Round 11: (1 sc, dec) repeat 6 times. (12 stitches)
- Round 12 (The Wavy Edge): This round creates the classic ghost tail.
- Work (sc, hdc, dc, hdc, sc) all in the first stitch.
- Sl st in the next 2 stitches.
- Work (sc, hdc, dc, hdc, sc) all in the next stitch.
- Sl st in the next 2 stitches.
- Repeat this pattern all the way around.
Cut the yarn and weave in the end.
The Arms (Make 2):
- Round 1: Work 6 sc into a magic ring. (6 stitches)
- Round 2: Work 1 sc in every stitch around. (6 stitches)
- Cut the yarn, leaving a long tail. Stuff very lightly.
Part 5: The Tiny Candy Corn (Optional)
Worked with yellow, orange, and white yarn.
- Round 1 (Yellow): Work 3 sc into a magic ring. (3 stitches)
- Round 2 (Orange): Join orange yarn. Work 1 sc in each of the 3 stitches. (3 stitches)
- Round 3 (White): Join white yarn. Work 1 sc in each of the 3 stitches. (3 stitches)
- Cut the yarn, leaving a tail. Pinch the top (white part) to a point and sew it closed.
Assembly and Finishing
This is where your project really comes to life. Take your time and pin everything in place before you start sewing.
Attaching the Stem and Vine: Sew the brown stem to the very top center of the pumpkin lid. Wrap the green vine around the base of the stem and sew it in place, letting the curly end hang off to the side.
Sewing the Ghost's Face: Use a little bit of black yarn to embroider a small, sweet smile just below and between the safety eyes. Use your pink yarn (or a dot of felt/blush) to add little round cheeks just below the eyes.
Attaching the Arms: Sew the little white arms to the front of the ghost's body, positioned so it looks like they are resting on the edge of the pumpkin. If you made the candy corn, sew it into one of the little hands.
Putting it Together: Stuff the pumpkin base lightly with poly-fil to give it some weight and shape. Place the ghost inside the base. Finally, place the lid on top. You can sew the lid to the base at the back with a few stitches so it stays in place, or just let it rest on top.
A Few Friendly Tips
- Finding the third loop: It can be tricky at first. Turn your work sideways and look at the top of the stitch. You will see a V shape. The third loop is the horizontal bar right behind the V. Once you get the rhythm, it is very soothing to work.
- Tension matters: For the pumpkin, try to keep your tension consistent so the ridges look even. For the ghost, keep your stitches tight so the stuffing does not show through.
- Customizing the ghost: Feel free to change the ghost's expression. A little "o" mouth makes it look surprised, while a big grin makes it look happy.
I really hope you enjoy making this little autumn scene. It is such a rewarding project, and the combination of the textured pumpkin and the smooth ghost is just delightful.
If you run into any trouble or just want to share how your little ghost turned out, please reach out. I love seeing what you create.
Happy crocheting.