September 26, 2026
Spooky Sweet Halloween Car Hanging Ornaments
There is something so magical about the crisp autumn air and the little joys of the Halloween season. These tiny crochet car hangings are the perfect way to bring a bit of handmade charm to your daily drive, your rearview mirror, or even your holiday tree. Featuring a sweet little ghost in a witch hat holding a tiny pumpkin, and a classic ribbed orange pumpkin, this project is a delightful way to use up your scrap yarn. Grab your favorite fall drink, and let us crochet some spooky friends together.
Jump to pattern instructions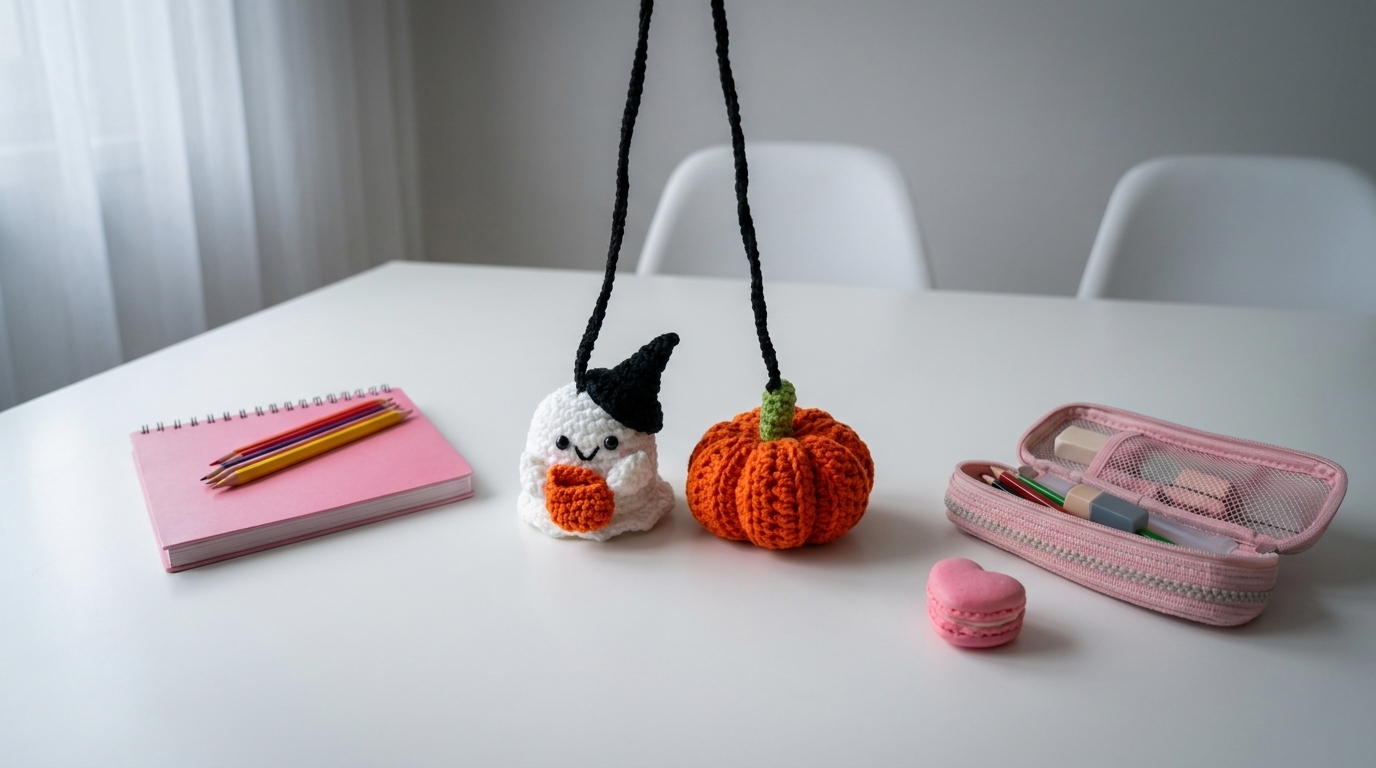
Spooky Sweet Halloween Car Hanging Ornaments
Difficulty: Beginner friendly (a wonderful project for practicing small-scale amigurumi)
Finished Size: Each ornament is about 2 to 2.5 inches tall, not including the hanging cord.
Time to Complete: 2 to 3 hours for both ornaments.
What You Will Need
Yarn:
- White (for the ghost body)
- Black (for the witch hat and hanging cords)
- Orange (for the pumpkins)
- Green (for the pumpkin stem)
- Tip: Use a light worsted or DK weight cotton or acrylic yarn. Cotton gives a nice, crisp definition to the stitches, which looks great on small ornaments.
Tools:
- 3.0 mm (D/3) or 3.5 mm (E/4) crochet hook. Using a smaller hook than usual helps keep your stitches tight so the stuffing does not show through.
- 6 mm black safety eyes (optional, you can also embroider them)
- Poly-fil or fiberfill stuffing (just a tiny bit)
- Yarn needle with a large eye for sewing and weaving in ends
- Stitch markers
- Sharp scissors
- Black cord, ribbon, or leather string for hanging (about 12 to 15 inches long per ornament)
The Basics (US Terms)
- MR = magic ring
- ch = chain
- sc = single crochet
- inc = increase (work 2 single crochets into the same stitch)
- dec = decrease (work 2 single crochets together, invisible decrease is best)
- sl st = slip stitch
- BLO = back loop only
Let Us Get Started
We will make these in a few tiny pieces and then sew them together. Because they are so small, take your time and keep your tension snug.
Part 1: The Ghost Body
Worked with white yarn.
- Round 1: Work 6 sc into a magic ring. (6 stitches)
- Round 2: Inc in every stitch around. (12 stitches)
- Round 3: (1 sc, inc) repeat 6 times. (18 stitches)
- Rounds 4 to 6: Work 1 sc in every stitch around. (18 stitches)
- Round 7: (1 sc, dec) repeat 6 times. (12 stitches) If you are using safety eyes, place them now between rounds 5 and 6, about 4 stitches apart. Secure them tightly on the inside.
- Round 8: Dec 6 times. (6 stitches)
- Stuff the ghost firmly, making sure the bottom is nice and round.
- Cut the yarn, leaving a long tail. Thread it onto your needle and pull through the front loops of the last 6 stitches to close the hole. Do not cut the tail yet.
Part 2: The Witch Hat
Worked with black yarn.
- Round 1: Work 6 sc into a magic ring. (6 stitches)
- Round 2: (1 sc, inc) repeat 3 times. (9 stitches)
- Round 3: Work 1 sc in every stitch around. (9 stitches)
- Round 4: (1 sc, dec) repeat 3 times. (6 stitches)
- Rounds 5 to 9: Work 1 sc in every stitch around. (6 stitches) This creates the tall, pointy part of the hat.
- Cut the yarn, leaving a long tail. Thread the tail through the last 6 stitches and pull tight to close the tip.
- Do not stuff the hat. Leave the bottom open so it can fit over the ghost's head.
Part 3: The Tiny Pumpkin (for the ghost to hold)
Worked with orange yarn.
- Round 1: Work 6 sc into a magic ring. (6 stitches)
- Round 2: Inc in every stitch around. (12 stitches)
- Round 3: Work 1 sc in the BLO of every stitch around. (12 stitches) Working in the back loop only creates a little ridge that makes it look like a real pumpkin.
- Round 4: Work 1 sc in every stitch around. (12 stitches)
- Round 5: Dec 6 times. (6 stitches)
- Stuff the tiny pumpkin very lightly.
- Cut the yarn, leaving a long tail. Pull the tail through the last 6 stitches and pull tight to close.
Part 4: The Main Pumpkin Ornament
Worked with orange yarn.
- Round 1: Work 6 sc into a magic ring. (6 stitches)
- Round 2: Inc in every stitch around. (12 stitches)
- Round 3: (1 sc, inc) repeat 6 times. (18 stitches)
- Round 4: Work 1 sc in the BLO of every stitch around. (18 stitches)
- Rounds 5 to 7: Work 1 sc in every stitch around. (18 stitches)
- Round 8: (1 sc, dec) repeat 6 times. (12 stitches)
- Stuff the pumpkin firmly.
- Round 9: Dec 6 times. (6 stitches)
- Cut the yarn, leaving a long tail. Pull the tail through the last 6 stitches and pull tight to close.
Part 5: The Pumpkin Stem
Worked with green yarn.
- Round 1: Work 6 sc into a magic ring. (6 stitches)
- Round 2: Work 1 sc in every stitch around. (6 stitches)
- Round 3: Work 1 sc in every stitch around. (6 stitches)
- Cut the yarn, leaving a long tail for sewing. Do not stuff. Pinch it flat.
Assembly and Finishing
This is where the magic happens. Take your time pinning the pieces in place before you sew.
Making the Ghost:
- Take your long tail from the ghost body and sew the bottom closed neatly if there is any gap.
- Place the black witch hat on top of the ghost's head. Use the long tail from the hat to sew it securely in place. You can angle it slightly to the side for a cute, playful look.
- Use a little bit of black yarn to embroider a tiny, sweet smile just below the eyes.
- Take the tiny orange pumpkin and sew it to the front of the ghost's body, right in the center, so it looks like the ghost is holding it.
Making the Main Pumpkin:
- Take your green stem and sew it to the top center of the orange pumpkin.
- If you like, use a little bit of green yarn to embroider a tiny curly vine coming off the side of the stem.
Adding the Hanging Cords:
- Take your black cord, ribbon, or a long chain of black crochet stitches (about 12 to 15 inches long).
- Fold the cord in half to create a loop at the top.
- For the ghost: Thread the two loose ends of the cord through the very top tip of the witch hat, from the inside out. Tie a secure knot on the inside of the hat to hold it in place.
- For the pumpkin: Thread the two loose ends of the cord through the base of the green stem, right where it meets the orange pumpkin. Tie a secure knot on the inside of the pumpkin.
A Few Friendly Tips
- Keep it tight: When working on such small pieces, it is very tempting to pull your stitches tight, but try to keep an even tension. If your stitches are too loose, the stuffing will peek through and the shape will look lumpy.
- Stuffing small pieces: It can be tricky to stuff tiny ornaments. Tear off very small tufts of poly-fil and use the back end of your crochet hook or a pair of tweezers to push the stuffing deep into the corners.
- Hanging cord options: If you do not have black cord, you can easily make your own by chaining about 60 to 80 stitches with black yarn and slip stitching back down the chain to make a sturdy cord.
I really hope you have fun making these little Halloween friends. They are such a quick and satisfying project, and they make the most wonderful handmade gifts for friends and family.
If you run into any trouble or just want to share how your ornaments turned out, please reach out. I love seeing what you create.
Happy crocheting and happy Halloween.