September 26, 2026
Spooky Spiderweb Garland Pattern
There is nothing quite like the feeling of transforming your home for Halloween, and this spiderweb garland is the perfect way to add a touch of handmade magic to your walls, mantel, or doorway. It looks incredibly intricate, but I promise it is one of the easiest and most relaxing projects you will ever crochet. It is also the ultimate scrap-buster, so dig into your yarn bin and grab those blacks, greys, and warm tans. Grab a cup of tea, and let us spin some webs together.
Jump to pattern instructions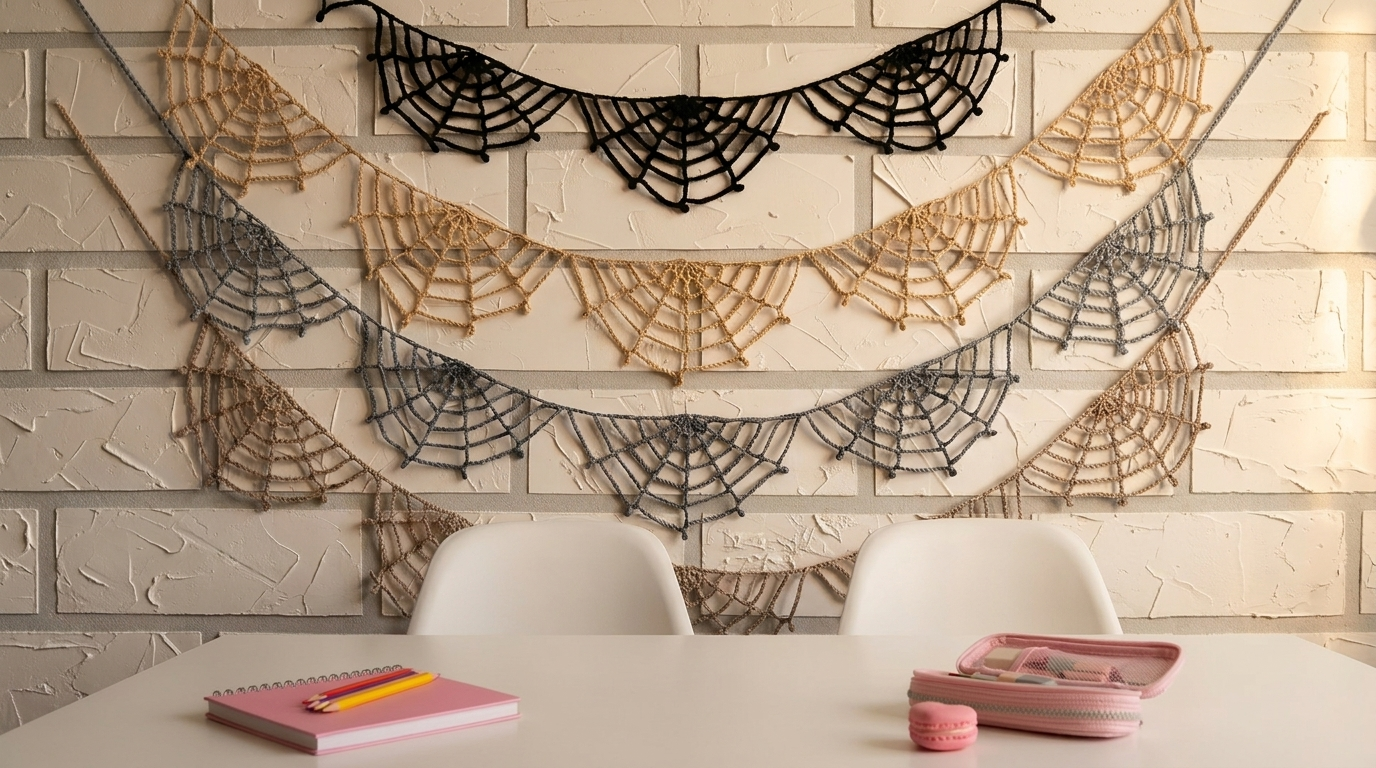
Spooky Spiderweb Garland Pattern
Difficulty: Beginner friendly (perfect for mindless, relaxing crocheting while watching a movie)
Finished Size: Each individual web motif is about 6 inches wide and 4 inches tall. The full garland length depends on how many webs you make, but 10 webs will give you a garland about 5 feet long.
Time to Complete: About 20 minutes per web motif, plus assembly time.
What You Will Need
Yarn:
- Worsted weight (Size 4) or DK weight (Size 3) yarn.
- You will need small amounts of Halloween colors: black, charcoal grey, and a warm tan or beige.
- Tip: This pattern is a fantastic way to use up leftover yarn from bigger projects. You only need about 15 yards per web.
Tools:
- 4.0 mm (G/6) or 4.5 mm (7) crochet hook.
- Yarn needle for weaving in ends.
- Sharp scissors.
- Stitch markers (optional, but helpful if you lose your place).
The Basics (US Terms)
- ch = chain
- sc = single crochet
- sl st = slip stitch
- sp = space (the gap created by a chain)
- sk = skip
Let Us Get Started
We are going to make individual half-web motifs and then string them together. This makes the project very manageable and allows you to mix and match your colors easily.
Part 1: The Spiderweb Motif
Row 1 (Creating the Spokes):
- Chain 21.
- Single crochet in the second chain from your hook.
- Chain 5, skip the next chain, and single crochet in the following chain.
- Repeat this pattern (chain 5, skip 1, sc in next) all the way to the end of the row.
- You should have 10 chain-5 loops. Turn your work.
Row 2 (The First Webbing):
- Chain 5 (this counts as your first chain-2 space and a turning chain).
- Single crochet in the next chain-5 loop.
- Chain 2, single crochet in the next chain-5 loop.
- Repeat this pattern (ch 2, sc in next loop) across the row. Turn your work.
Row 3:
- Chain 2.
- Single crochet in the next chain-2 space.
- Chain 2, single crochet in the next chain-2 space.
- Repeat this pattern across the row. Turn your work.
Row 4:
- Repeat Row 3 exactly. Turn your work.
Row 5:
- Repeat Row 3 exactly. Turn your work.
Row 6 (The Top Edge):
- Chain 1.
- Work 2 single crochets in every chain-2 space across the top of the web. This creates a sturdy, straight edge for hanging.
- At the very last stitch, chain 3. This little tail will help you attach it to the main garland string later.
Cut the yarn, leaving a 6-inch tail. Weave in the starting tail, but leave the ending tail for now.
Make as many webs as you like! I recommend making at least 8 to 12 for a nice, full garland. Mix up your colors as you go.
Part 2: Assembling the Garland
Now we will string them all together to create that beautiful, draped look you see in the photo.
Making the Main String:
- Take your main hanging yarn (I recommend using black or a dark grey for this so it blends in).
- Chain 100 (or longer, depending on how wide your wall is).
Attaching the Webs:
- Lay your main chain flat on the table.
- Take your first web motif. Find the little chain-3 tail you left at the end of Row 6.
- Thread that tail onto your yarn needle.
- Skip about 10 chains on your main string, and then sew the top corner of the web to the main string. Go through the top edge of the web and wrap it securely around the main chain.
- Take the other side of the web (the very first chain of Row 1) and sew it to the main string about 6 inches away from the first attachment point.
- Pull the yarn tight so the web hangs nicely in a curve. Knot it securely on the back of the main string and weave in the end.
Repeating:
- Skip about 2 chains on the main string, and then attach the next web.
- Continue this process until all your webs are attached.
- When you reach the end, chain another 20 or 30 chains to create a tail for hanging, then fasten off and weave in all ends.
A Few Friendly Tips
- Tension does not matter too much: Because this is a lacy, open project, your exact tension is not critical. Just try to keep it consistent so all your webs are roughly the same size.
- Blocking: If your webs look a little curly or uneven, do not worry. You can lightly steam them with an iron (hold the iron an inch above the yarn, do not touch it directly) or spray them with water and pin them flat to dry. They will look perfectly crisp.
- Hanging it up: Use clear command hooks or small nails to hang the garland. Because it is made of yarn, it is very lightweight and will not damage your walls.
I really hope you have fun making this garland. It is such a satisfying project to watch grow, and it instantly makes a room feel festive and cozy.
If you run into any trouble or just want to share how your spooky decor turned out, please reach out. I love seeing what you create.
Happy crocheting and happy Halloween.