September 24, 2026
Witch Hat Lantern Cover Crochet Pattern
Transform a simple glass jar into a magical Halloween centerpiece with this cozy witch hat lantern cover. It is the perfect way to add a touch of spooky charm to your fall decor without spending a fortune. Whether you use a flickering LED candle or just display it on your mantle, this little hat brings so much personality to any room. Grab your favorite mug of tea, and let us make some magic together.
Jump to pattern instructions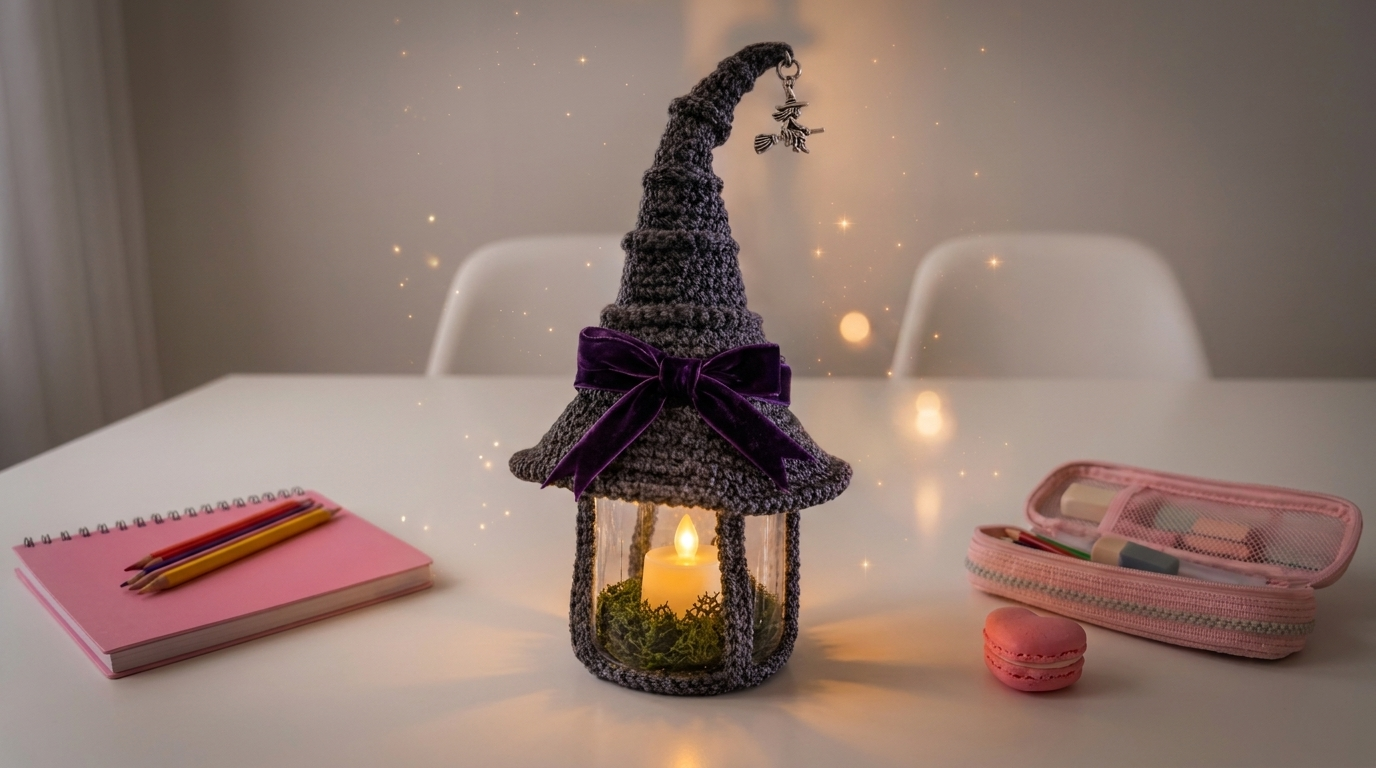
Difficulty: Beginner friendly (perfect for practicing your tension)
Finished Size: Designed to fit a standard 16 oz wide mouth mason jar (about 3.5 inches across the opening), but easily adjustable.
Time to Complete: 2 to 3 hours of relaxed crocheting
What You Will Need
Yarn:
- Worsted weight (Size 4) yarn in a dark charcoal gray or black. You will only need about 100 to 150 yards, so this is a great scrap buster project.
- Tip: I recommend using a wool blend or a sturdy acrylic. You want the hat to hold its shape and not flop over.
Tools:
- 5.0 mm (H/8) crochet hook
- Yarn needle for weaving in ends
- Sharp scissors
- Stitch marker
Embellishments & Props:
- A wide purple velvet ribbon (about 1 inch wide and 18 inches long)
- A small witch charm or button for the tip of the hat (optional)
- A wide mouth glass jar (like a mason jar)
- An LED tea light candle and some craft moss for the inside
- Safety note: Please only use battery operated LED candles inside these covers. Real flames and yarn do not mix.
The Basics (US Terms)
- ch = chain
- sc = single crochet
- hdc = half double crochet
- dc = double crochet
- sl st = slip stitch
- inc = increase (work 2 stitches into the same stitch)
- dec = decrease (work 2 stitches together)
- BLO = back loop only
Let Us Get Started
We are going to build this in three simple parts: the brim, the cone, and the base band. Take your time, and remember to check your sizing against your jar as you go.
Part 1: The Brim
The brim needs to sit flat on top of your jar. We will start with a ring that fits the mouth of the jar, and then work outward.
Row 1: Chain 22. Join with a slip stitch to the first chain to form a ring. (Make sure this ring fits snugly but comfortably around the mouth of your jar. If it is too tight, chain a few more. If it is too loose, chain fewer). Chain 1. Work 22 single crochets into the center of the ring. Join with a slip stitch to the first sc. (22 stitches)
Row 2: Chain 1. Work 2 single crochets in every stitch around. Join with a slip stitch. (44 stitches)
Row 3: Chain 1. Work (1 sc in the next stitch, 2 sc in the next stitch) all the way around. Join with a slip stitch. (66 stitches)
Row 4: Chain 1. Work (1 sc in the next 2 stitches, 2 sc in the next stitch) all the way around. Join with a slip stitch. (88 stitches)
Row 5: Chain 1. Work (1 sc in the next 3 stitches, 2 sc in the next stitch) all the way around. Join with a slip stitch. (110 stitches)
Check your brim against your jar. It should extend about 1 to 1.5 inches past the mouth of the jar. If you want a wider brim, just keep going with the increase pattern (4 sc, inc, then 5 sc, inc, etc.). Fasten off and weave in your ends.
Part 2: The Hat Cone
Now for the fun part. We are going to build the tall, pointy cone. We will work this in continuous rounds (spirals) so you do not have to join at the end of each round. Use your stitch marker to mark the first stitch of every round.
Round 1: Join your yarn to the inside edge of the brim (the very first chain ring you made in Row 1 of the brim). Work 22 single crochets evenly around that inner ring. Do not join. (22 stitches)
Round 2 to 10: Work 1 single crochet in every stitch around. (22 stitches per round). At this point, your cone should be standing up nicely. If it is flopping, you might need to switch to a slightly smaller hook or a tighter tension.
Round 11: (1 sc in the next 9 stitches, dec) repeat twice. (20 stitches)
Round 12: Work 1 sc in every stitch around. (20 stitches)
Round 13: (1 sc in the next 8 stitches, dec) repeat twice. (18 stitches)
Round 14: Work 1 sc in every stitch around. (18 stitches)
Round 15: (1 sc in the next 7 stitches, dec) repeat twice. (16 stitches)
Round 16: Work 1 sc in every stitch around. (16 stitches)
Round 17: (1 sc in the next 6 stitches, dec) repeat twice. (14 stitches)
Round 18: Work 1 sc in every stitch around. (14 stitches)
Round 19: (1 sc in the next 5 stitches, dec) repeat twice. (12 stitches)
Round 20: Work 1 sc in every stitch around. (12 stitches)
Round 21: (1 sc in the next 4 stitches, dec) repeat twice. (10 stitches)
Round 22: Work 1 sc in every stitch around. (10 stitches)
Round 23: (1 sc in the next 3 stitches, dec) repeat twice. (8 stitches)
Round 24: Work 1 sc in every stitch around. (8 stitches)
Round 25: (1 sc in the next 2 stitches, dec) repeat twice. (6 stitches)
Round 26: (1 sc, dec) repeat twice. (4 stitches)
Round 27: Dec twice. (2 stitches)
Finishing the tip: Cut your yarn, leaving a long tail. Thread the tail onto your yarn needle and pull it through the last 2 stitches. Pull it tight to close the hole completely.
To get that cute curl at the tip of the hat, gently bend the top of the cone to the side and hold it there for a few seconds. The natural memory of the yarn will help it stay curved.
Part 3: The Jar Base Band
This little band sits at the bottom of the glass jar to hold everything in place and give it a finished look.
Row 1: Chain 28 (or enough chains to wrap comfortably around the base of your specific jar). Join with a slip stitch to form a ring. Chain 1. Work 1 single crochet in every chain around. Join with a slip stitch.
Row 2: Chain 1. Work 1 single crochet in the back loop only (BLO) of every stitch around. Join with a slip stitch.
Row 3: Chain 1. Work 1 single crochet in every stitch around. Join with a slip stitch.
Fasten off and weave in your ends. The ridge created by the back loop only row will help the band grip the glass jar so it does not slide around.
Assembly and Embellishments
This is where your project really comes to life.
Tying the Bow: Take your purple velvet ribbon and tie it into a nice, full bow. Wrap it around the base of the cone, right where it meets the brim. Tie it securely in the back. If the ribbon is slippery, you can use a tiny dot of hot glue or a few stitches of thread to hold the knot in place.
Adding the Charm: If you have a little witch charm, safety pin, or button, sew it onto the very tip of the hat. It adds such a lovely, professional detail.
Setting the Scene: Place your base band around the bottom of your glass jar. Put a handful of craft moss inside the jar, set your LED tea light on top of the moss, and turn it on. Finally, place the witch hat cover over the top of the jar.
A Few Friendly Tips
- Check your gauge as you go: Every crocheter has a different tension. If your brim is too big, just frog it back and use a smaller hook. It is much easier to fix it now than at the end.
- Stiffening the hat: If your yarn is a bit soft and the hat is drooping, you can spray the finished cone with a little bit of starch or a mixture of white glue and water. Let it dry completely over a cup or bowl to hold its shape.
- Customizing the colors: While gray and purple are classic, do not be afraid to experiment. Try black and orange for a traditional look, or deep green and gold for a more mystical vibe.
I really hope you have fun making this. It is such a quick, satisfying project, and it makes a wonderful handmade gift for friends who love Halloween.
If you run into any trouble or just want to share how yours turned out, please reach out. I love seeing what you create.
Happy crocheting.