October 19, 2026
Larry the Plush Lobster
Meet the softest, squishiest crustacean you have ever cuddled. Larry has a plump rust-orange body in velvety chenille yarn, a chunky segmented tail with a little tail fan, two curly antennae, and a pair of round, mitten-like claws raised in a happy wave. Two shiny black eyes and a cherry-red crest on his head finish his look. He is made from simple spheres and tubes, so he works up fast and is perfect for a cozy cuddle, a shelf buddy, or a gift for anyone who loves the seaside. Pour something warm, grab your softest yarn, and let us catch a lobster.
Jump to pattern instructions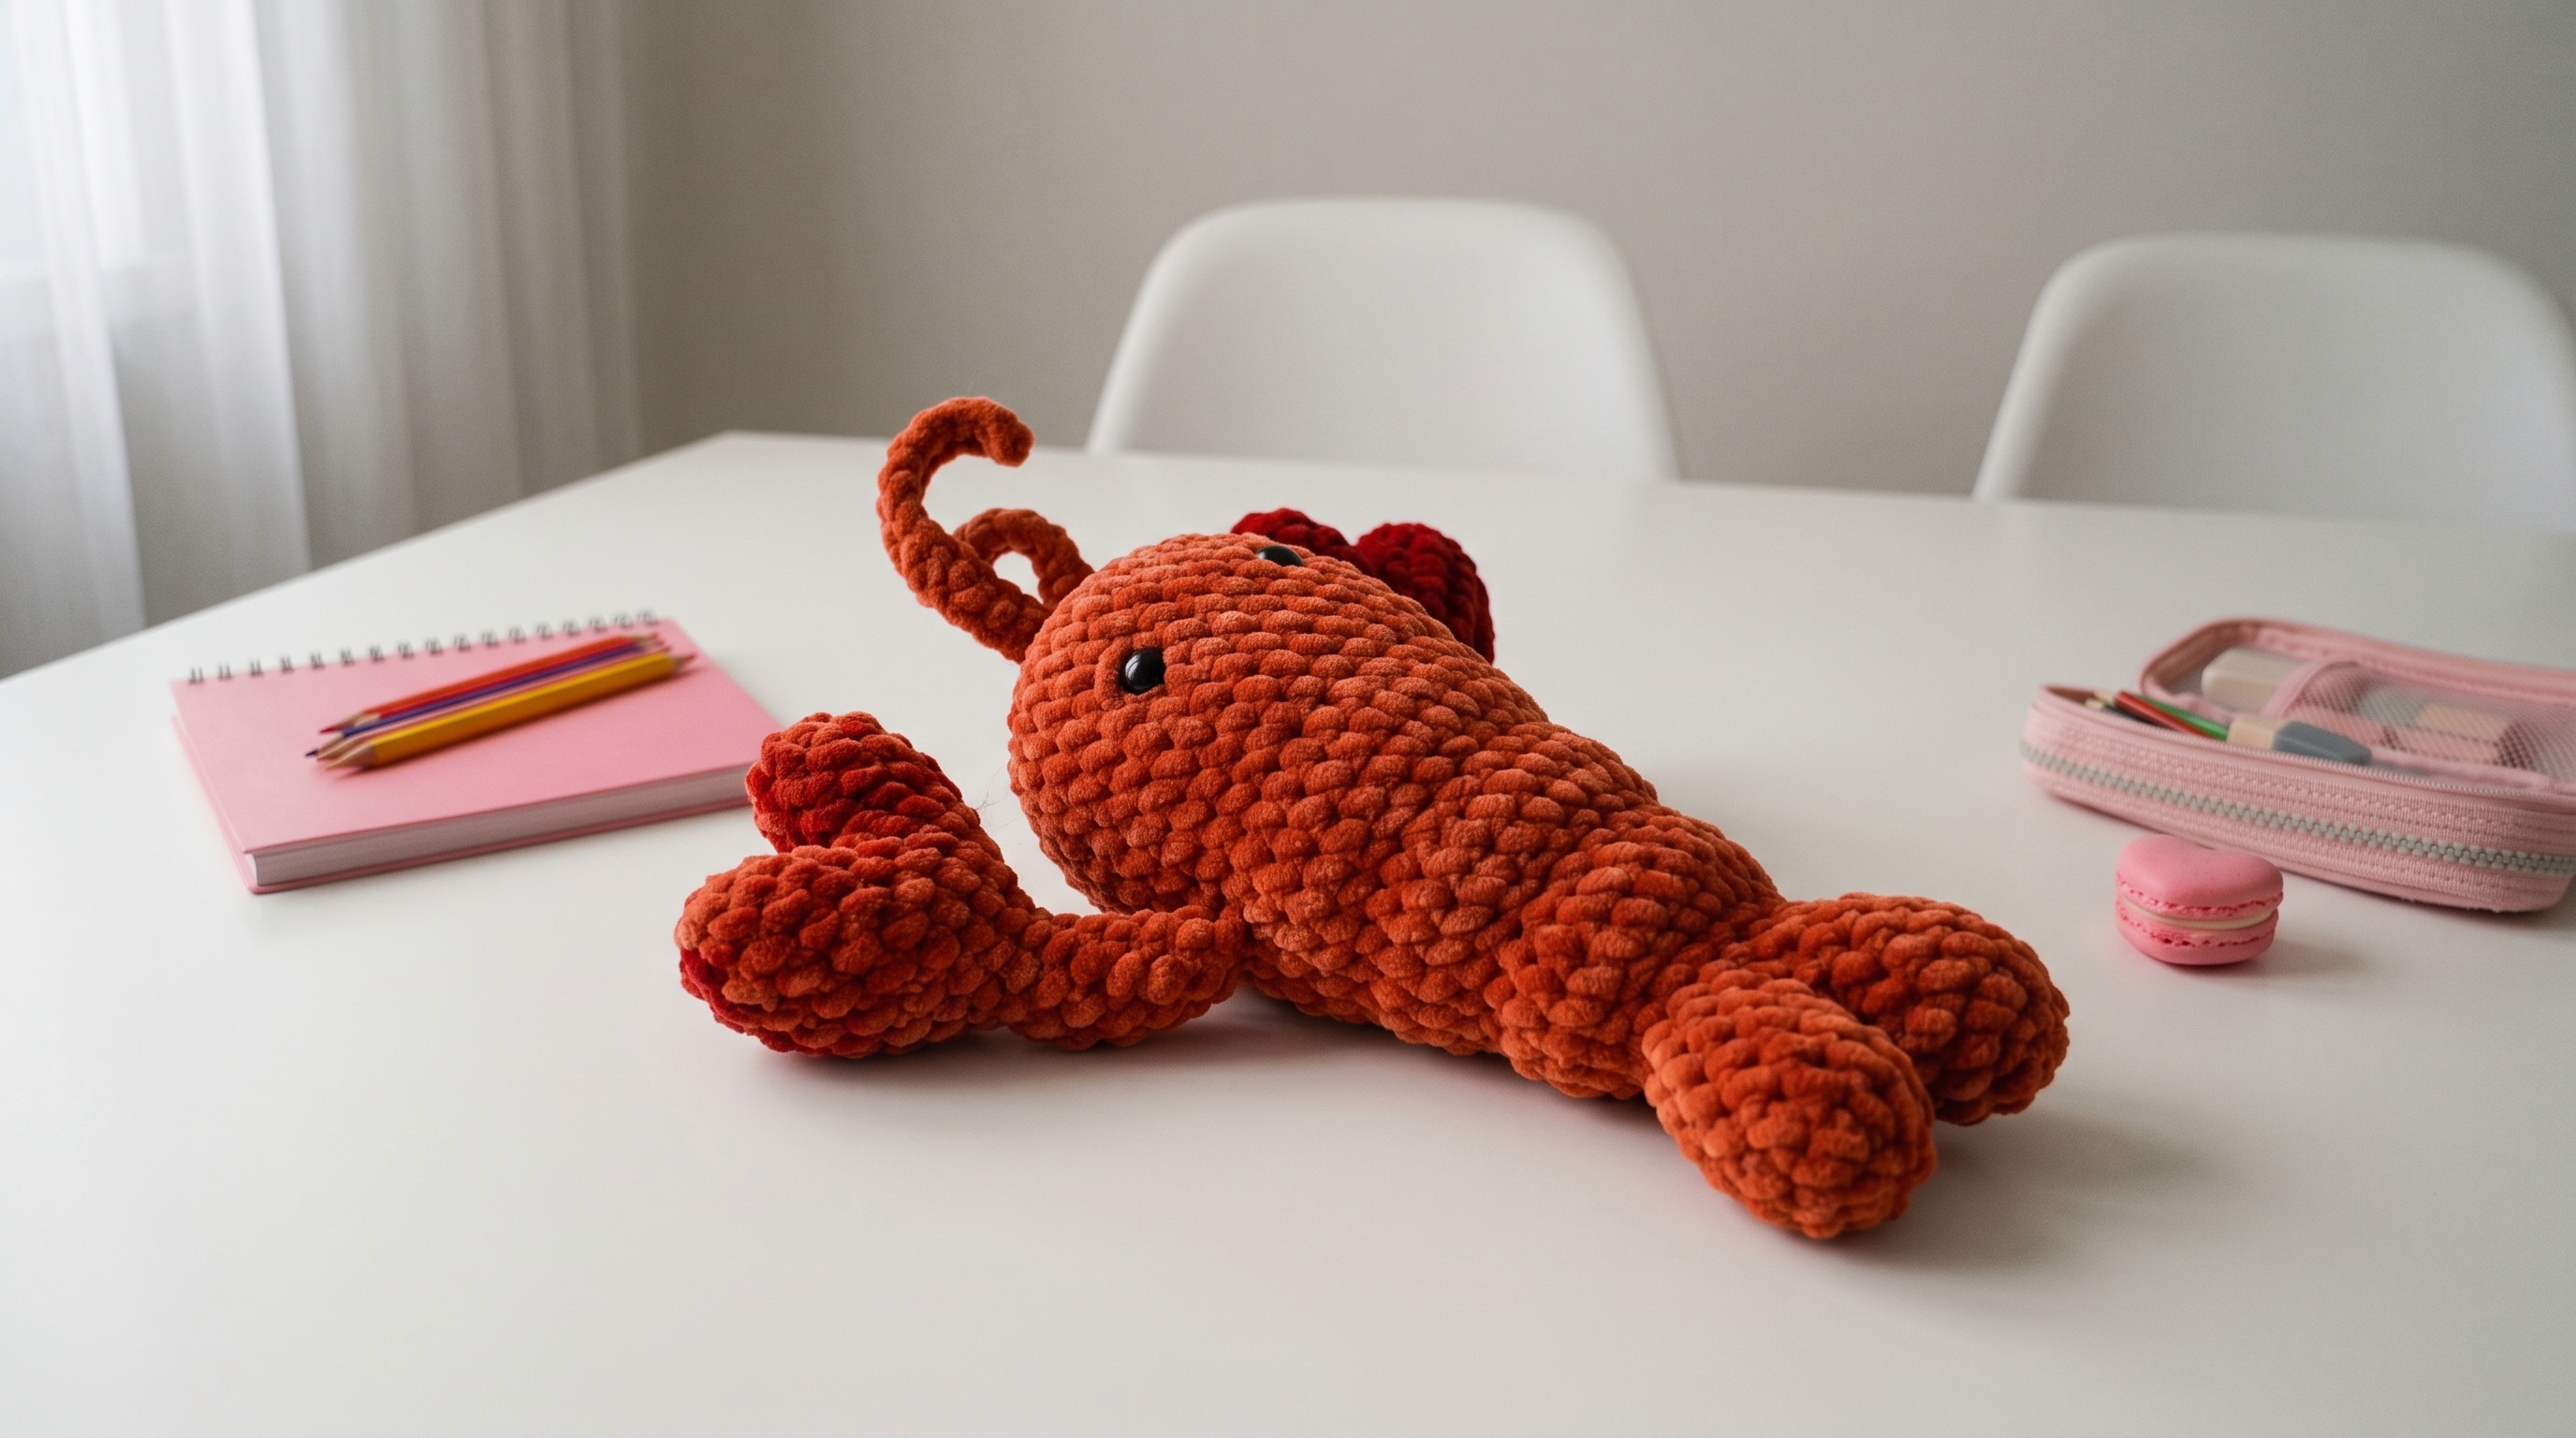
Larry the Plush Lobster
Difficulty: Easy to intermediate (basic shapes, plus a few small parts to sew on, and chenille yarn can be tricky to see)
Finished Size: About 9 inches (23 cm) long and 4 inches (10 cm) tall in chunky chenille yarn, not including the claws. In DK weight yarn, he is about 6 inches (15 cm) long.
Time to Complete: 5 to 6 hours.
What You Will Need
Yarn:
- Rust orange (O), about 150 yards (137 m) of chunky chenille or velvet yarn, for the body, tail, arms, claws, and antennae
- Deep red (R), about 30 yards (27 m) of the same yarn, for the crest and the claw notches
- Tip: The photo shows a soft chenille or velvet style yarn, which gives that plush, squishy look. For this yarn, use a 4.0 to 4.5 mm hook, and work in good light. You can also use regular DK weight cotton with a 3.0 mm hook for a firmer, smaller lobster, but you will need to add a few rounds to the tail and antennae.
Tools:
- 4.0 mm (G/6) or 4.5 mm (7) crochet hook for chenille yarn
- 10 mm black safety eyes (1 pair), or black beads
- Poly-fil or fiberfill stuffing
- Yarn needle with a large eye for sewing and embroidering
- Stitch markers
- Sharp scissors
- Straight pins for placing the pieces before sewing
- Optional: 2 pipe cleaners, about 8 inches (20 cm) long, for the antennae
The Basics (US Terms)
- MR = magic ring
- sc = single crochet
- inc = increase (work 2 single crochets into the same stitch)
- dec = decrease (work 2 single crochets together, invisible decrease is best)
- sl st = slip stitch
- BLO = back loop only
- O, R = orange, red
- All pieces are worked in continuous rounds. Use a stitch marker to mark the first stitch of each round.
- Chenille yarn is hard to see, so count your stitches at the end of every round.
Let Us Get Started
Larry is made of a head and chest, a segmented tail, two tail flaps, two arms, two claws, two antennae, and a red crest.
Part 1: The Head and Chest
Worked with orange yarn.
- Round 1: Work 6 sc into a magic ring. (6 stitches)
- Round 2: Inc in every stitch around. (12 stitches)
- Round 3: (1 sc, inc) repeat 6 times. (18 stitches)
- Round 4: (2 sc, inc) repeat 6 times. (24 stitches)
- Round 5: (3 sc, inc) repeat 6 times. (30 stitches)
- Rounds 6 to 10: Work 1 sc in every stitch around. (30 stitches) If you are using safety eyes, place them now between rounds 7 and 8, on the sides of the head, about 12 stitches apart. Secure them tightly on the inside.
- Round 11: (3 sc, dec) repeat 6 times. (24 stitches)
- Round 12: (2 sc, dec) repeat 6 times. (18 stitches)
- Stuff the body firmly so it is nice and round.
- Round 13: (1 sc, dec) repeat 6 times. (12 stitches)
- Round 14: Dec 6 times. (6 stitches)
- Cut the yarn, leaving a long tail. Pull the tail through the front loops of the last 6 stitches and pull tight to close. Weave in the end.
Part 2: The Tail
Worked with orange yarn. Start at the tip.
- Round 1: Work 6 sc into a magic ring. (6 stitches)
- Round 2: Inc in every stitch around. (12 stitches)
- Rounds 3 to 4: Work 1 sc in every stitch around. (12 stitches)
- Round 5: (3 sc, inc) repeat 3 times. (15 stitches)
- Round 6: Work 1 sc in the BLO of every stitch around. (15 stitches) This leaves a little ridge that makes the first tail segment.
- Round 7: Work 1 sc in every stitch around. (15 stitches)
- Round 8: (4 sc, inc) repeat 3 times. (18 stitches)
- Round 9: Work 1 sc in the BLO of every stitch around. (18 stitches)
- Round 10: Work 1 sc in every stitch around. (18 stitches)
- Round 11: (5 sc, inc) repeat 3 times. (21 stitches)
- Round 12: Work 1 sc in the BLO of every stitch around. (21 stitches)
- Round 13: Work 1 sc in every stitch around. (21 stitches)
- Stuff the tail firmly, working from the tip up, so each segment is plump.
- Cut the yarn, leaving a long tail for sewing. Leave the 21 stitches open for attaching the tail to the body.
Part 3: The Tail Flaps (Make 2)
Worked with orange yarn.
- Round 1: Work 6 sc into a magic ring. (6 stitches)
- Round 2: Inc in every stitch around. (12 stitches)
- Round 3: (1 sc, inc) repeat 6 times. (18 stitches)
- Rounds 4 to 5: Work 1 sc in every stitch around. (18 stitches)
- Round 6: (1 sc, dec) repeat 6 times. (12 stitches)
- Stuff lightly, then pinch the flap flat, so it looks like a thick oval paddle.
- Cut the yarn, leaving a long tail for sewing. Leave the end open.
Part 4: The Arms (Make 2)
Worked with orange yarn.
- Round 1: Work 6 sc into a magic ring. (6 stitches)
- Round 2: (1 sc, inc) repeat 3 times. (9 stitches)
- Rounds 3 to 8: Work 1 sc in every stitch around. (9 stitches)
- Stuff lightly.
- Cut the yarn, leaving a long tail for sewing. Leave the end open.
Part 5: The Claws (Make 2)
Worked with orange yarn.
- Round 1: Work 6 sc into a magic ring. (6 stitches)
- Round 2: Inc in every stitch around. (12 stitches)
- Round 3: (1 sc, inc) repeat 6 times. (18 stitches)
- Round 4: (2 sc, inc) repeat 6 times. (24 stitches)
- Rounds 5 to 7: Work 1 sc in every stitch around. (24 stitches)
- Round 8: (2 sc, dec) repeat 6 times. (18 stitches)
- Round 9: (1 sc, dec) repeat 6 times. (12 stitches)
- Stuff the claw firmly so it is nice and round.
- Round 10: Dec 6 times. (6 stitches)
- Cut the yarn, leaving a long tail for sewing. Pull the tail through the front loops of the last 6 stitches and pull tight to close. Do not cut the tail yet.
The pincer notch:
- Pinch the closed end of the claw flat, so it is slightly heart-shaped.
- With red yarn, make a line of backstitches down the center of the flat top, about 1 inch (2.5 cm) long, pulling each stitch snug, so the claw indents and makes a notch. Fasten off on the inside. The notch divides the claw into two rounded lobes, so it looks like a pincer.
Part 6: The Antennae (Make 2)
Worked with orange yarn.
- Round 1: Work 5 sc into a magic ring. (5 stitches)
- Rounds 2 to 30: Work 1 sc in every stitch around. (5 stitches)
- Do not stuff. For curly antennae, slide a pipe cleaner folded over at the tip into the tube. Otherwise, the antenna will be soft and floppy.
- Cut the yarn, leaving a long tail for sewing. Leave the end open.
- Curl each antenna into a loose hook, as in the photo, and bend it into shape. If you used the pipe cleaner, the curve will hold on its own.
Part 7: The Crest (Make 2)
Worked with red yarn.
- Round 1: Work 6 sc into a magic ring. (6 stitches)
- Round 2: (1 sc, inc) repeat 3 times. (9 stitches)
- Rounds 3 to 4: Work 1 sc in every stitch around. (9 stitches)
- Round 5: (1 sc, dec) repeat 3 times. (6 stitches)
- Stuff very lightly.
- Cut the yarn, leaving a long tail for sewing. Pull the tail through the front loops of the last 6 stitches and pull tight to close.
Assembly and Finishing
This is where Larry comes to life. Take your time pinning before you sew.
Attaching the Tail:
- Pin the open end of the tail to the back of the head and chest, a little below the center, with the tail curving slightly downward.
- Sew all the way around with the long tail, using a whip stitch. Sew firmly, and add a bit more stuffing before you close, if needed, so the tail does not droop.
Attaching the Tail Flaps:
- Pin one flap on each side of the tail tip, angled outward and slightly down, so the tip and the two flaps make a fan.
- Sew each flap on firmly with the long tail, going around the base twice.
Attaching the Antennae and Crest:
- Pin the antennae on top of the head, about 5 stitches apart, near the front, with the curls pointing up and slightly back.
- Sew them on all around the base with the tails.
- Pin the two red crest pieces on top of the head, just behind the antennae, side by side and slightly angled outward.
- Sew them on firmly with the tails.
Attaching the Arms and Claws:
- Sew each claw to the open end of an arm, with the notch at the far end, and sew all the way around with the claw's tail.
- Pin the arms on the front sides of the head and chest, about 3 rounds from the front, and angle them forward and up, as if Larry is waving.
- Sew each arm on firmly, going around twice, since the claws are heavy.
- Weave in all remaining ends.
A Few Friendly Tips
- Keep it snug: Keep your tension tight and even. Loose stitches let the stuffing show through, especially with velvet yarn.
- Counting chenille: Chenille yarn is hard to see, so use a stitch marker in every round, and count at the end of each round. A light-colored table helps you see the stitches.
- Firm stuffing: Stuff the head and tail firmly, and the arms lightly. Firm body parts make a lobster who looks plump, and soft arms make him flop in a cuddly way.
- Standing strong: If Larry tips over, add a little more stuffing to the tail, and sew the arms a little lower. He looks best lying on his side or his tummy.
- Add legs: For extra legs, make 6 small tubes, with 6 sc in a magic ring and 5 rounds of 6 sc, and sew them in a row along each side of the belly.
- Make it your own: Try a blue lobster, a pink one, a cream one with a tiny chef hat, or a tiny bow tie.
- Size up: For a bigger lobster, use jumbo chenille yarn and a 6.0 mm hook, with the same stitch counts.
- Safe for little ones: For babies and toddlers, skip the safety eyes and embroider the eyes with black yarn. Sew the antennae, arms, and crest on with extra stitches, and leave out the pipe cleaners.
- Care: Spot clean, or hand wash gently, and lay flat to dry. Chenille can shed a little at first, so shake the toy gently after finishing.
I hope you enjoy making this squishy little lobster. He is such a fun project and makes a wonderful handmade gift.
If you run into any trouble or just want to share how your lobster turned out, please reach out. I love seeing what you create.
Happy crocheting!