October 19, 2026
Pocket Garden Coasters
A tiny garden you can set your mug on. This sampler set has big white daisies, a sunflower, a honey-colored flower, a round medallion, a flower-shaped hexagon, and two simple corner-to-corner squares in warm mustard and in cherry red and white. They all come in cheerful greens, golds, oranges, and creams. Every flower is made the same easy way, so once you know one, you know them all. Use them as coasters or mug rugs, or join them into a blanket or pillow. Pour something warm, grab your sunniest scraps, and let us plant a garden.
Jump to pattern instructions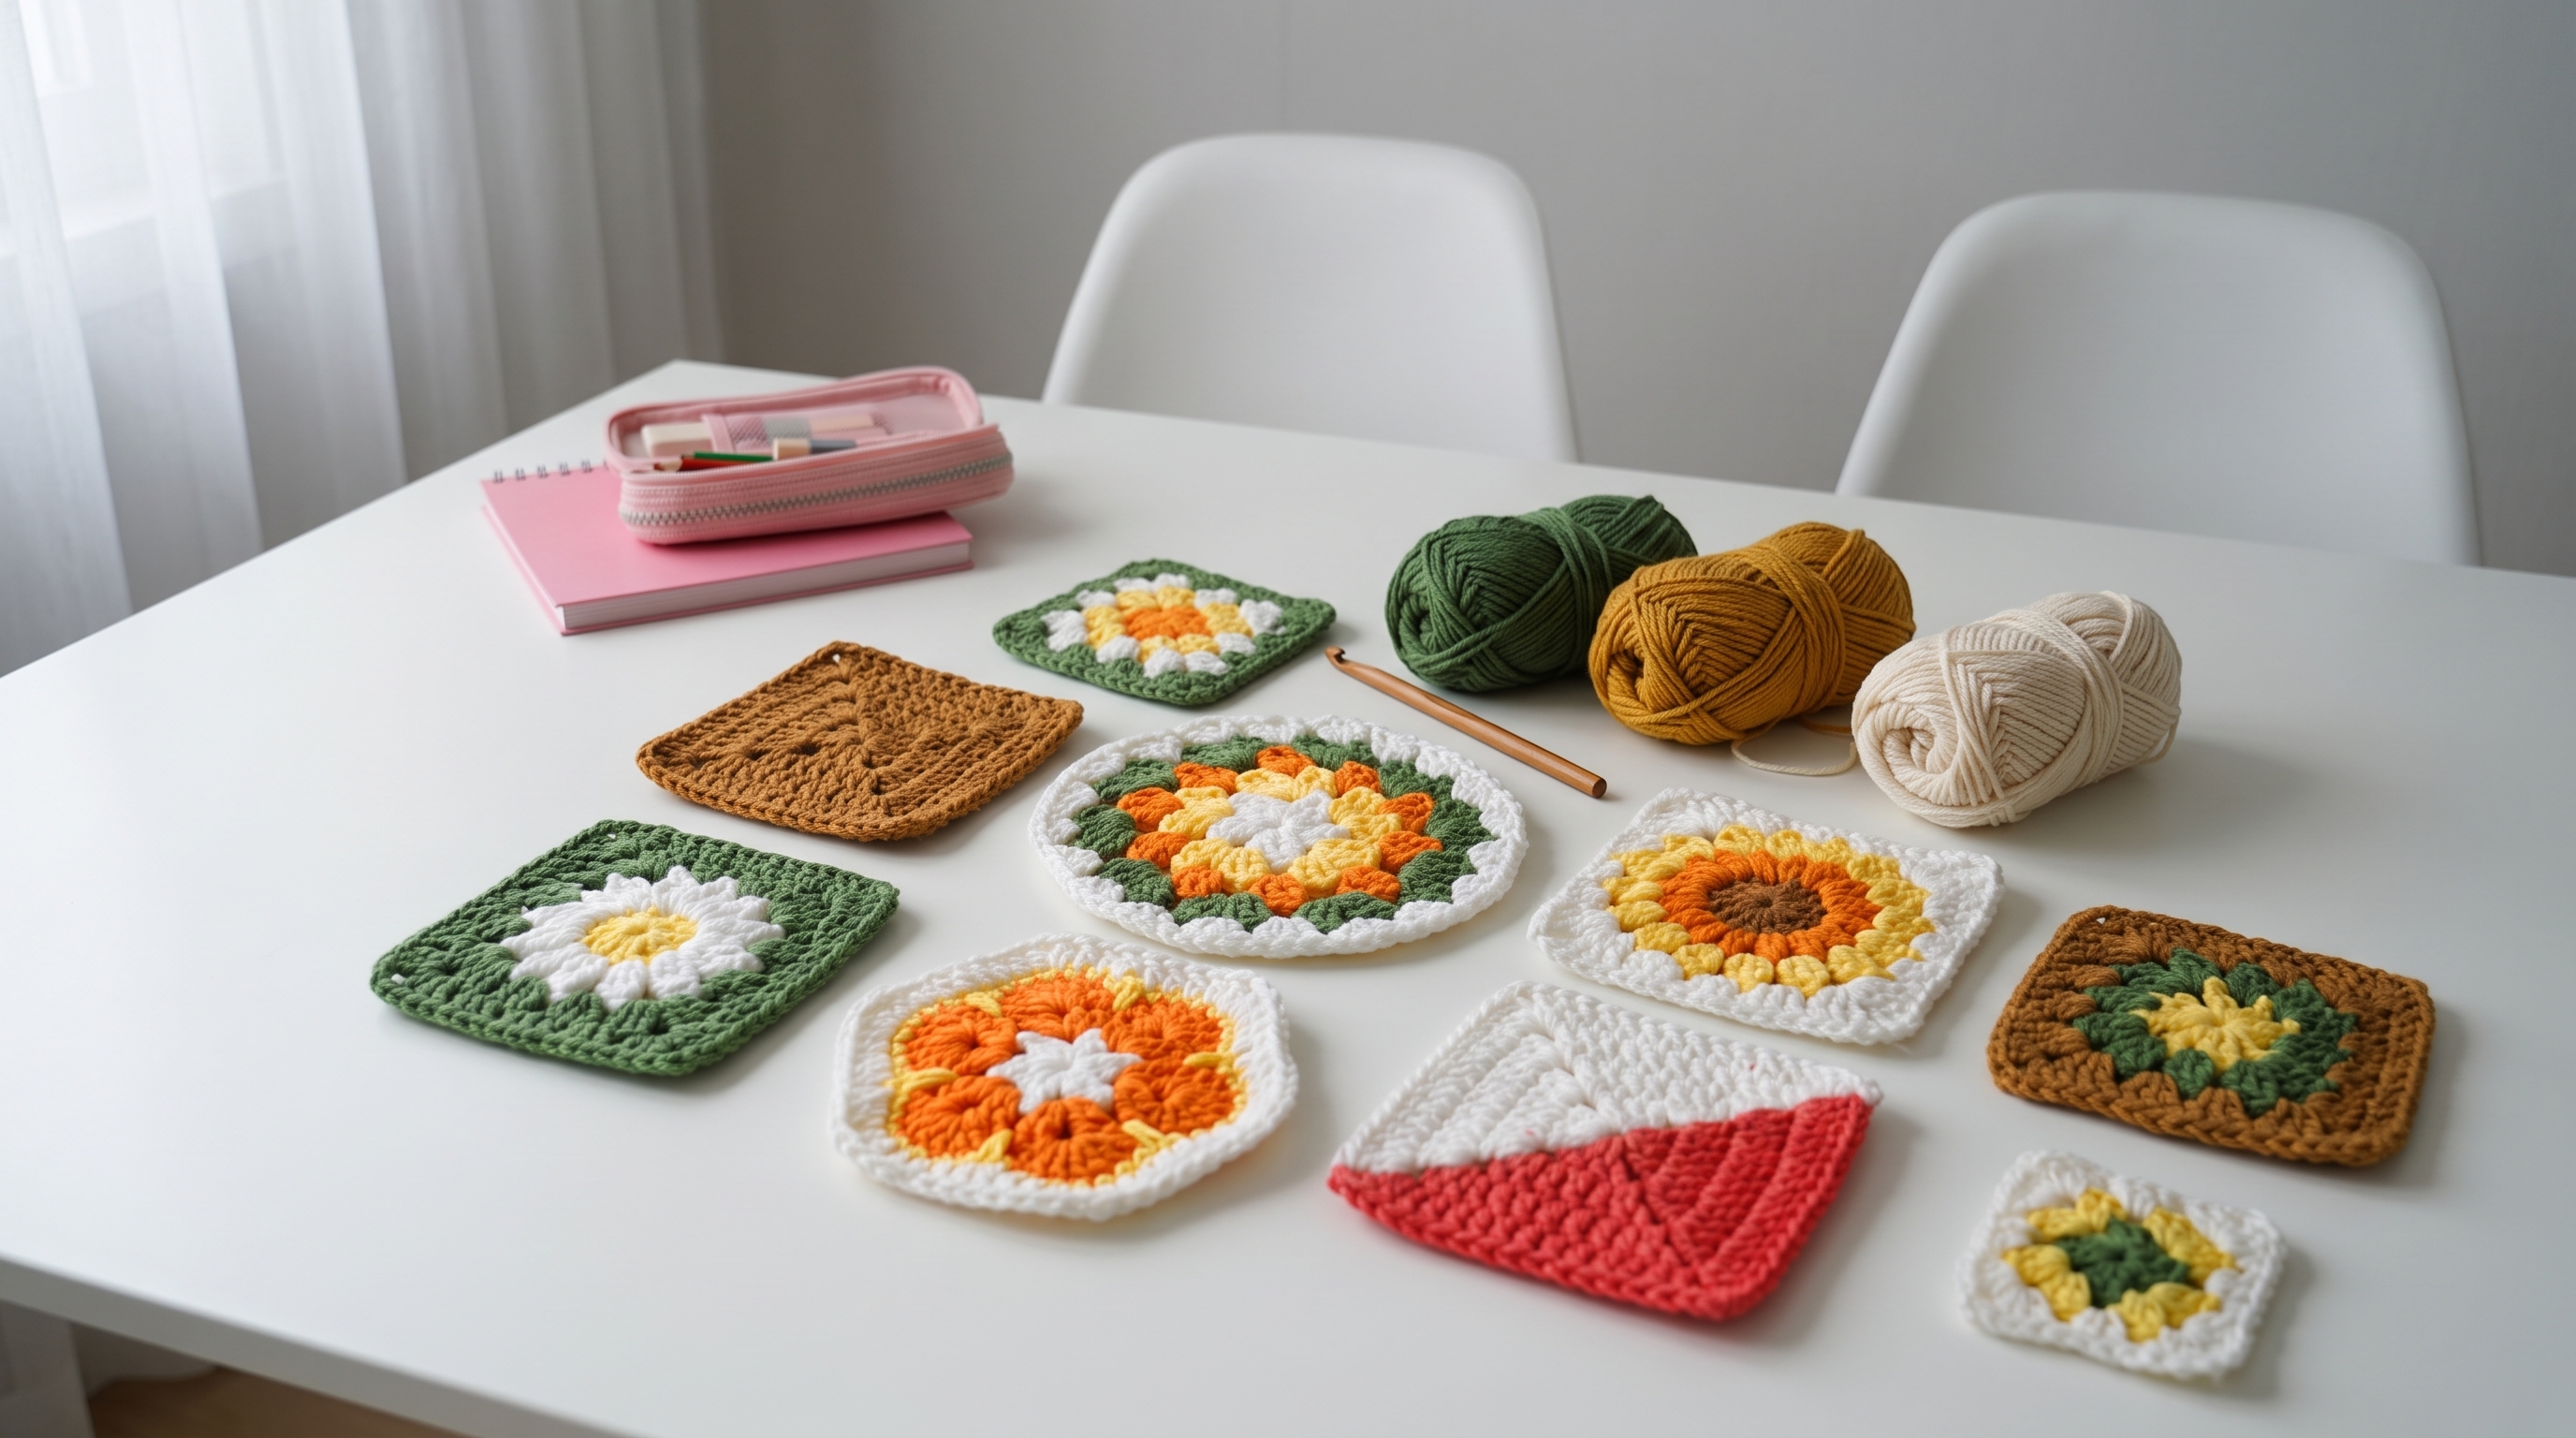
Pocket Garden Coasters
Difficulty: Easy (basic stitches, and the flowers all use the same simple recipe)
Finished Size: Full-size motifs are about 4.5 inches (11 cm) across. Mini squares are about 3 inches (7.5 cm).
Time to Complete: 30 to 45 minutes per motif, or about 5 hours for the whole set.
What You Will Need
Yarn (DK weight cotton):
- Cream or white (W), about 100 yards (91 m)
- Green (G), about 70 yards (64 m)
- Mustard or golden yellow (Y), about 60 yards (55 m)
- Orange (O), about 40 yards (37 m)
- Brown (N), about 40 yards (37 m)
- Cherry red or coral (R), about 30 yards (27 m)
- Tip: Use 100% cotton. Cotton is sturdy and washable, and it holds the shape of the petals. It also soaks up drips, which is useful for coasters.
Tools:
- 3.5 mm (E/4) crochet hook
- Yarn needle with a large eye for weaving in ends
- Stitch markers
- Sharp scissors
- Blocking mats and pins
The Basics (US Terms)
- MR = magic ring
- ch = chain
- sc = single crochet
- hdc = half double crochet
- dc = double crochet
- inc = increase (work 2 single crochets into the same stitch)
- sl st = slip stitch
- FLO / BLO = front loop only / back loop only
- sp = space
- st(s) = stitch(es)
- W, G, Y, O, N, R = cream, green, yellow, orange, brown, red
- corner = (2 dc, ch 2, 2 dc) worked in the same place, unless a pattern says otherwise
- Every round is joined with a sl st to the first stitch (or to the top of the beginning ch 3). Fasten off at the end of a round when you change colors.
Let Us Get Started
The pieces are grouped into four families. The flower squares and the round medallion share the same center. The hexagon and the corner-to-corner squares have their own recipes.
Part 1: The Flower Center (for the Squares and the Round Medallion)
All flower motifs begin the same way. Use the color table in Part 3 to choose your colors.
- Round 1 (center color): Work 12 sc into a magic ring. Join with a sl st to the first sc and fasten off. (12 stitches)
- Round 2 (petals): With the right side facing, join the petal color in the FLO of any stitch of Round 1. (Sl st, ch 2, 2 dc, ch 2, sl st) all in the same front loop. Repeat in the FLO of each stitch around. Join with a sl st and fasten off. (12 petals) Each petal sits on top like a tiny rounded flower petal.
- Round 3 (background): Flip the motif over, so you can see the free back loops of Round 1. Join the background color in the BLO of any stitch from Round 1. Ch 1, then work 2 sc in the BLO of every stitch around. Join with a sl st to the first sc. (24 stitches) Keep this side facing you for all the remaining rounds. The flower is on the other side, which is the right side of the finished motif.
Part 2: The Square Frame (for the Flower Squares)
Continue from Round 3, with the background color (or change colors for the frame, see the table).
- Round 4: Ch 3 (counts as a dc), dc in the same stitch, ch 2, 2 dc in the same stitch (first corner). Dc in each of the next 5 stitches, then work a corner in the next stitch. Repeat from * 2 more times. Dc in each of the last 5 stitches. Join with a sl st to the top of the beginning ch 3. (4 corners, 9 dc on each side) For a mini square, fasten off here. It measures about 3 inches (7.5 cm).
- Round 5: Sl st in the next dc and into the corner ch-2 space. Ch 3, dc in the same space, ch 2, 2 dc in the same space (first corner). Dc in each of the next 9 stitches, then work a corner in the next corner space. Repeat from * 2 more times. Dc in each of the last 9 stitches. Join with a sl st and fasten off. (4 corners, 13 dc on each side) This is the full size, about 4.5 inches (11 cm).
- Weave in all the ends.
Part 3: The Flower Square Color Recipes
Work Part 1, then Part 2, using these colors.
| Motif | Round 1 (center) | Round 2 (petals) | Round 3 (background) | Frame (Rounds 4 to 5) | Size | |---|---|---|---|---|---| | Daisy Square | Y | W | G | G | Full | | Mini Meadow | O | W | G | G | Mini | | Sunshine Pop | G | Y | W | W | Mini | | Honey Square | Y | G | N | N | Full | | Sunflower Square | N | O | Y | W | Full |
For the frame, change colors when you start Round 4. Join the new color in any stitch of Round 3, and ch 3 as usual.
Part 4: The Round Medallion
Worked in the same way as the flowers, then grown into a circle.
- Work Part 1 with these colors: Round 1 in W, Round 2 petals in Y, Round 3 background in O. (24 stitches)
- Round 4 (G): Join green in any stitch. Ch 1, then work (3 sc, inc) repeat 6 times. Join with a sl st. (30 stitches)
- Round 5 (G): Ch 1. (4 sc, inc) repeat 6 times. Join with a sl st and fasten off. (36 stitches)
- Round 6 (W): Join cream in any stitch. Ch 1, then (5 sc, inc) repeat 6 times. Join with a sl st. (42 stitches)
- Round 7 (W, scallops): Ch 1. Sc in the next stitch, skip 2 stitches, 5 dc in the next stitch, skip 2 stitches. Repeat from * 6 more times. Join with a sl st and fasten off. (7 scallops)
- Weave in all the ends. The medallion is about 4.5 inches (11 cm) across.
Part 5: The Hexagon
Worked with cream, orange, and yellow yarn. Each round is a granny round.
Granny rounds: In every round after Round 2, work a corner (3 dc, ch 2, 3 dc) in each corner ch-2 space, work 3 dc in each ch-1 space along the sides, and ch 1 between all the clusters.
- Round 1 (W): Work a magic ring. Ch 3 (counts as a dc), 2 dc in the ring, ch 2. 3 dc in the ring, ch 2. Repeat from * 4 more times. Join with a sl st to the top of the beginning ch 3 and fasten off. (6 clusters)
- Round 2 (O): Join orange in any ch-2 space. Ch 3, 2 dc, ch 2, 3 dc in the same space (first corner). Ch 1. Work a corner (3 dc, ch 2, 3 dc) in the next ch-2 space, ch 1. Repeat from * 4 more times. Join with a sl st and fasten off. (6 corners)
- Round 3 (O): Join orange in any corner space. Work a corner there. Ch 1, 3 dc in the next ch-1 space, ch 1, then work a corner in the next corner space. Repeat from * 4 more times. Finish with ch 1, 3 dc in the last ch-1 space, ch 1. Join with a sl st and fasten off.
- Round 4 (Y): Join yellow in any corner space. Work a corner there. Ch 1, 3 dc in the next ch-1 space, ch 1, 3 dc in the next ch-1 space, ch 1, then work a corner in the next corner space. Repeat from * 4 more times. Finish the last side the same way. Join with a sl st and fasten off.
- Round 5 (W, border): Join cream in any corner space. Ch 1, then work 3 sc in the corner space. Sc in each dc and 1 sc in each ch-1 space along each side, and work 3 sc in each corner space. Join with a sl st and fasten off.
- Weave in all the ends. The hexagon is about 4.5 inches (11 cm) across.
Part 6: The Corner-to-Corner Squares
Two simple squares. Both are worked diagonally, from one corner to the opposite corner, in blocks. Each block is 3 dc and a ch-3 space.
Mustard Mosaic Square (all in Y): Red and Cream Corner Square (rows 1 to 6 in W, rows 7 to 11 in R, so there are 6 increase rows and 5 decrease rows).
- Row 1: Ch 6. Dc in the 4th ch from the hook and in the next 2 chains. (1 block)
- Row 2 (increase): Ch 4, turn. Work 3 dc in the first ch-3 space (from the hook), then ch 3 and sl st into the next ch-3 space...
Use these clearer steps instead:
- Increase rows (Rows 2 to 6): Ch 6, turn. Dc in the 4th ch from the hook and the next 2 chains (a new block). Then sl st in the next ch-3 space of the previous row, ch 3, 3 dc in the same space. Repeat from * across, ending with a block in the last ch-3 space. Each increase row has 1 more block than the one before. (Row 6 has 6 blocks.)
- Decrease rows (Rows 7 to 11): Ch 1, turn. Sl st across the first 3 dc and into the first ch-3 space. Ch 3, 3 dc in the same space. Sl st in the next ch-3 space, ch 3, 3 dc in the same space. Repeat across, stopping at the last ch-3 space. Do not work the final block of the previous row. Each decrease row has 1 block fewer than the one before. (Row 11 has 1 block.)
- Color change (red and cream square): Change from cream to red at the start of Row 7. Fasten off the cream, and join the red in the first ch-3 space.
- Finishing: Fasten off after Row 11. Weave in all the ends.
- Optional edging: Join any color in a corner. Ch 1, then work 1 sc in each stitch and 3 sc in each ch-3 space, with 3 sc in each corner. Join with a sl st and fasten off.
- Each square is about 4.5 inches (11 cm). For a larger square, work more increase and decrease rows, in matching numbers.
Assembly and Finishing
Blocking:
- Pin each motif flat on blocking mats, and gently steam or spray it with water. Let it dry fully.
- Blocking makes the petals lie flat and the edges crisp, so all the motifs sit nicely on the table.
Using as Coasters:
- Weave in any loose ends on the wrong side.
- For a sturdier coaster, make two of the same motif, and place them with wrong sides together. Join them with a round of sc through both layers all around.
- For a mug rug, join 2 or 3 motifs side by side with a whip stitch through the back loops.
Joining into a Blanket or Pillow:
- Lay out your motifs, and arrange them so the colors balance.
- Join them with a whip stitch through the back loops, from corner to corner. The squares join neatly. For round and hexagon motifs, join them to squares with a sl st seam, or fill the gaps with plain granny squares.
- Add a border of sc in cream around the edge.
A Few Friendly Tips
- Keep it snug: Keep your tension even, especially in the petals. Tight stitches make petals that stand up neatly.
- Seeing the back loops: If you cannot see the back loops of Round 1, hold the motif up to a window. They are easy to find once you know where to look.
- Weave as you go: Weave in the ends after each motif. With so many colors, ends build up fast.
- Different sizes: For a larger flower square, add more rounds in the same way (13 dc on each side adds 4 more stitches per side each round). For a smaller one, stop after Round 4.
- Matching set: Pick 4 colors and mix them across all the motifs, so they look like they belong together. Use the same frame color on every motif for a clean look.
- Make it your own: Try pastels for spring, jewel tones for winter, or a single color with a white frame.
- Care: Machine wash gently on a cool setting, and lay flat to dry. Wash coasters often, since they get stained.
I hope you enjoy making this little garden of motifs. They are quick, satisfying projects, and they make wonderful handmade gifts.
If you run into any trouble or just want to share how your motifs turned out, please reach out. I love seeing what you create.
Happy crocheting!