September 24, 2026
Crochet Flower Bookmark Pattern
There is something so special about curling up with a good book and a warm cup of tea. These little crochet flower bookmarks are the perfect way to add a handmade, cozy touch to your reading routine. They are also the ultimate scrap-busting project. You can use up all those tiny bits of yarn left over from bigger projects and turn them into a beautiful garden of bookmarks. Let us get started and make something lovely together.
Jump to pattern instructions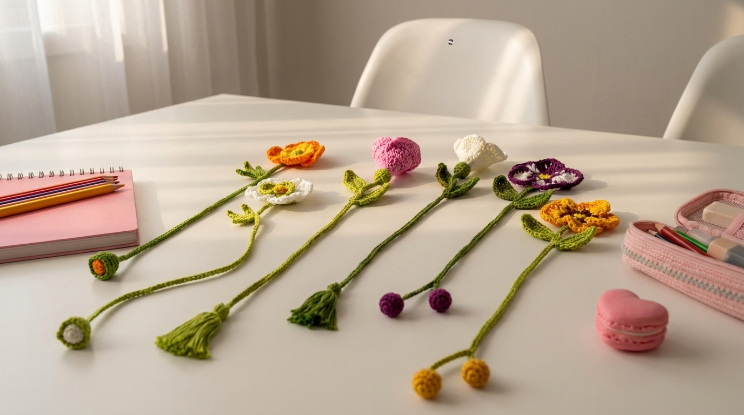
Difficulty: Beginner friendly (a great way to practice your tension and learn basic stitches)
Finished Size: The stem is about 8 to 10 inches long, with a flower head about 1.5 inches wide.
Time to Complete: About 30 to 45 minutes per bookmark.
What You Will Need
Yarn:
- This is the perfect project for your scrap yarn bin. You will need small amounts of various colors for the flower heads (white, yellow, purple, orange, pink).
- Green yarn for the stems and leaves (worsted weight or DK weight works best).
- Tip: Try to use the same weight of yarn for all the flowers so they have a uniform look, but mixing textures can be fun too.
Tools:
- 3.5 mm (E/4) or 4.0 mm (G/6) crochet hook (using a slightly smaller hook than your yarn calls for will make the stem sturdier).
- Yarn needle for weaving in ends and sewing.
- Sharp scissors.
- Stitch marker.
The Basics (US Terms)
- ch = chain
- sc = single crochet
- hdc = half double crochet
- dc = double crochet
- sl st = slip stitch
- MR = magic ring
Let Us Get Started
We will build these bookmarks in three simple steps: the long stem, the little leaf, and the flower head.
Part 1: The Stem and Tassel End
The stem needs to be long and relatively sturdy so it can hold its place in your book.
The Stem:
- Chain 45 (this will give you a nice long stem, but feel free to chain more or less depending on how tall your books are).
- Starting in the second chain from your hook, work a slip stitch in every chain all the way back down to the beginning.
- When you reach the top, do not cut your yarn yet.
The Tassel End (The part that hangs out of the book):
- At the bottom end of your stem, chain 6.
- Work 4 single crochets back down the chain.
- Chain 3, and cut the yarn, leaving a 4-inch tail.
- Take your scissors and cut through the bottom loops of those last few chains to create a little fringe or tassel. This little tassel adds a bit of weight to the bottom and keeps the bookmark from slipping out of your book.
Part 2: The Leaf
Now let us add a little greenery to the stem. You can place the leaf anywhere along the stem, but about halfway up or two-thirds of the way up looks really natural.
- Find a stitch on the side of your stem where you want the leaf to grow. Insert your hook and pull up a loop.
- Chain 4.
- In the second chain from the hook, work a single crochet.
- In the next chain, work a half double crochet.
- In the last chain, work a double crochet, chain 1, and work another double crochet in the same chain (this creates the pointy tip of the leaf).
- Work a half double crochet in the next chain, and a single crochet in the last chain.
- Slip stitch back into the stem to secure the leaf.
- Cut your yarn and weave in the end tightly so the leaf does not flop around.
Part 3: The Flower Heads
Here is where you can get creative. I have included three different flower styles you can make. Make sure to leave a long tail (about 6 inches) when you fasten off, so you can sew the flower to the top of the stem later.
Option 1: The Classic Daisy Use white for the petals and yellow for the center.
- Center: With yellow yarn, make a magic ring. Chain 1, work 6 single crochets into the ring. Pull tight to close. Do not join. (6 stitches)
- Petals: Switch to white yarn. In the first stitch, work (single crochet, half double crochet, double crochet, half double crochet, single crochet). Slip stitch in the next stitch. Repeat this pattern all the way around the yellow center.
- Fasten off, leaving a long tail.
Option 2: The Pansy Use purple for the petals and yellow for the center.
- Make a magic ring. Chain 1.
- Work (chain 3, 2 double crochets, chain 3, slip stitch) all into the magic ring. This is your first petal.
- Repeat this 4 more times so you have 5 petals total.
- Pull the magic ring tight to close the center.
- With yellow yarn, sew a few small stitches or a tiny French knot in the very center of the flower.
- Fasten off, leaving a long tail.
Option 3: The Simple Bud Use any solid color like pink, orange, or deep red.
- Make a magic ring. Chain 1, work 6 single crochets into the ring. Pull tight. (6 stitches)
- Work 2 single crochets in every stitch around. (12 stitches)
- Work 1 single crochet in every stitch around. (12 stitches)
- Fasten off, leaving a long tail. This creates a cute, tight little flower bud.
Assembly
This is the final step where everything comes together.
- Take your long tail from the flower head and thread it onto your yarn needle.
- Position the flower at the very top of your green stem.
- Sew the flower securely to the top of the stem. Go through the base of the flower and the top of the stem a few times to make sure it is sturdy.
- Weave in all your remaining ends. Hide them inside the flower head or along the stem so they do not show.
A Few Friendly Tips
- Stiffening the stem: If you find your stem is a bit too floppy and you want it to stand up straighter, you can run a thin piece of floral wire or a pipe cleaner along the inside of the stem as you work your slip stitches. Alternatively, you can paint a little bit of diluted white glue along the finished stem and let it dry flat.
- Mix and match: Do not feel like you have to stick to just one flower type. Make a whole bouquet with daisies, pansies, and buds. It looks beautiful when they are all together.
- Gifting: These make incredibly thoughtful, handmade gifts for teachers, friends, or anyone who loves to read. Tie a few together with a nice ribbon for a lovely present.
I really hope you enjoy making these. They are such a quick, satisfying project, and it is so rewarding to use them in your favorite books.
If you run into any trouble or just want to share how your little garden turned out, please reach out. I love seeing what you create.
Happy crocheting and happy reading.