September 19, 2026
"Happy Birthday" Floral Pot – A Crocheted Bouquet Pattern
Celebrate a special day with this everlasting bouquet! This charming project features a textured, ribbed beige pot filled with a mix of vibrant blue lilies, delicate white and light blue blossoms, and fresh green buds. It’s a perfect intermediate project that combines amigurumi techniques with floral assembly to create a stunning, long-lasting gift.
Jump to pattern instructions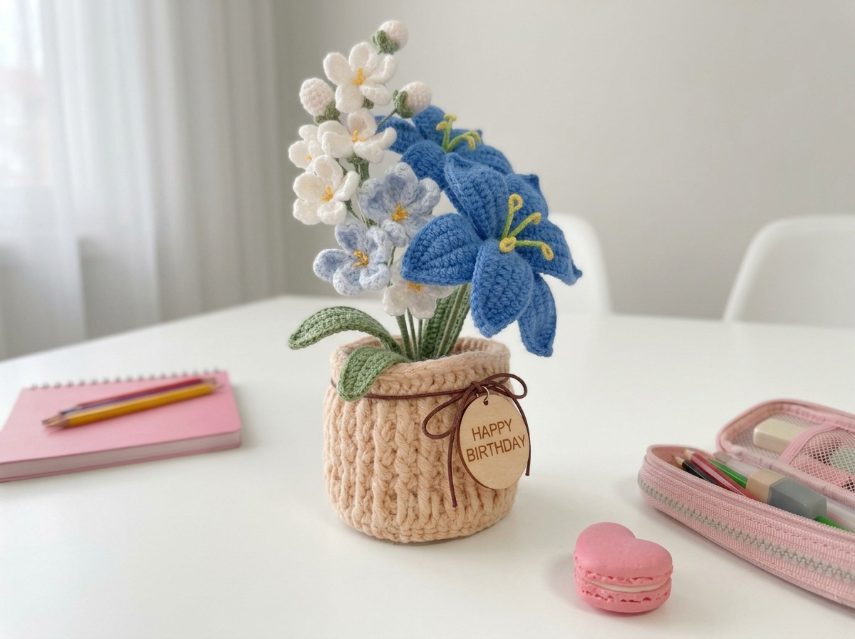
"Happy Birthday" Floral Pot – Complete Step-by-Step Pattern
1. Gathering Your Supplies
To make the flowers stand up straight and the pot hold its shape, you will need floral wire and a sturdy yarn.
- Yarn: Worsted weight cotton yarn (e.g., YarnArt Jeans, Catania).
- Beige/Cream: For the pot (approx. 50g).
- Blue (Royal/Denim): For the large lilies (approx. 30g).
- Light Blue/White: For the smaller filler flowers (approx. 20g each).
- Green: For stems and leaves (approx. 30g).
- Yellow: For the flower centers/stamens (tiny amount).
- Hooks:
- 3.0 mm or 3.5 mm for the pot and flowers.
- 2.5 mm for fine details.
- Notions:
- Floral Wire: 22 gauge (essential for stems).
- Floral Tape: Green tape to wrap wires.
- Poly-fil stuffing: To fill the pot.
- Tag: A small wooden or cardboard circle and brown string (or crochet a small beige circle).
- Tapestry needle, scissors.
What you'll master: Wiring amigurumi flowers, creating a ribbed texture, and arranging a bouquet.
2. Abbreviations & Special Techniques
- MR: Magic ring
- ch: Chain
- sc: Single crochet
- hdc: Half double crochet
- dc: Double crochet
- sl st: Slip stitch
- FPdc: Front Post Double Crochet (creates the ribbed texture).
- BPdc: Back Post Double Crochet.
3. The Ribbed Pot (Beige)
We will create a sturdy pot with a vertical ribbed texture.
- Base:
- R1: 6 sc in MR (6)
- R2: 6 inc (12)
- R3: (1 sc, inc) x 6 (18)
- R4: (2 sc, inc) x 6 (24)
- R5: (3 sc, inc) x 6 (30)
- R6: (4 sc, inc) x 6 (36)
- Sides (The Ribbing):
- R7: Ch 3 (counts as first dc). FPdc in next st, BPdc in next st. Repeat around. Join to top of ch-3. (36 sts)
- R8-14: Repeat R7. Note: To keep the ribs vertical, you must FPdc into the FPdc of the previous row and BPdc into the BPdc of the previous row.
- The Rim:
- R15: Ch 1. Sc in each st around.
- R16: Sc in each st around.
- Finishing: Fasten off.
What you'll master: Creating a textured fabric using post stitches.
4. The Large Blue Lilies (Make 3-4)
These are the statement flowers of the bouquet.
- Petals (Blue, Make 6 per flower):
- Ch 4. Sc in 2nd ch from hook, hdc in next, dc in next, 3 dc in last ch (tip). Working down opposite side: dc, hdc, sc. Sl st to join. Fasten off.
- Center (Yellow):
- MR 4 sc. Fasten off.
- Stamens:
- Cut 3 pieces of yellow yarn (10cm long). Fold in half.
- Assembly:
- Arrange the 6 blue petals around the yellow center.
- Thread the yellow stamen yarn through the center so it sticks out.
- Sew petals together at the base.
What you'll master: Creating large, shaped petals.
5. The Small Flowers (White & Light Blue, Make 5-6)
These add volume and contrast.
- Instructions:
- MR 5 sc.
- Petal: Ch 3, dc, ch 3, sl st in same st.
- Repeat petal sequence 5 times around the ring.
- Fasten off.
- Center: Add a tiny yellow French knot or bead in the center.
What you'll master: Quick, repetitive floral motifs.
6. The Buds & Leaves (Green & White)
White Buds (Make 5-7):
- MR 6 sc. R2: (sc, inc) x 3 (9). R3: sc around.
- Finishing: Stuff lightly and close. Leave a long tail of yarn (this acts as the stem base).
Leaves (Green, Make 4-5):
- Ch 10. Sc in 2nd ch, hdc in next 2, dc in next 4, hdc in next 2, sc in last.
- Working down opposite side: sc, hdc, dc (4 times), hdc, sc. Sl st to join.
- Finishing: Fasten off.
What you'll master: Creating organic shapes.
7. Wiring and Assembly (The Magic Step!)
This is how you make the bouquet stand up!
- Prepare Stems: Cut floral wire into lengths of 20-30 cm.
- Attach Flowers:
- For the Lilies: Pierce the wire through the base of the flower. Wrap the base tightly with green floral tape or green yarn to secure it to the wire.
- For the Small Flowers: Same process.
- For the Buds: The long yarn tail from the bud can be wrapped around the wire, or pierce the wire through.
- Add Leaves: Wrap a leaf around the wire stem using floral tape about halfway down.
- Arrange: Group the flowers together. Put the tall blue lilies in the center/back, and the smaller white flowers and buds around the edges.
- Potting:
- Fill the beige pot with poly-fil stuffing (or crumpled paper) to make it solid.
- Insert the bundled stems into the center of the pot. Push them down deep so they are secure.
- Optional: Add a little bit of stuffing around the stems inside the pot to hold them in place.
8. The Finishing Touches
- The Tag: Take your small wooden or cardboard circle. Write "Happy Birthday" on it with a marker.
- The Bow: Tie the brown string around the neck of the pot (just below the rim). Attach the tag to the string.
- Final Fluff: Adjust the petals and leaves so the bouquet looks full and natural.
What you'll master: Final styling and gift presentation.
Final Section: Where to Go from Here
Congratulations! You’ve just crafted a beautiful, everlasting floral arrangement. This project is incredibly rewarding and makes a perfect gift that never wilts.
From here, try experimenting with different flower types! You could add red roses for Valentine's Day, or pastel tulips for Easter. You could even change the pot color to match a specific room decor. Happy crocheting!