October 1, 2026
Rainbow Bones Cardigan
Who says skeletons have to be spooky? This cozy purple cardigan has a pastel rainbow ribcage across the chest, little hip bones near the hem, and long arm bones running down each sleeve, like the sweetest X-ray ever. It is worked in simple single crochet, so the shaping stays easy and all the fun is in the color work. Perfect for Halloween, or for any day you want your bones to be a little brighter. Pour something warm, pick your favorite pastels, and let us stitch a rainbow skeleton together.
Jump to pattern instructions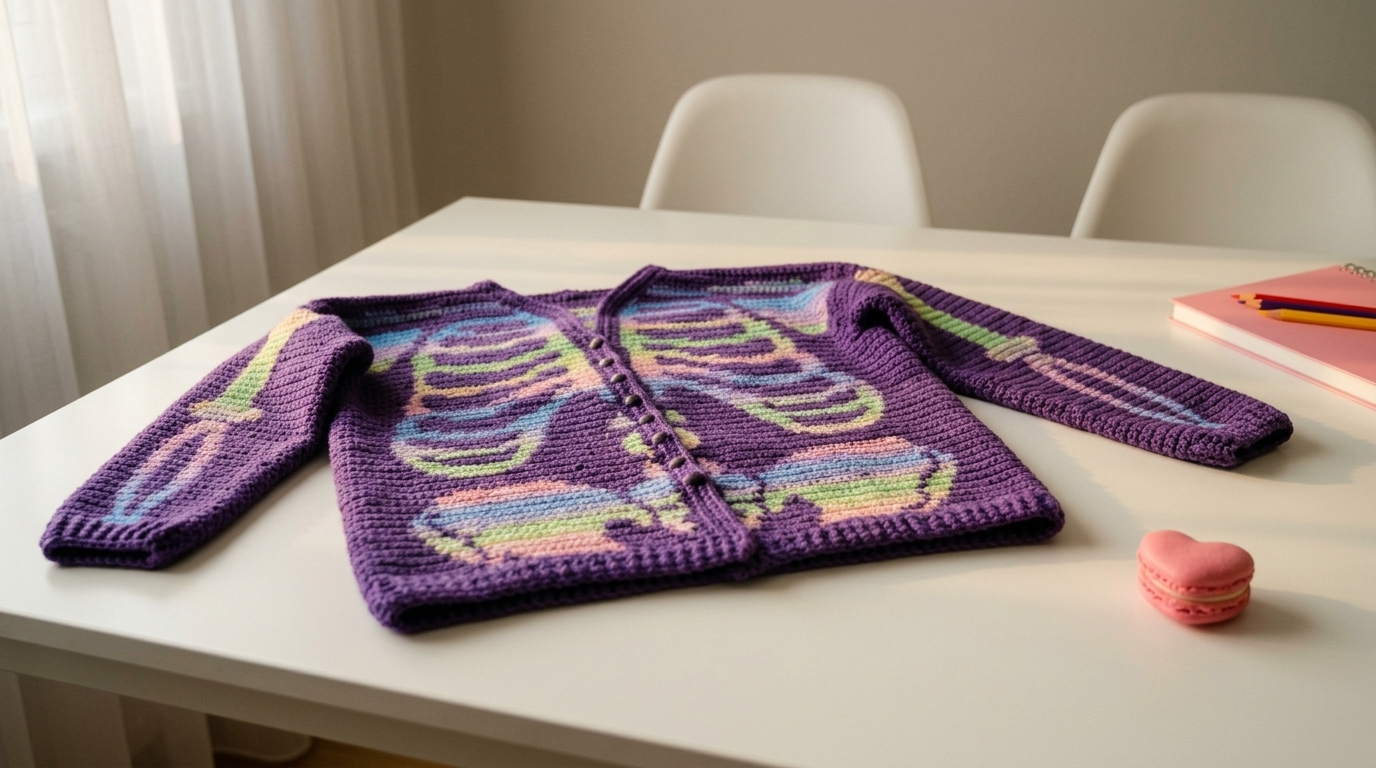
Rainbow Bones Cardigan
Difficulty: Intermediate (a great step up for practicing color changes and finishing a garment)
Finished Size: Adult medium. About 40 inches (101 cm) around the chest, 22 inches (56 cm) long, with a 19 inch (48 cm) sleeve. Easy to adjust, see the tips at the end.
Time to Complete: 40 to 50 hours, in easy, relaxing sessions.
What You Will Need
Yarn:
- Deep purple (for the whole cardigan), about 1,400 yards (1,280 m). Buy an extra skein to be safe.
- Pastel pink (P), about 40 yards (37 m)
- Pastel yellow (Y), about 40 yards (37 m)
- Pastel mint green (G), about 40 yards (37 m)
- Pastel blue (B), about 40 yards (37 m)
- Tip: Use a DK weight cotton or cotton blend yarn. Cotton gives crisp stitches that keep the color work sharp, and it makes a sturdy, long-lasting cardigan. Using a smaller hook than usual keeps the fabric dense and neat.
Tools:
- 3.5 mm (E/4) crochet hook
- 7 round buttons, about 3/4 inch (18 mm), in purple or a matching dark color
- Yarn needle with a large eye for sewing and weaving in ends
- Stitch markers
- Sharp scissors
- Small bobbins or clothespins for the color work (optional but helpful)
- Straight pins and a measuring tape
- Sewing needle and thread for the buttons
- Blocking mats and pins
Gauge: 20 stitches and 22 rows in single crochet = 4 x 4 inches (10 x 10 cm). Please make a swatch, since the gauge decides how the cardigan fits.
The Basics (US Terms)
- ch = chain
- sc = single crochet
- inc = increase (work 2 single crochets into the same stitch)
- sc2tog = decrease (work 2 single crochets together)
- sl st = slip stitch
- BLO = back loop only
- RS / WS = right side / wrong side
- CF = center front, which is the front opening edge of each front panel
- st(s) = stitch(es)
- P, Y, G, B = pink, yellow, green, blue
- All pieces are worked flat in rows. Row 1 of every piece is the right side. Unless stated otherwise, ch 1 at the start of each row does not count as a stitch.
Color Work Basics
The skeleton is worked with the intarsia method, which means each color block has its own piece of yarn, and nothing is carried across the back.
- Cut a separate length of pastel yarn for each block, and wind it on a bobbin if you like.
- To change colors, work the last stitch before the new color until 2 loops remain on the hook. Then pull the new color through to finish the stitch.
- When you switch colors on the next row, twist the old and new yarns around each other once on the wrong side. This keeps the blocks connected and prevents holes.
- Leave the purple yarn attached for the whole row, and drop it at the edge of each pastel block.
- Weave in the ends on the wrong side as you go, so you are not left with dozens of tails at the end.
Let Us Get Started
We will make five flat pieces, the back, two fronts, and two sleeves, then sew them together and add the front band.
Part 1: The Back
Worked with purple yarn.
- Foundation: Ch 101.
- Row 1 (RS): Sc in the 2nd ch from the hook and in each chain across. (100 stitches)
- Rows 2 to 8: Ch 1, turn. Sc in the BLO of every stitch across. (100 stitches) This creates the ribbed hem with its little ridges.
- Rows 9 to 120: Ch 1, turn. Sc in both loops of every stitch across. (100 stitches)
- Fasten off and weave in the ends. The back is plain purple. For an extra surprise, see the spine option in the tips.
Part 2: The Fronts (Make 2)
Worked with purple, plus pastel yarns for the skeleton.
Make two fronts. They are mirror images, so the color work and the neckline decreases switch sides. Read the notes for each front before you start.
Counting stitches for the skeleton: All stitch positions in the tables count from the center front (CF) edge.
- Right Front (as worn): On RS rows, the CF edge is where you start the row. Count from the beginning of RS rows and from the end of WS rows.
- Left Front (as worn): On RS rows, the CF edge is where you end the row. Count from the end of RS rows and from the beginning of WS rows.
Base pattern (both fronts):
- Foundation: Ch 51.
- Row 1 (RS): Sc in the 2nd ch from the hook and in each chain across. (50 stitches)
- Rows 2 to 8: Ch 1, turn. Sc in the BLO of every stitch across. (50 stitches)
- Rows 9 to 88: Ch 1, turn. Sc in both loops of every stitch across, adding the skeleton color work below. (50 stitches)
The Hip Bones (rows 20 to 27)
These stack into a rainbow bowl shape near the hem. Work each row in purple except for the stitches listed.
| Rows | Color | Stitches (from CF) | |---|---|---| | 20 to 21 | Blue | 8 to 20 | | 22 to 23 | Green | 6 to 22 | | 24 to 25 | Yellow | 4 to 24 | | 26 to 27 | Pink | 3 to 25 |
The Ribs (rows 50 to 81)
Each rib is made of 3 short color blocks, each 5 stitches wide and 2 rows tall. Each block sits 1 row lower than the one before it, so the rib curves gently downward and away from the center, just like in the photo. Work the rest of each row in purple.
| Rib | Color | Block A (sts 3 to 7) | Block B (sts 8 to 12) | Block C (sts 13 to 17) | |---|---|---|---|---| | 1 (top) | Pink | Rows 80 to 81 | Rows 79 to 80 | Rows 78 to 79 | | 2 | Yellow | Rows 70 to 71 | Rows 69 to 70 | Rows 68 to 69 | | 3 | Green | Rows 60 to 61 | Rows 59 to 60 | Rows 58 to 59 | | 4 (bottom) | Blue | Rows 50 to 51 | Rows 49 to 50 | Rows 48 to 49 |
Tip: Tick off each rib on a printed copy as you go, so you never lose your place.
The V-Neck and Shoulder (rows 89 to 120)
Keep working in purple only, and shape the neckline by decreasing at the CF edge on RS rows.
- Right Front: On rows 89, 91, 93, and every RS row up to row 117 (15 rows in total): Ch 1, turn, sc2tog, then sc across.
- Left Front: On the same rows: Ch 1, turn, sc across to the last 2 stitches, then sc2tog.
- On all the WS rows between, sc across with no shaping.
- Rows 118 to 120: Work 1 sc in every stitch across with no more decreases. (35 stitches)
- Fasten off and weave in the ends.
Part 3: The Sleeves (Make 2)
Worked with purple, plus pastel yarns for the arm bones. Start at the cuff.
- Foundation: Ch 35.
- Row 1 (RS): Sc in the 2nd ch from the hook and in each chain across. (34 stitches)
- Rows 2 to 8: Ch 1, turn. Sc in the BLO of every stitch across. (34 stitches) This makes the ribbed cuff.
- Rows 9 to 106: Ch 1, turn. Sc across, working an inc row on row 12 and every 6th row after (rows 12, 18, 24, up to row 102, 16 inc rows in total). Inc row: Ch 1, 2 sc in the first stitch, sc across to the last stitch, 2 sc in the last stitch. (adds 2 stitches)
- After the last inc row, you will have 66 stitches. Work rows 103 to 106 even. (66 stitches)
- Fasten off, leaving a long tail for seaming.
The Arm Bones
While you work the sleeve, add a long bone down the center. Stitches are counted outward from the center line of the sleeve. On the first row of the sleeve, the center line sits between stitch 17 and stitch 18, and it stays in the middle as you increase evenly on both sides. Work the rest of each row in purple.
Forearm bone
| Rows | Color | Width | |---|---|---| | 14 to 15 | Blue | 8 stitches, centered (the wrist knob) | | 16 to 24 | Blue | 4 stitches, centered | | 25 to 34 | Pink | 4 stitches, centered | | 35 to 43 | Yellow | 4 stitches, centered | | 44 to 48 | Green | 4 stitches, centered | | 49 to 50 | Green | 8 stitches, centered (the elbow knob) |
Rows 51 to 56 are all purple, which makes the elbow gap.
Upper arm bone
| Rows | Color | Width | |---|---|---| | 57 to 58 | Green | 8 stitches, centered (the elbow knob) | | 59 to 68 | Green | 4 stitches, centered | | 69 to 78 | Yellow | 4 stitches, centered | | 79 to 88 | Pink | 4 stitches, centered | | 89 to 98 | Blue | 4 stitches, centered | | 99 to 100 | Blue | 8 stitches, centered (the shoulder knob) |
Rows 101 to 106 are all purple.
Assembly and Finishing
This is where your skeleton comes together. Take your time pinning before you sew.
Blocking:
- Gently wet block all five pieces to the measurements listed above. Pin them flat and let them dry fully.
- Blocking evens out the color work and makes seaming so much easier.
Joining the Shoulders:
- Place the back and one front with right sides together. Match the top 35 stitches of the front to the outer 35 stitches of the back.
- Join with a slip stitch seam or a whip stitch, using purple yarn. Repeat for the other shoulder.
- The remaining 30 stitches in the middle of the back make the back neck opening.
Attaching the Sleeves:
- Find the center of the top edge of each sleeve (the 66 stitch edge). Match it to the shoulder seam.
- Pin the sleeve along the armhole edge, working outward from the shoulder seam, so the stitches are spread evenly across the front and back. The skeleton bone should run straight down the center of the arm.
- Sew the sleeve in with a whip stitch or slip stitch seam.
Closing the Sides:
- Fold the cardigan with the right sides together. Sew the underarm of each sleeve and the side of the body in one continuous seam, from the cuff to the underarm, then down to the hem.
- Match the rows of the ribbed cuff and hem carefully, so the ridges line up.
Adding the Front Band:
- With the right side facing, join purple at the bottom right corner of the Right Front (as worn).
- Row 1: Ch 1. Sc evenly up the right front edge, around the back neck, and down the left front edge. Work about 3 sc for every 4 rows along the sides, and 1 sc per stitch across the back neck. Work 3 sc in each corner. Turn. Make a note of the total, because you will place the buttonholes with it.
- Row 2: Ch 1, turn. Sc in the BLO of every stitch across, with 3 sc in each corner stitch.
- Row 3 (buttonholes): Ch 1, turn. Work sc in the BLO of every stitch to the start of the right front band. Place 7 buttonholes along the Left Front band (as worn), about 15 stitches apart, with the first about 1 inch (2.5 cm) above the hem. For each buttonhole, ch 2, skip 2 stitches, then keep going. Work in the BLO of every stitch elsewhere.
- Row 4: Ch 1, turn. Sc in the BLO of every stitch across, working 2 sc in each ch-2 space.
- Row 5: Ch 1, turn. Sc in the BLO of every stitch across. Fasten off and weave in the ends.
Adding the Buttons:
- Try on the cardigan or lay it flat, then pin the buttons opposite the buttonholes, on the Right Front band.
- Sew each button on firmly with a needle and thread.
- Weave in any remaining ends, and give the whole cardigan one last gentle steam.
A Few Friendly Tips
- Swatch first: A garment is more fun when it fits. Make a 5 x 5 inch swatch and check your gauge. If you have too many stitches per inch, go up a hook size. If you have too few, go down.
- Count as you go: Dark purple yarn is hard to see. Work in good light, count stitches at the end of each row, and use stitch markers at the color work edges.
- Adjusting the fit: Every 5 stitches adds about 1 inch to the width. For a bigger or smaller cardigan, add or remove 10 stitches on the back and 5 on each front, and keep the shaping the same. For longer or shorter, add or remove rows before the neckline decreases, and shift the skeleton rows to match.
- Spine option: For a fun surprise, embroider or work a pastel spine down the center of the back. Use 6 stitches wide in a rainbow of colors, with small horizontal bars every 10 rows, like a row of tiny vertebrae.
- Make it your own: Try a black cardigan with neon bones for a glow-in-the-dark look, or a cream cardigan with a pastel skeleton for a soft, sleepy feel.
- Care: Machine wash gently on a cool setting and lay flat to dry. Wash the cardigan inside out the first few times, so the pastels stay bright and do not bleed.
I hope you enjoy making this colorful little skeleton. It takes patience, but every rib you add makes it more fun, and it makes a wonderful handmade gift or a statement piece for your own wardrobe.
If you run into any trouble or just want to share how your cardigan turned out, please reach out. I love seeing what you create.
Happy crocheting and happy Halloween!