September 18, 2026
Sunny Starfish Baby Poncho – A Whimsical Crochet Pattern
Keep your little one warm and cozy in this adorable Starfish Poncho! Shaped like a cheerful five-pointed star in a soft, sunny yellow, this unique blanket features a built-in hood (the top point!) and cute wooden buttons. It’s a perfect intermediate project for creating a one-of-a-kind baby shower gift or photo prop.
Jump to pattern instructions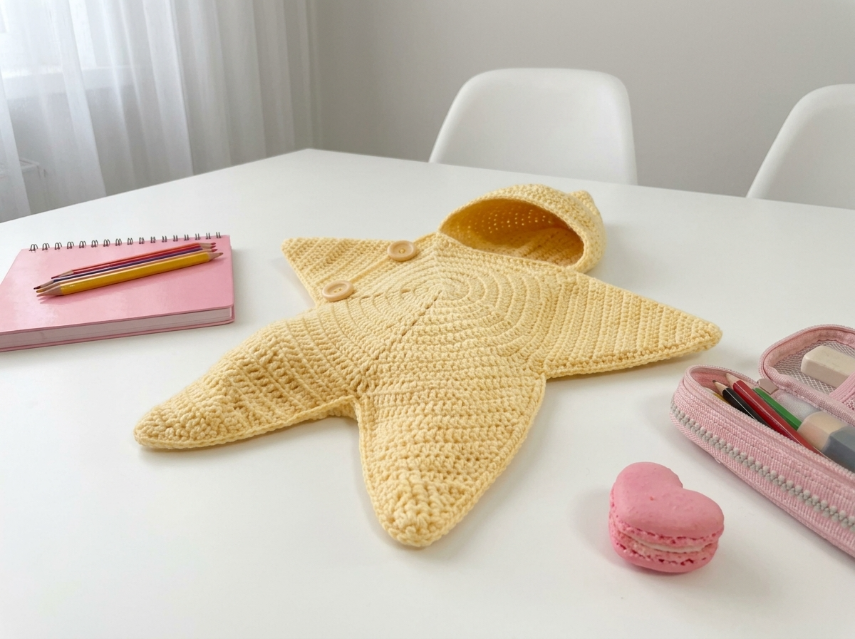
Sunny Starfish Baby Poncho – Complete Step-by-Step Pattern
1. Gathering Your Supplies
To get that soft, dense texture seen in the photo, a soft acrylic or cotton blend yarn is best. The texture looks like Half Double Crochet (hdc).
- Yarn: Worsted weight (Size 4) yarn in a soft Yellow (approx. 300–400g).
- Hook: 5.0 mm (US H/8) or 5.5 mm (US I/9).
- Notions:
- 2 Wooden buttons (approx. 15-20 mm).
- Tapestry needle.
- Scissors.
- Stitch markers.
- Finished Size: Fits approx. 6–12 months (adjust by adding more rows to the center).
What you'll master: Creating a geometric shape from a circle, working modular extensions, and constructing a hooded garment.
2. Abbreviations & Special Techniques
- MR: Magic ring
- ch: Chain
- sc: Single crochet
- hdc: Half double crochet
- inc: Increase (2 hdc in one stitch)
- dec: Decrease (hdc 2 together)
- sl st: Slip stitch
- st(s): Stitch(es)
Texture Tip: To get the ridged look in the photo, try working your hdc stitches into the Back Loop Only (BLO) or the Third Loop (the horizontal bar behind the V). For this pattern, we will use standard hdc for simplicity, but BLO adds great texture!
3. The Body (The Center Circle)
We start with a flat circle that will sit on the baby's chest and back.
- R1: 12 hdc in MR. Join with sl st. (12 sts)
- R2: Ch 2 (counts as first hdc). 2 hdc in each st around. Join. (24 sts)
- R3: Ch 2. (1 hdc, inc) x 12. Join. (36 sts)
- R4: Ch 2. (2 hdc, inc) x 12. Join. (48 sts)
- R5: Ch 2. (3 hdc, inc) x 12. Join. (60 sts)
- R6: Ch 2. (4 hdc, inc) x 12. Join. (72 sts)
- Check Size: This circle should be about 20-25 cm (8-10 inches) across. This is the main body of the poncho.
- Finishing: Do not fasten off. We will start the points directly from here.
What you'll master: Creating a large, flat circular base.
4. The Star Points (Arms, Legs, and Hood Base)
The starfish has 5 points. We will divide our 72 stitches into 5 sections. Since 72 isn't perfectly divisible by 5, we will approximate: 4 sections of 14 stitches and 1 section of 16 stitches (for the hood).
Points 1, 2, 3, 4 (The Limbs/Flaps):
- Setup: Skip the first 16 stitches (save these for the hood). Join yarn to the next stitch.
- Row 1: Ch 2 (counts as hdc). Hdc in the next 13 stitches. Turn. (14 sts)
- Row 2-20: Ch 2, turn. Hdc in each st across. (14 sts)
- Note: This creates a long, rectangular arm/leg.
- Tapering the Tip:
- Row 21: Ch 2, turn. Hdc 2 tog, hdc across to last 2 sts, hdc 2 tog. (12 sts)
- Row 22: Dec, hdc across, dec. (10 sts)
- Row 23: Dec, hdc across, dec. (8 sts)
- Row 24: Dec, hdc across, dec. (6 sts)
- Row 25: Dec, hdc across, dec. (4 sts)
- Row 26: Dec, hdc across, dec. (2 sts)
- Row 27: Dec. Fasten off.
- Repeat: Do this 3 more times around the circle, leaving gaps between the points if you want a true star shape, or working them continuously if you want a flower shape. The photo shows distinct points, so leave a small gap (sl st over 2-3 stitches) between each point.
What you'll master: Working flat rows on a circular edge and tapering shapes.
5. The Hood (The Top Point)
This is the largest point (Point 5). It needs to be long enough to fold over and cover the baby's head.
- Setup: Join yarn to the 16 stitches reserved at the top of the circle.
- Row 1: Ch 2. Hdc in each st across. Turn. (16 sts)
- Row 2-25: Ch 2, turn. Hdc in each st across. (16 sts)
- Note: Make this section longer than the other points! It needs to reach from the neck, over the head, and back down.
- Tapering: Same as above (decrease rows until closed).
- Finishing: Fasten off.
What you'll master: Creating an elongated section for a hood.
6. Assembly & The Magic of Details
Now for the most rewarding part: turning this star into a wearable poncho!
- The Hood Construction:
- Take the long top point (the hood).
- Fold the tip of this point down towards the center of the body circle.
- It should look like a hood resting on the "neck" area.
- The Buttons:
- Look at the "neck" area (where the points meet the center circle).
- Sew the two wooden buttons on the left side of the neck opening.
- Create buttonholes on the right side (or simply use the natural gaps in the crochet stitches as buttonholes, which is very common in baby clothes!).
- Alternative: You can sew the buttons on the chest to hold the hood in place if it's loose.
- Weave in Ends: There will be many ends to weave in where you changed colors or started new points. Take your time!
- Blocking: Gently steam the poncho to help the star points lay flat and the circle relax.
What you'll master: Garment assembly and adding functional closures.
Final Section: Where to Go from Here
Congratulations! You’ve just crafted a sunny, whimsical Starfish Poncho. This project is incredibly unique and sure to be a favorite for any little one.
From here, try experimenting with different colors! You could make a "Pink Starfish" for a girl, or a "Blue Crab" version (add claws to the side points!). You could even add a face to the center circle to make it a literal starfish character. Happy crocheting, and stay sunny!