September 16, 2026
SpongeBob Face Sweater – A Quirky & Fun Crochet Project
Who lives in a pineapple under the sea? You do, when you wear this adorable SpongeBob Face Sweater! Featuring a bright yellow body, cozy ribbed cuffs and hem, and a giant, cheerful SpongeBob face appliquéd across the chest, this sweater is the ultimate statement piece for fans of Bikini Bottom. It’s an intermediate-friendly project that combines garment construction with detailed appliqué work.
Jump to pattern instructions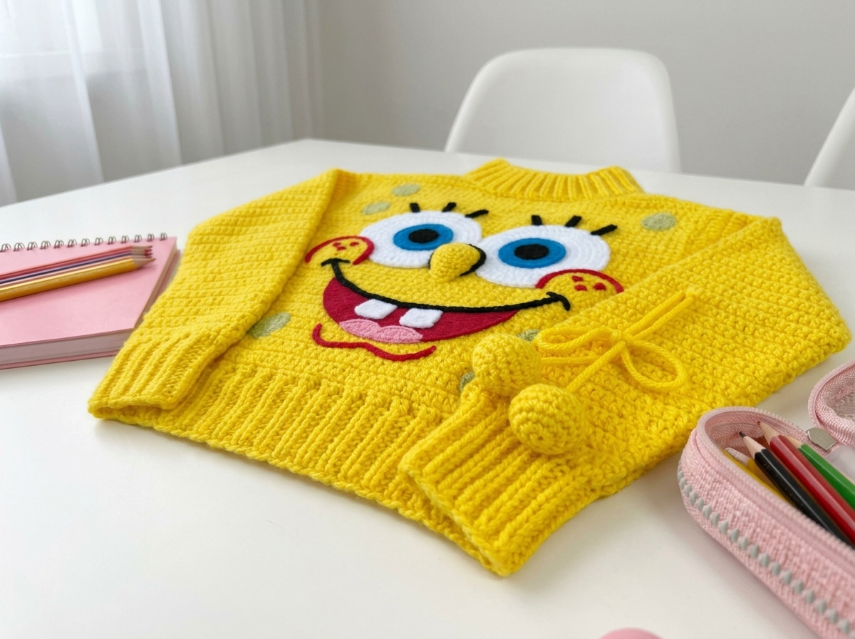
SpongeBob Face Sweater – Complete Step-by-Step Pattern
1. Gathering Your Supplies
To get that dense, sweater-like fabric that holds the heavy appliqués well, a sturdy acrylic or cotton-acrylic blend yarn is best.
- Yarn: Worsted weight (Size 4) yarn. You will need:
- Bright Yellow: Main color for the body, sleeves, nose, and pom-poms (approx. 400–500g).
- White: For the eyes and buck teeth (approx. 50g).
- Light Blue: For the irises (small amount).
- Black: For the pupils, eyelashes, mouth outline, and freckles (small amount).
- Red: For the mouth interior and cheeks (small amount).
- Pink: For the tongue (tiny amount).
- Light Green: For the "pores" scattered on the sweater (tiny amount).
- Hooks:
- 4.5 mm (US 7) for the main sweater body.
- 3.5 mm (US E/4) for the ribbing and small facial details.
- Notions: Tapestry needle for sewing, scissors, stitch markers, and a little bit of poly-fil stuffing (for the nose and pom-poms).
- Finished Size: Adult Small/Medium (approx. chest circumference 90-100 cm). Adjust foundation chain for your size.
What you'll master: Constructing a seamless sweater, working detailed multi-color appliqués, and adding 3D character elements.
2. Abbreviations & Special Techniques
Let’s quickly review a few terms. If you're new to garment crochet, don't worry—the construction is straightforward!
- ch: Chain
- sc: Single crochet
- hdc: Half double crochet (we'll use this for the main body for a nice, dense texture).
- dc: Double crochet
- sl st: Slip stitch
- BLO: Back loop only (creates a stretchy ribbed effect).
- FLO: Front loop only.
- inc: Increase (2 stitches in one stitch).
- dec: Decrease (2 stitches crocheted together).
3. The Main Sweater Body (Yellow)
We will work the body as a simple tube in the round.
- Foundation: With 4.5 mm hook and Yellow yarn, Ch 100 (adjust to a multiple of 4 for your desired chest size). Join with a sl st to form a ring, being careful not to twist.
- R1: Ch 2 (counts as first hdc). Hdc in each ch around. Join with a sl st to the top of the ch-2. (100 sts)
- R2-60: Ch 2, turn (working in alternating rounds to prevent spiraling, or just work continuous rounds and use a marker). Hdc in each st around. Join.
- Note: Work until the body measures about 40-45 cm from the cast-on edge.
- Finishing: Fasten off.
What you'll master: Creating a large, seamless tube for a garment.
4. The Sleeves (Yellow)
- Setup: Join Yellow yarn at the underarm of the body tube.
- R1: Ch 2. Hdc evenly around the armhole (approx. 40-50 sts). Join.
- R2-35: Hdc in each st around.
- Optional Taper: To make the sleeve narrower at the wrist, work a dec round every 10 rounds.
- Finishing: Fasten off. Repeat for the second sleeve.
What you'll master: Picking up stitches for sleeves and maintaining even tension.
5. The Ribbing (Hem, Cuffs, and Neck)
To get that classic sweater look, we add ribbing using the Back Loop Only (BLO) technique. Switch to the 3.5 mm hook.
Hem & Cuffs:
- Instructions: Join Yellow yarn to the bottom edge of the body (or sleeve cuffs).
- R1: Ch 1. Sc in the BLO of each st around. Join.
- R2-6: Repeat R1. (This creates a thick, stretchy ribbed band).
- Finishing: Fasten off. Repeat for cuffs and the neckline.
What you'll master: Creating professional, stretchy ribbed edges.
6. The SpongeBob Face Appliqués
Now for the magic moment! We will create the face in separate pieces and sew them onto the front of the sweater.
The Eyes (Make 2):
- White Base: Ch 15. Sc in 2nd ch from hook, sc across, work 3 sc in last ch, sc down opposite side, 2 sc in last ch. Join. (Creates a large oval). Fasten off.
- Blue Iris: MR, 6 sc. R2: 6 inc (12). R3: (1 sc, inc) x 6 (18). Fasten off.
- Black Pupil: MR, 6 sc. R2: 6 inc (12). Fasten off.
- Assembly: Stack Black on Blue on White.
The Nose (Yellow):
- Instructions: Ch 10. Sc in 2nd ch from hook, hdc, dc, 3 dc in last ch. Working down opposite side: dc, hdc, sc, sc. Join. Stuff lightly to make it 3D. Fasten off.
The Mouth (Red & Pink):
- Red Mouth: Ch 20. Sc in 2nd ch, hdc, dc, 2 dc in next 4 sts, hdc, sc, sc. (Creates a wide smile shape). Fasten off.
- Pink Tongue: A small pink semi-circle sewn inside the bottom of the red mouth.
- White Teeth: Ch 6. Sc across. Row 2: Sc across. Make 2 small rectangles.
Cheeks & Freckles:
- Cheeks: Two small red circles (MR, 6 sc, R2: 6 inc).
- Freckles: Using black yarn, embroider 3 tiny dots on each red cheek.
Eyelashes & Outline:
- Eyelashes: Using black yarn, chain 3 and sl st to the top of the white eyes (3 lashes per eye).
- Mouth Outline: Using black yarn and a tapestry needle, embroider a thick outline around the red mouth and the nose to make the features pop!
What you'll master: Creating complex, multi-layered character appliqués.
7. The Green Pores & Pom-Poms
The Pores:
- Instructions: Using Light Green yarn, crochet 6-8 small circles (MR, 6 sc). Scatter them randomly across the yellow body and sleeves, just like SpongeBob's sponge texture. Sew them down securely.
The Pom-Poms:
- Instructions: Make two standard yellow yarn pom-poms (approx. 4 cm diameter).
- Attachment: Tie them together with a long strand of yellow yarn, and sew the center of the string to the bottom right corner of the sweater (or attach them as a drawstring detail).
What you'll master: Adding texture and playful 3D embellishments.
8. Final Assembly
- Layout: Lay the sweater flat. Arrange the face pieces on the chest area. Start with the eyes, then the nose, then the mouth. Pin them in place to ensure they are centered and level.
- Sewing: Using your tapestry needle and matching yarn, whip stitch all the face pieces securely to the sweater. Make sure to catch the back of the appliqués and the sweater fabric so they don't flap around!
- Weave in Ends: Take your time weaving in all those loose ends on the inside of the sweater.
- Final Touches: Give the sweater a gentle steam block to help the ribbing lay flat and the appliqués sit smoothly.
What you'll master: Multi-step structural assembly and strategic placement of decorative elements.
Final Section: Where to Go from Here
Congratulations! You’ve just crafted a hilarious and cozy SpongeBob Face Sweater. This project is a fantastic way to practice your garment construction and appliqué skills, resulting in a truly unique, conversation-starting piece.
From here, try experimenting with other characters! You could make a Patrick Star sweater (pink with green flowers), a Squidward sweater (teal with a long nose), or even a Gary the Snail sweater. Happy crocheting, and I'm ready!