September 15, 2026
Citrus Beanie Hat – A Fresh & Fun Crochet Pattern
Stay warm and look sweet in this adorable Citrus Beanie! Featuring a vibrant orange body, a cozy folded brim, and a cute little green leaf on top, this hat is perfect for adding a pop of color to your winter wardrobe. It’s a quick, beginner-friendly project that works up in no time.
Jump to pattern instructions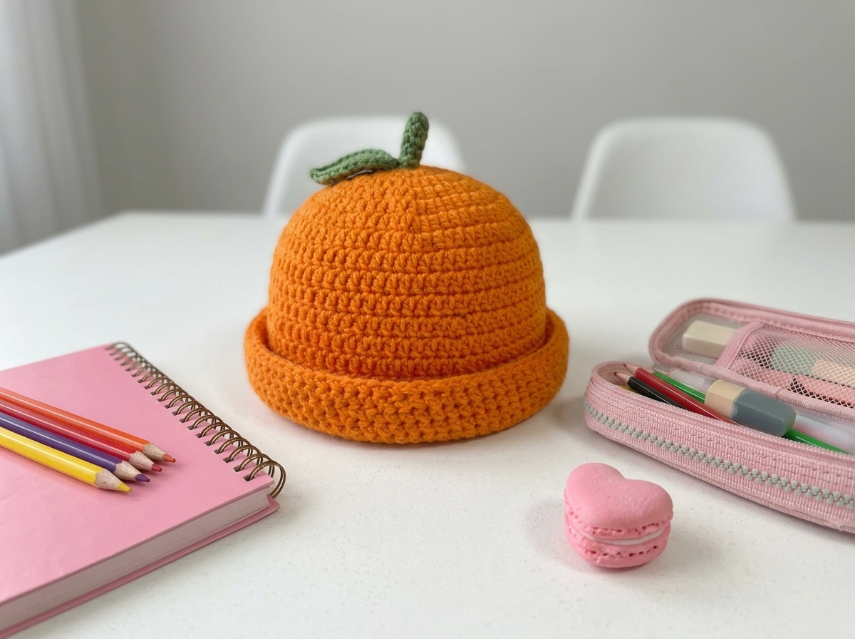
Citrus Beanie Hat – Complete Step-by-Step Pattern
1. Gathering Your Supplies
To get that dense, warm texture seen in the photo, a soft acrylic or wool blend yarn in worsted weight is perfect.
- Yarn: Worsted weight (Size 4) yarn.
- Orange: Approx. 100–150g (Main color for the hat).
- Green: Small amount (for the leaf and stem).
- Hook: 4.5 mm (US 7) or 5.0 mm (US H/8) (choose the size that gives you a firm, warm fabric).
- Notions: Tapestry needle for weaving in ends, scissors, and a stitch marker.
- Finished Size: Fits approx. Adult Small/Medium (can be adjusted by adding more increase rounds).
What you'll master: Creating a seamless beanie, working in the back loop only (BLO) for a fold line, and adding cute 3D embellishments.
2. Abbreviations & Special Techniques
Let’s quickly review a few terms. If you're new to any of these, don't worry—you'll be a pro by the time you're ready to wear it!
- MR: Magic ring
- ch: Chain
- sc: Single crochet
- inc: Increase (2 sc in one stitch)
- dec: Decrease (2 sc crocheted together invisibly)
- sl st: Slip stitch
- BLO: Back loop only (working only into the back loop creates a ridge that helps the hat fold neatly).
- st(s): Stitch(es)
3. The Hat Body (Orange)
We start at the crown and work down. The secret to the neat folded brim is working one round in the Back Loop Only (BLO).
- R1: 6 sc in MR (6)
- R2: 6 inc (12)
- R3: (1 sc, inc) x 6 (18)
- R4: (2 sc, inc) x 6 (24)
- R5: (3 sc, inc) x 6 (30)
- R6: (4 sc, inc) x 6 (36)
- R7: (5 sc, inc) x 6 (42)
- R8: (6 sc, inc) x 6 (48)
- Check Fit: At this point, the flat circle should measure about 7-8 inches across. If you need a larger hat, continue increasing (R9: 7 sc, inc x 6 = 54) until it fits.
- R9-15: 48 sc (48) [7 rows]
- Note: This creates the main depth of the hat.
- R16 (The Fold Line): 48 sc in BLO (48).
- Pro Tip: This round creates a sharp ridge. When you fold the bottom up later, it will fold perfectly along this line!
- R17-20: 48 sc (48) [4 rows]
- Note: This section is the brim that will be folded up. If you want a thicker brim, add more rows here.
- Finishing: Fasten off and weave in the end.
What you'll master: Standard hat shaping and using BLO to create structural definition.
4. The Leaf & Stem (Green)
This cute little topper makes the hat look like a fresh orange or tangerine!
The Stem:
- Instructions: With Green yarn, Ch 4.
- Row 1: Sc in the 2nd ch from the hook, sc in next 2 chs. (3 sc).
- Row 2: Ch 1, turn. Sc in each st across.
- Finishing: Do not fasten off yet; we will attach the leaf directly to this.
The Leaf:
- Instructions: Working into the top of the stem (or the last stitch of the stem row):
- Row 1: Ch 5. Sc in the 2nd ch from the hook, hdc in the next, dc in the next, 3 dc in the last ch (tip of the leaf). Working down the opposite side of the chain: dc in the next, hdc in the next, sc in the last ch. Sl st to join to the base of the stem.
- Finishing: Fasten off, leaving a long tail for sewing.
What you'll master: Creating small, organic shapes and combining them into a single motif.
5. Assembly & Finishing
Now for the magic moment where your hat gets its citrus personality!
- Fold the Brim: Fold the bottom section (R17-20) up and over the BLO ridge (R16). It should sit neatly, creating a double-layer brim.
- Attach the Leaf: Position the green leaf and stem at the very top center of the hat (right in the middle of the Magic Ring). Using your long tail and a tapestry needle, sew it securely in place. Make sure to stitch through all layers of the hat top so it doesn't flop over.
- Weave in Ends: Take your time weaving in all those loose ends on the inside of the hat.
- Final Touch: Give the hat a gentle steam block if needed to help the brim lay flat and the crown hold its shape.
What you'll master: Final assembly and styling a functional accessory.
Final Section: Where to Go from Here
Congratulations! You’ve just crafted a fresh and fun Citrus Beanie Hat. This project is incredibly satisfying because it works up quickly and the result is both practical and adorable.
From here, try experimenting with different colors! You could make a "Lemon" version with bright yellow yarn and a green leaf, or a "Lime" version with vibrant green yarn. You could even add a small white flower to the top for a "Orange Blossom" look. Happy crocheting, and stay warm and zesty!