September 15, 2026
Summer Turtle Sandals – A Whimsical Crochet Footwear Pattern
Step into summer with these adorable Turtle Sandals! Featuring a sturdy crochet sole, comfortable straps, and a charming 3D amigurumi sea turtle perched on top, this project is a unique blend of footwear construction and cute character design. Perfect for beach days or adding a playful touch to your warm-weather wardrobe.
Jump to pattern instructions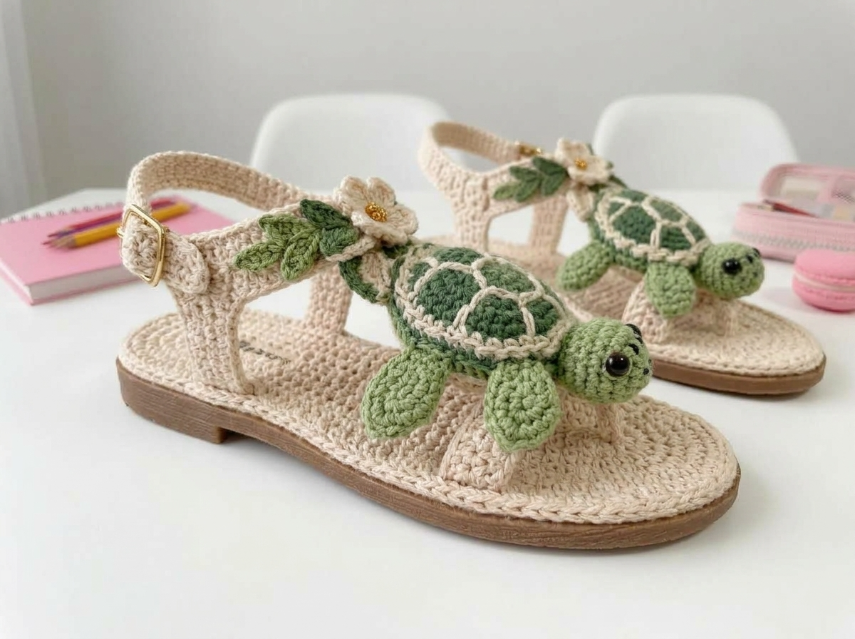
Summer Turtle Sandals – Complete Step-by-Step Pattern
1. Gathering Your Supplies
For the sandals, you need durable yarn that can withstand wear. For the turtle, a softer cotton works best for detail.
- Yarn:
- Sand/Beige Cotton: Approx. 100-150g (for the sandal sole and straps). Use a sturdy cotton like Lily Sugar'n Cream or a cotton blend.
- Light Green & Dark Green Cotton: Small amounts (for the turtle shell and body).
- Cream/White & Yellow: Tiny amounts (for the flower embellishment).
- Hooks:
- 3.5 mm or 4.0 mm (for the sandal sole and straps).
- 2.5 mm (for the turtle and flower details).
- Notions:
- 2 Flat sandal soles (leather or rubber, approx. size 37-38 EU / 6-7 US) OR yarn to crochet your own soles.
- 2 Gold buckles (1.5 cm width).
- 2 Small safety eyes (6-8 mm) for the turtle.
- Tapestry needle, scissors, stitch markers.
- Strong thread or fishing line (optional, for extra durability on straps).
What you'll master: Constructing wearable footwear, attaching 3D amigurumi elements to functional items, and working with durable cotton yarns.
2. Abbreviations & Special Techniques
- MR: Magic ring
- ch: Chain
- sc: Single crochet (use a tight tension for sandals!)
- hdc: Half double crochet
- dc: Double crochet
- sl st: Slip stitch
- inc: Increase
- dec: Decrease
- BLO/FLO: Back/Front Loop Only
3. The Sandal Sole (If crocheting your own)
Note: You can also buy pre-made leather soles and crochet a cover for them. If making from scratch:
- Row 1: Ch 15 (adjust for foot size). Sc in 2nd ch from hook, sc across. 3 sc in last ch. Working down opposite side: sc across, 2 sc in last ch. (32 sts)
- Row 2: Ch 1. Inc, sc 12, 3 inc, sc 12, 2 inc. (38 sts)
- Row 3-5: Sc in each st around. (38 sts)
- Row 6 (Edge): Sl st in each st around to create a firm edge. Fasten off.
What you'll master: Creating a sturdy, flat oval base.
4. The Straps
We will create three main strap components: the Toe Loop, the Main Turtle Strap, and the Ankle Strap.
A. The Toe Loop (Sand Color):
- Instructions: Ch 12. Sc in 2nd ch from hook and across. (11 sc).
- Rows 2-3: Ch 1, turn, sc across. Fasten off, leaving long tails.
- Attachment: Sew the ends of this loop to the front center of the sole, about 2-3 cm from the toe edge.
B. The Main Turtle Strap (Sand Color):
- Instructions: This strap needs to be wide and sturdy. Ch 20 (width of foot).
- Rows 1-10: Sc in each st across. (20 sts).
- Texture: You can work in BLO for a ribbed look or standard sc for density.
- Finishing: Do not fasten off yet if attaching directly, or leave long tails. This strap will go across the top of the foot.
C. The Ankle Strap with Buckle (Sand Color):
- Long Side: Ch 60 (adjust for ankle size). Sc in 2nd ch from hook and across. Work 3-4 rows of sc to make a sturdy band.
- Buckle Loop: At one end, create a small loop (Ch 10, sl st to base) to fit the buckle prong.
- Short Side (Other end): Ch 15. Sc across for 4 rows. This end will have holes for the buckle.
- Buttonholes: In the last row of the short side, work: Sc 2, Ch 1, skip 1, Sc 4, Ch 1, skip 1, Sc 2. This creates two holes for the buckle.
5. The 3D Sea Turtle (Amigurumi)
This cute turtle sits on top of the Main Strap.
Head & Neck (Light Green):
- R1: 6 sc in MR (6)
- R2: 6 inc (12)
- R3-4: 12 sc (12)
- R5: (4 sc, dec) x 2 (10) - Start stuffing lightly
- R6: 10 sc. Fasten off, leaving a long tail.
Shell/Body (Dark Green & Light Green):
- R1 (Dark Green): 6 sc in MR (6)
- R2: 6 inc (12)
- R3: (1 sc, inc) x 6 (18)
- R4: (2 sc, inc) x 6 (24)
- R5: (3 sc, inc) x 6 (30)
- R6-8: 30 sc (30)
- R9: (3 sc, dec) x 6 (24)
- R10: (2 sc, dec) x 6 (18) - Stuff firmly
- R11: (1 sc, dec) x 6 (12)
- Finishing: Fasten off.
Flippers (Make 4, Light Green):
- R1: 4 sc in MR (4)
- R2: 4 inc (8)
- R3: 8 sc. Fasten off, leaving a tail. Flatten the bottom to sew.
Tail (Light Green):
- Instructions: Ch 6. Sc in 2nd ch from hook, sc across. Fasten off.
Assembly of Turtle:
- Sew the head to the front of the shell.
- Sew the 4 flippers to the sides (2 front, 2 back).
- Sew the tail to the back.
- Attach safety eyes to the head.
- Crucial Step: Sew the turtle's belly firmly to the center of the Main Turtle Strap. Ensure the stitching goes through the strap layers so it doesn't flop over.
6. The Flower & Leaves Embellishment
Add a touch of nature near the ankle strap connection.
Leaves (Dark Green, Make 3):
- Instructions: Ch 8. Sc in 2nd ch, hdc, 2 dc, hdc, sc, sl st. Fasten off.
Flower (Cream, Make 1):
- R1: 5 sc in MR (5)
- R2: In each st: (Ch 3, dc, ch 3, sl st). (5 petals).
- Center: Sew a small yellow circle or bead in the middle.
7. Final Assembly
- Attach Main Strap: Sew the ends of the Main Turtle Strap to the sides of the sole, roughly in the middle of the foot.
- Attach Ankle Strap: Sew the short end of the Ankle Strap to the side of the sole, near the heel. The long end should wrap around the ankle and buckle into the short end.
- Add Embellishments: Sew the leaves and flower to the side of the Main Strap, near where it meets the ankle strap, to hide the seams and add cuteness.
- Secure Everything: Weave in all ends. For extra durability on the sole attachments, you can use a strong needle and thread to whip stitch the crochet sole to the leather sole (if using one).
Final Section: Where to Go from Here
Congratulations! You’ve just crafted a pair of unique, hand-made Turtle Sandals. These are sure to be a conversation starter at the beach or pool.
From here, try experimenting with different sea creatures! You could make a crab with claws gripping the strap, a starfish on the toe loop, or even a seashell motif. You can also change the sandal color to match different outfits—white for a classic look, or bright coral for a pop of color. Happy crocheting, and enjoy your custom footwear!