September 16, 2026
Snoopy Pixel Art Sweater – A Retro Graphic Crochet Pattern
Stay cozy and cute with this adorable Snoopy sweater! Featuring a soft light blue body, dark blue ribbed accents, and a large, retro-style pixel art graphic of everyone's favorite beagle, this project is a fantastic way to practice tapestry crochet techniques. It’s a statement piece that combines comfort with nostalgia.
Jump to pattern instructions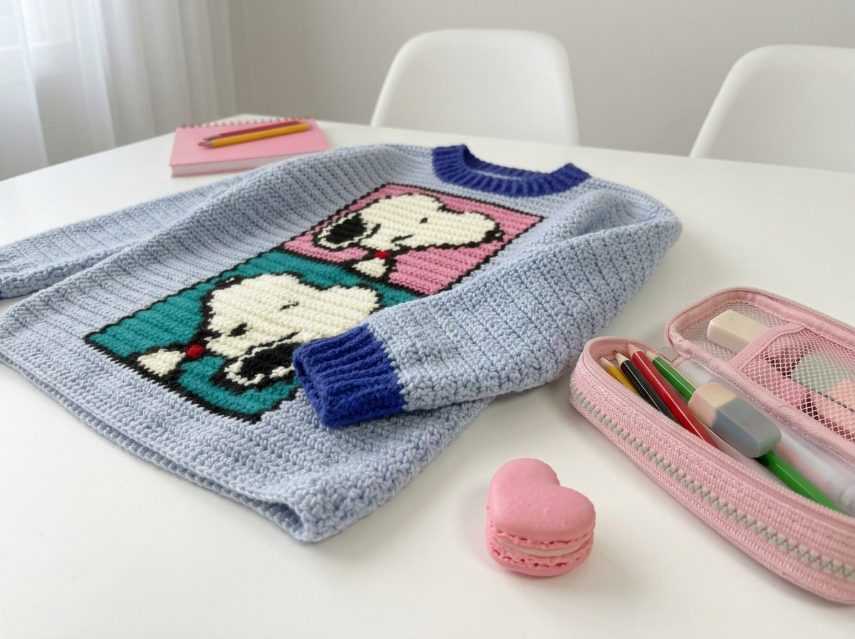
Snoopy Pixel Art Sweater – Complete Step-by-Step Pattern
1. Gathering Your Supplies
To get that dense, knit-like fabric that holds the graphic well, a sturdy acrylic or cotton-acrylic blend yarn is best.
- Yarn: Worsted weight (Size 4) yarn. You will need:
- Light Blue: Main color for the body and sleeves (approx. 400–500g).
- Dark Blue (Royal Blue): For the ribbed cuffs, hem, and neckline (approx. 100g).
- Graphic Colors: White, Black, Red, Pink, and Teal/Green (approx. 50g of each for the Snoopy design).
- Hooks:
- 4.5 mm (US 7) for the main sweater body.
- 3.5 mm (US E/4) for the ribbing.
- Notions: Tapestry needle for sewing, scissors, stitch markers, and a graph/chart for the Snoopy design (you can find "Snoopy pixel art" charts online or create your own on graph paper).
What you'll master: Tapestry crochet (carrying yarn), garment construction, and working from a color chart.
2. Abbreviations & Special Techniques
Let’s quickly review a few terms. If you're new to garment crochet, don't worry—the construction is straightforward!
- ch: Chain
- sc: Single crochet
- hdc: Half double crochet (we'll use this for the main body for a nice, dense texture).
- sl st: Slip stitch
- BLO: Back loop only (creates a stretchy ribbed effect).
- Tapestry Crochet: A technique where you crochet over the unused yarn colors to carry them along the row, creating a dense, double-sided fabric with a pixelated design.
3. The Back Panel (Light Blue)
We start with the back of the sweater, worked flat in rows.
- Foundation: With 4.5 mm hook and Light Blue yarn, Ch 60 (adjust for desired width, usually chest width + ease).
- Row 1: Hdc in the 3rd ch from the hook and each ch across. Turn. (58 hdc)
- Rows 2-60: Ch 2 (counts as first hdc), hdc in each st across. Turn.
- Note: Work until the piece measures about 40-45 cm from the shoulder to the hem.
- Finishing: Fasten off.
What you'll master: Creating a large, rectangular fabric panel.
4. The Front Panel (Light Blue with Graphic)
This is the star of the show! We will work the front panel just like the back, but switch to Tapestry Crochet for the center section to create the Snoopy design.
- Foundation: Ch 60 (same as back panel).
- Rows 1-15: Work in plain Light Blue hdc (same as back panel). This is the bottom hem area before the graphic starts.
- The Graphic Section (Rows 16-45 approx):
- Switch to Tapestry Crochet. You will follow a chart (grid) where each square on the grid equals one stitch (hdc).
- The Design: The image shows a split design. The bottom-left is Teal with Snoopy lying on his doghouse. The top-right is Pink with Snoopy sitting.
- Technique: When changing colors, complete the last yarn-over of the previous stitch with the new color. Carry the unused colors loosely inside the stitches by crocheting over them.
- Note: This section requires patience! Keep your tension consistent so the fabric doesn't pucker.
- Rows 46-60: Return to plain Light Blue hdc for the top shoulder area.
- Finishing: Fasten off.
What you'll master: Reading a color chart and managing multiple yarn strands in Tapestry Crochet.
5. The Sleeves (Light Blue)
- Setup: With 4.5 mm hook and Light Blue yarn, Ch 40 (adjust for arm width).
- Rows 1-40: Ch 2, hdc in each st across. Turn. (38 hdc)
- Note: Work until the sleeve is the desired length (approx. 45-50 cm).
- Finishing: Fasten off. Make 2.
What you'll master: Creating matching sleeves.
6. Assembly
- Shoulders: Place the Front and Back panels together with right sides facing. Sew the shoulder seams using a tapestry needle and whip stitch.
- Sleeves: Pin the sleeves to the armholes. The center of the sleeve top should align with the shoulder seam. Sew them in place.
- Sides: Fold the sweater in half. Sew the side seams and the underarm seams of the sleeves in one long continuous line.
What you'll master: Assembling a garment from flat pieces.
7. The Ribbing (Dark Blue)
To give it that classic sweater finish, we add ribbing to the neck, cuffs, and hem. Switch to the 3.5 mm hook and Dark Blue yarn.
Neckline Ribbing:
- Instructions: Join Dark Blue yarn to the neck opening.
- R1: Ch 1. Sc evenly around the neck opening. Join.
- R2-4: Ch 1. Sc in the BLO of each st around. Join. (This creates the stretchy rib).
- Finishing: Fasten off.
Cuffs & Hem:
- Instructions: Join Dark Blue yarn to the sleeve cuffs and bottom hem.
- Rows: Work back and forth in rows of sc in the BLO for about 4-6 rows to create a ribbed band. Sew the ends of the band together to form a circle.
What you'll master: Creating professional, stretchy ribbed edges using BLO.
Final Section: Where to Go from Here
Congratulations! You’ve just crafted a hilarious and cozy Snoopy Pixel Art Sweater. This project is a fantastic way to practice your tapestry crochet skills and create a truly unique, handmade piece of clothing.
From here, try experimenting with other characters! You could make a Garfield sweater (orange with lasagna), a Hello Kitty sweater (white with a red bow), or even a custom pixel art portrait of your pet. Happy crocheting, and stay cozy!