September 15, 2026
Ramen Bowl Amigurumi Set – A Tasty & Whimsical Crochet Project
**Excerpt:** Serve up a bowl of cuteness with this adorable Ramen Bowl set! Featuring a deep red bowl, squiggly yellow noodles, a classic pink-and-white fish cake (narutomaki), boiled egg halves, and leafy greens, this project is a fun, intermediate-friendly make. It’s perfect for play food, kitchen decor, or a unique gift for foodies.
Jump to pattern instructions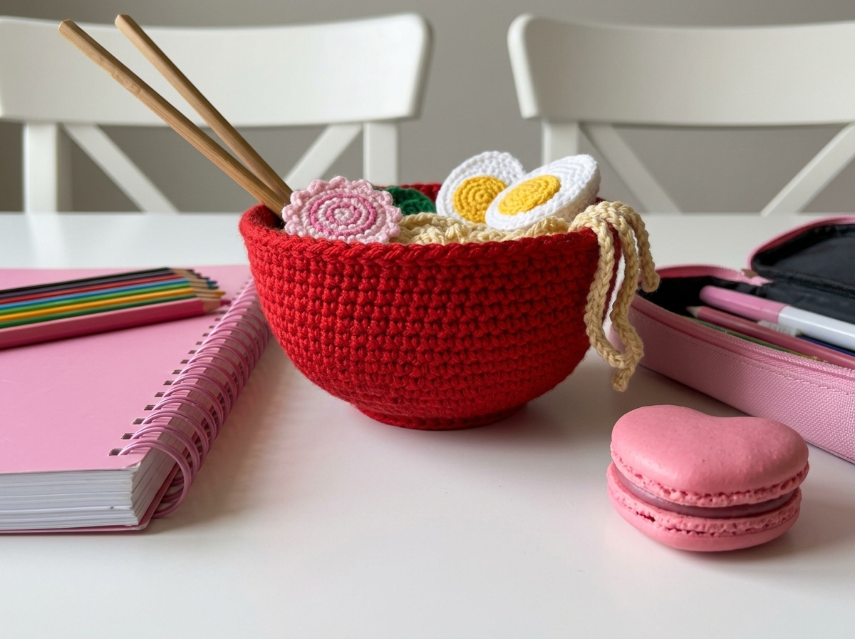
Ramen Bowl Amigurumi Set – Complete Step-by-Step Pattern
1. Gathering Your Supplies
To get that vibrant, appetizing look, use bright, solid-colored cotton or acrylic yarn.
- Yarn: Worsted weight (Size 4) yarn. You will need small amounts of:
- Red: For the bowl (approx. 50g).
- Yellow/Cream: For the noodles (approx. 30g).
- White: For the egg whites and fish cake base.
- Pink: For the fish cake swirl.
- Yellow (bright): For the egg yolks.
- Green: For the bok choy/leaf.
- Brown: For the chopsticks (or use real mini wooden chopsticks!).
- Hook: 3.0 mm or 3.5 mm (choose a size that gives you a tight fabric so the stuffing doesn't show).
- Notions: Poly-fil stuffing, tapestry needle, scissors, stitch markers.
What you'll master: Creating modular food items, assembling a scene, and working with multiple colors for details.
2. Abbreviations & Special Techniques
Let’s quickly review a few terms. If you're new to any of these, don't worry—you'll be a pro by the time the broth is ready!
- MR: Magic ring
- ch: Chain
- sc: Single crochet
- hdc: Half double crochet
- dc: Double crochet
- sl st: Slip stitch
- inc: Increase (2 sc in one stitch)
- dec: Decrease (2 sc crocheted together invisibly)
- BLO: Back loop only
3. The Bowl (Red)
The bowl is a sturdy, deep hemisphere that holds all the delicious toppings.
- R1: 6 sc in MR (6)
- R2: 6 inc (12)
- R3: (1 sc, inc) x 6 (18)
- R4: (2 sc, inc) x 6 (24)
- R5: (3 sc, inc) x 6 (30)
- R6: (4 sc, inc) x 6 (36)
- R7: (5 sc, inc) x 6 (42)
- R8: (6 sc, inc) x 6 (48)
- R9-16: 48 sc (48) [8 rows]
- Note: This creates the deep sides of the bowl. If you want a wider bowl, add more increase rounds at the start. If you want a deeper bowl, add more straight rounds here.
- R17 (Rim - Optional): 48 sc in BLO (48). This creates a little lip at the top.
- R18: 48 sc (48).
- Finishing: Fasten off. Do not stuff the bowl itself; it needs to be hollow to hold the noodles!
What you'll master: Creating a large, structural container shape.
4. The Noodles (Yellow)
We’ll create a "nest" of noodles that sits inside the bowl.
-
Base:
- R1: 6 sc in MR (6)
- R2: 6 inc (12)
- R3: (1 sc, inc) x 6 (18)
- R4: (2 sc, inc) x 6 (24)
- R5: (3 sc, inc) x 6 (30)
- R6: (4 sc, inc) x 6 (36)
- Finishing: Fasten off. This flat circle fits snugly inside the bowl opening.
-
Noodle Texture (Optional but recommended):
- Cut 10-15 strands of yellow yarn, each about 15 cm long.
- Thread them onto your tapestry needle and sew them randomly across the surface of the yellow base in squiggly lines to mimic ramen strands.
What you'll master: Creating a textured surface and fitting pieces together.
5. The Toppings
Now for the delicious details!
Narutomaki (Fish Cake - Pink & White):
- Base (White): 6 sc in MR (6). R2: 6 inc (12). R3: (1 sc, inc) x 6 (18). Fasten off.
- Swirl (Pink): Chain 20 with pink yarn. Sew this chain onto the white circle in a spiral shape, starting from the center and coiling outwards.
Boiled Egg Halves (White & Yellow):
- White Part (Make 2): Ch 6. Sc in 2nd ch from hook, 3 sc, 3 sc in last ch. Working down opposite side: 3 sc, 2 sc in last ch. (12 sts). Fasten off. (This creates a small oval).
- Yolk (Make 2): 6 sc in MR (6). Fasten off, leaving a tail.
- Assembly: Sew the yellow yolk circle onto the center of the white oval.
Bok Choy / Leaf (Green):
- Instructions: Ch 6. Sc in 2nd ch from hook, hdc in next, dc in next, hdc in next, sc in last. Working down the opposite side of the chain: sc, hdc, dc, hdc, sc. Sl st to join. Fasten off.
- Detail: You can sew a lighter green or white yarn down the center for the stem vein.
What you'll master: Creating miniature food appliqués and surface embroidery.
6. The Chopsticks (Brown)
You can use real mini wooden chopsticks (approx. 15-20 cm long) for realism, or crochet them!
- Crochet Version: Ch 30. Sc in 2nd ch from hook and each ch across. (29 sc). Fasten off. Make 2.
- Assembly: If crocheted, you might want to insert a thin wire or toothpick inside the chain before sewing it shut to keep them straight and rigid.
What you'll master: Creating long, thin structural elements.
7. Assembly & Serving
Now for the magic moment where your ramen is ready to serve!
- The Broth: Place the yellow noodle base inside the red bowl. It should sit right at the rim.
- The Toppings: Arrange the Narutomaki, Egg Halves, and Green Leaf on top of the noodles. You can sew them down lightly if you want them to stay in place, or just let them rest there for a removable play food set.
- The Chopsticks: Rest the chopsticks across the rim of the bowl or stick them into the noodles.
What you'll master: Final styling and assembly of a multi-part scene.
Final Section: Where to Go from Here
Congratulations! You’ve just crafted a delicious bowl of Ramen that will never get cold. This project is a fantastic way to practice your amigurumi skills and create a fun, decorative piece.
From here, try experimenting with different toppings! You could add a brown "chashu pork" slice (a flat brown oval with red swirls), a green "seaweed" strip (a long green rectangle), or even a spicy red oil drizzle (red yarn sewn in zig-zags). Happy crocheting, and enjoy your meal!