October 2, 2026
Sandy Shore Granny Sweater
There is something so comforting about a granny stitch sweater, and this one feels like a walk along the beach on a cloudy morning. Soft cream, sandy taupe, and rich brown are stitched in easy stripes, with pops of teal and ocean blue that sparkle across the fabric like little waves. The pattern is just one simple cluster stitch, so you can relax and let the colors do the work. Pour something warm, pick your favorite coastal shades, and let us stitch a sweater you will want to wear all season.
Jump to pattern instructions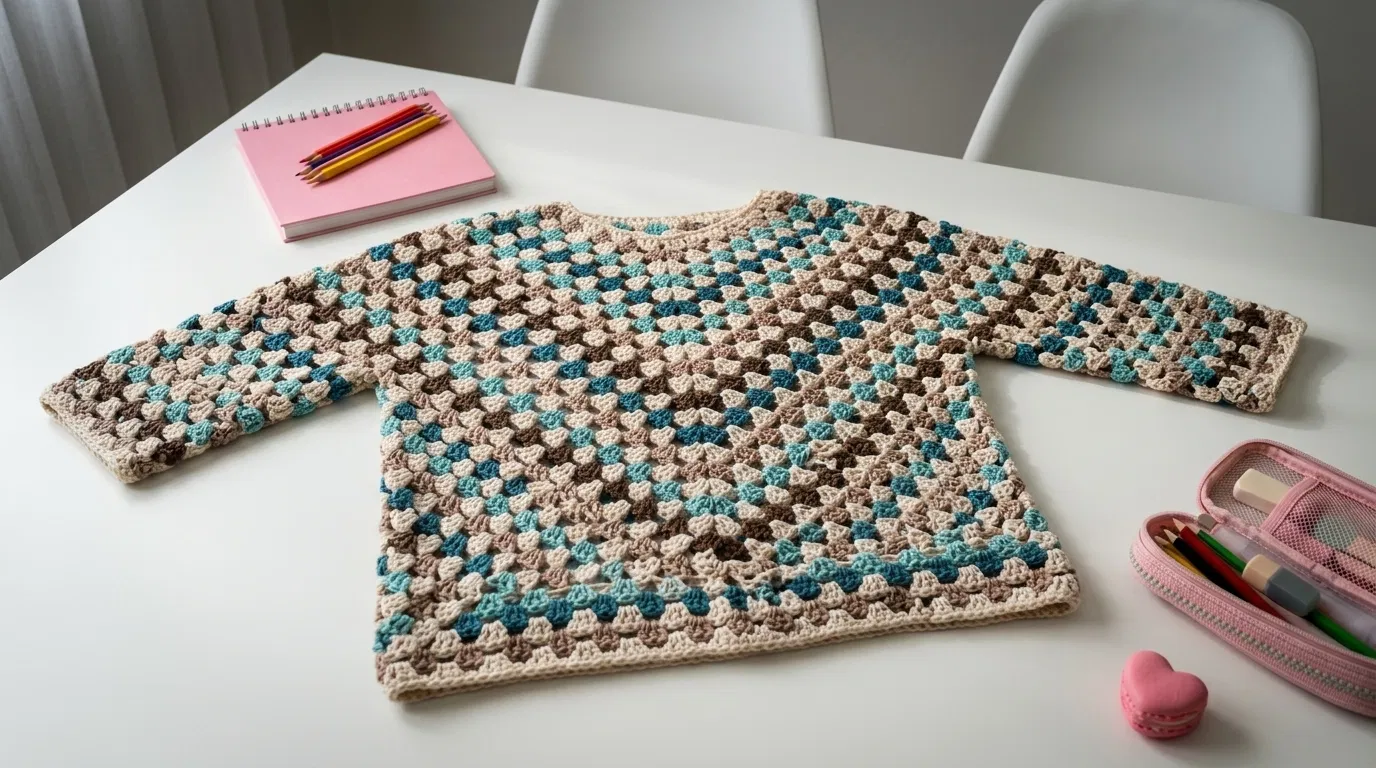
Sandy Shore Granny Sweater
Difficulty: Easy to intermediate (only basic stitches, but it is a long project that needs patience with color changes and seaming)
Finished Size: Adult medium. About 40 inches (101 cm) around the chest, 22 inches (56 cm) long, with a 3/4 length sleeve of about 14 inches (36 cm). Easy to adjust, see the tips at the end.
Time to Complete: 30 to 40 hours, in easy, relaxing sessions.
What You Will Need
Yarn:
- Cream (C), about 450 yards (410 m). This also covers the edgings.
- Sandy taupe (T), about 250 yards (230 m)
- Dark brown (D), about 200 yards (185 m)
- Teal (L), about 250 yards (230 m)
- Ocean blue (B), about 200 yards (185 m)
- Tip: Use a DK weight cotton or cotton blend yarn. Cotton gives the clusters crisp definition and keeps the sweater light and breathable. Buy a little extra of each color, since you will use more than you expect.
Tools:
- 3.5 mm (E/4) crochet hook
- Yarn needle with a large eye for sewing and weaving in ends
- Stitch markers
- Sharp scissors
- Straight pins and a measuring tape
- Blocking mats and pins
Gauge: 6 clusters and 8 rows in granny stitch = 4 x 4 inches (10 x 10 cm). Please make a swatch, since the gauge decides how the sweater fits.
The Basics (US Terms)
- ch = chain
- dc = double crochet
- sc = single crochet
- sl st = slip stitch
- RS / WS = right side / wrong side
- sp = space
- cluster = 3 dc worked in the same place
- C, T, D, L, B = cream, taupe, dark brown, teal, blue
- All pieces are worked flat in rows. Row 1 of every piece is the right side.
The Granny Stitch
All the pieces use the same easy stitch.
- Row 1: Make the foundation chain. Work 2 dc in the 4th ch from the hook (the skipped chains count as the first dc). Skip 2 ch, 3 dc in the next ch. Repeat from * across to the last 3 ch. Skip 2 ch, dc in the last ch.
- Row 2 and all following rows: Ch 3 (counts as a dc), turn. Work 3 dc in the space between the next two clusters. Repeat from * across. Finish with 1 dc in the top of the turning ch from the row below.
- Foundation chain: Make a multiple of 3 chains, plus 4.
Each row has the same number of clusters. If your cluster count changes, check that you worked the last dc into the top of the turning chain.
Color Change Basics
- Every row is one color, so change colors at the end of each row. On the last dc of the row, work until 2 loops remain on the hook, then pull the new color through.
- If a color comes back within 2 rows, carry it loosely up the side of the work. For longer gaps, cut the yarn and weave in the ends later.
- Weave in your ends right after finishing each piece. It saves a lot of work later.
Stripe Sequence
Use this stripe order for the back, the front, and the sleeves. Each row is a single color.
Hem stripes (rows 1 to 10):
| Row | 1 | 2 | 3 | 4 | 5 | 6 | 7 | 8 | 9 | 10 | |---|---|---|---|---|---|---|---|---|---|---| | Color | C | C | L | B | L | B | L | C | T | C |
Main repeat (12 rows), starting at row 11 and repeated:
| Row | 1 | 2 | 3 | 4 | 5 | 6 | 7 | 8 | 9 | 10 | 11 | 12 | |---|---|---|---|---|---|---|---|---|---|---|---|---| | Color | C | T | D | T | C | L | B | L | C | T | D | T |
Repeat these 12 rows until the piece is finished. For the 44 row body, you will work the repeat 2 full times (24 rows), then 10 more rows.
Let Us Get Started
We will make four flat pieces, the back, the front, and two sleeves, then sew them together and add the edging.
Part 1: The Back
- Foundation: With cream, ch 94.
- Row 1: Work Row 1 of the granny stitch. (30 clusters)
- Rows 2 to 44: Work Row 2 of the granny stitch, changing colors by following the stripe sequence. (30 clusters)
- Fasten off and weave in all ends. The back is straight across with no neck shaping. The center 12 clusters stay open to make the neck.
Part 2: The Front
- Foundation: With cream, ch 94.
- Row 1: Work Row 1 of the granny stitch. (30 clusters)
- Rows 2 to 35: Work Row 2 of the granny stitch, following the stripe sequence. (30 clusters)
- Row 36 (neck split): Work Row 2 across the first 9 clusters only. Finish the row with 1 dc in the last stitch. Do not work across the rest. Turn.
- Rows 37 to 44: Continue in pattern on these 9 clusters only, working 1 dc into the last stitch at the neck edge on every row so the edge stays straight. Fasten off.
- Other shoulder: Skip the center 12 clusters. Join the matching color in the next space. Ch 3 and work 3 dc in each space across the last 9 clusters, finishing with 1 dc in the top of the turning ch. Work rows 37 to 44 to match the first shoulder, following the stripe sequence. Fasten off.
- Weave in all ends.
Part 3: The Sleeves (Make 2)
Worked from the top down.
- Foundation: With cream, ch 76.
- Row 1: Work Row 1 of the granny stitch. (24 clusters)
- Rows 2 to 5: Work Row 2 of the granny stitch, following the stripe sequence. (24 clusters)
- Row 6 (decrease row): Ch 3, turn. Skip the first space, then work 3 dc in each space across until 1 space remains. Skip that space, then dc in the top of the turning ch. (22 clusters)
- Rows 7 to 11: Work Row 2 of the granny stitch. (22 clusters)
- Row 12 (decrease row): Repeat Row 6. (20 clusters)
- Rows 13 to 17: Work Row 2 of the granny stitch. (20 clusters)
- Row 18 (decrease row): Repeat Row 6. (18 clusters)
- Rows 19 to 23: Work Row 2 of the granny stitch. (18 clusters)
- Row 24 (decrease row): Repeat Row 6. (16 clusters)
- Rows 25 to 28: Work Row 2 of the granny stitch. (16 clusters)
- Fasten off, leaving a long tail for seaming. Weave in the other ends.
Assembly and Finishing
This is where your sweater comes together. Take your time pinning before you sew.
Blocking:
- Gently wet block all four pieces to the sizes listed above. Pin them flat and let them dry fully.
- Blocking opens up the clusters and makes the colors lie evenly, so seaming is much easier.
Joining the Shoulders:
- Place the front and back with right sides together. Match the 9 shoulder clusters on each side.
- Using cream yarn, join with a slip stitch seam or a whip stitch. The center 12 clusters stay open for the neck.
Joining the Sides:
- Join the side seams from the hem up for the first 28 rows. The top 16 rows on each side stay open for the armholes.
- Match your hem stripes carefully so the teal and blue rows line up across the front and back.
Attaching the Sleeves:
- Fold each sleeve in half lengthwise, right sides together, and seam the long edge from the cuff up to the top. Turn the sleeve right side out.
- Match the center of the top edge of the sleeve to the shoulder seam. Pin along each side of the armhole, working down toward the underarm.
- Sew the sleeve into the armhole with a whip stitch. The armhole edge is about 16 inches (40 cm) long, and the sleeve top edge is also about 16 inches (40 cm).
- Repeat for the second sleeve.
Adding the Neck Edging:
- With the right side facing, join cream at the shoulder seam.
- Round 1: Ch 1. Work sc evenly around the neck opening, placing about 3 sc in each space and 1 sc in each stitch along the sides. Join with a sl st to the first sc.
- Round 2: Ch 1. Sc in each stitch around. Join with a sl st.
- Round 3: Repeat Round 2. Fasten off and weave in the end.
Adding the Hem and Cuff Edging:
- With the right side facing, join cream at the side seam of the hem.
- Round 1: Ch 1. Sc evenly around the bottom edge, placing about 3 sc in each space between clusters. Join with a sl st to the first sc.
- Round 2: Ch 1. Sc in each stitch around. Join with a sl st. Fasten off.
- Repeat the same 2 rounds around each cuff.
- Weave in all remaining ends and give the whole sweater one last gentle steam.
A Few Friendly Tips
- Swatch first: A garment is more fun when it fits. Make a 5 x 5 inch swatch in granny stitch and check your gauge. If you have too many clusters per inch, go up a hook size. If you have too few, go down.
- Keep the edges straight: The most common mistake in granny stitch is losing the last dc of the row. Always work a dc into the top of the turning chain, and count your clusters every few rows.
- Adjusting the fit: Every 3 clusters adds about 2 inches to the width. For a bigger or smaller sweater, add or remove clusters on both the front and the back, and keep the shoulders and neck the same. For longer or shorter, add or remove rows before the neck split.
- Color planning: Lay out all your yarn before you start, and take a photo of the stripe order. Seeing the whole palette helps you spot where colors clump together.
- Make it your own: Try warm autumn shades, soft pastels, or one bold accent color for a modern twist. You can also leave out the cuff edging for a looser, more relaxed sleeve.
- Care: Machine wash gently on a cool setting and lay flat to dry. Wash the first time on its own, in case any of the darker colors bleed.
I hope you enjoy making this cozy sandy sweater. It is such a relaxing project, and every striped row makes it more fun to watch it grow.
If you run into any trouble or just want to share how your sweater turned out, please reach out. I love seeing what you create.
Happy crocheting!