October 2, 2026
Snowy Beanie Friends
A whole snowy family in their coziest winter hats. Each little snowman has rosy cheeks, a tiny orange carrot nose, a sweet embroidered smile, and a fluffy pom-pom beanie in red, lilac, blue, green, tan, or sunny yellow. Little scarves, shiny buttons, and tiny hat decorations like holly leaves, a flower, a heart, a star, and a snowflake make each one its own little character. They work up fast from simple spheres, so they are great for using up scrap yarn, filling a winter shelf, or giving as gifts. Pour something warm, pick your favorite hat colors, and let us build a snow family.
Jump to pattern instructions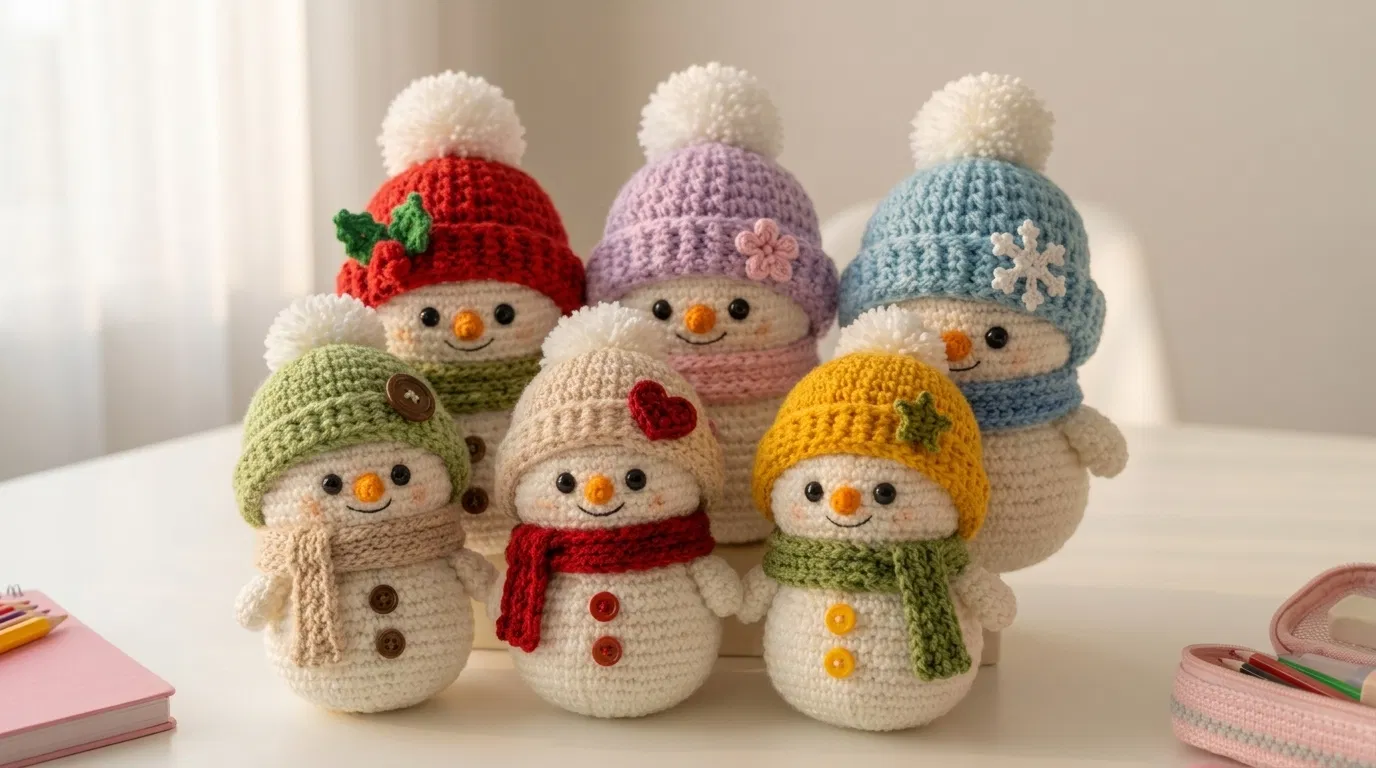
Snowy Beanie Friends
Difficulty: Beginner friendly (simple spheres and tiny accessories, perfect for practicing amigurumi)
Finished Size: About 5.5 inches (14 cm) tall including the hat and pom-pom, in DK weight yarn. See the tips for making a bigger one.
Time to Complete: About 2 hours per snowman.
What You Will Need
Yarn:
- White or cream (for the head, body, and arms)
- One hat color per snowman, such as red, lilac, light blue, sage green, tan, or mustard yellow
- A second color for the scarf, such as red, pink, blue, green, or tan
- White (for the pom-pom)
- Orange (for the nose)
- Light pink (optional, for the cheeks)
- Black (for the smile)
- Small scraps in green, red, pink, yellow, and white for the hat decorations
- Tip: Use a DK weight cotton or cotton blend yarn. Cotton gives crisp stitches that hide the stuffing and look great on small shapes.
Tools:
- 3.0 mm (D/3) crochet hook. A smaller hook than usual keeps your stitches tight.
- 6 mm black safety eyes (1 pair per snowman), or black yarn for embroidered eyes
- 2 buttons per snowman, about 10 to 12 mm, in brown, red, or yellow
- Poly-fil or fiberfill stuffing
- Yarn needle with a large eye for sewing and weaving in ends
- Stitch markers
- Sharp scissors
- Straight pins for placing the pieces before sewing
- Piece of cardboard or a fork for making the pom-poms
- Sewing needle and thread for the buttons
The Basics (US Terms)
- MR = magic ring
- ch = chain
- sc = single crochet
- hdc = half double crochet
- dc = double crochet
- inc = increase (work 2 single crochets into the same stitch)
- dec = decrease (work 2 single crochets together, invisible decrease is best)
- sl st = slip stitch
- BLO = back loop only
- The head, body, nose, arms, hat, and decorations are worked in continuous rounds. Use a stitch marker to mark the first stitch of each round.
- The scarf is worked flat in rows. Ch 1 at the start of each row does not count as a stitch.
Let Us Get Started
Each snowman is made of a head, a body, a nose, two arms, a hat, a pom-pom, and a scarf. Then add buttons and one little hat decoration.
Part 1: The Head
Worked with white yarn.
- Round 1: Work 6 sc into a magic ring. (6 stitches)
- Round 2: Inc in every stitch around. (12 stitches)
- Round 3: (1 sc, inc) repeat 6 times. (18 stitches)
- Round 4: (2 sc, inc) repeat 6 times. (24 stitches)
- Rounds 5 to 9: Work 1 sc in every stitch around. (24 stitches) If you are using safety eyes, place them now between rounds 6 and 7, about 7 stitches apart. Secure them tightly on the inside.
- Round 10: (2 sc, dec) repeat 6 times. (18 stitches)
- Round 11: (1 sc, dec) repeat 6 times. (12 stitches)
- Stuff the head firmly so it is nice and round.
- Round 12: Dec 6 times. (6 stitches)
- Cut the yarn, leaving a long tail. Pull the tail through the front loops of the last 6 stitches and pull tight to close. Weave in the end.
Part 2: The Body
Worked with white yarn.
- Round 1: Work 6 sc into a magic ring. (6 stitches)
- Round 2: Inc in every stitch around. (12 stitches)
- Round 3: (1 sc, inc) repeat 6 times. (18 stitches)
- Round 4: (2 sc, inc) repeat 6 times. (24 stitches)
- Round 5: (3 sc, inc) repeat 6 times. (30 stitches)
- Rounds 6 to 10: Work 1 sc in every stitch around. (30 stitches)
- Round 11: (3 sc, dec) repeat 6 times. (24 stitches)
- Round 12: (2 sc, dec) repeat 6 times. (18 stitches)
- Stuff the body firmly, making sure the bottom is nice and round so the snowman sits upright.
- Round 13: (1 sc, dec) repeat 6 times. (12 stitches)
- Round 14: Dec 6 times. (6 stitches)
- Cut the yarn, leaving a long tail. Pull the tail through the front loops of the last 6 stitches and pull tight to close. Weave in the end.
Part 3: The Carrot Nose
Worked with orange yarn.
- Round 1: Work 5 sc into a magic ring. (5 stitches)
- Rounds 2 to 3: Work 1 sc in every stitch around. (5 stitches)
- Stuff with a tiny bit of stuffing, just enough to keep the shape.
- Cut the yarn, leaving a long tail for sewing. Leave the end open.
Part 4: The Arms (Make 2)
Worked with white yarn.
- Round 1: Work 6 sc into a magic ring. (6 stitches)
- Rounds 2 to 4: Work 1 sc in every stitch around. (6 stitches)
- Stuff very lightly.
- Cut the yarn, leaving a long tail for sewing. Leave the end open.
Part 5: The Beanie
Worked with the hat color. Start at the top.
- Round 1: Work 6 sc into a magic ring. (6 stitches)
- Round 2: Inc in every stitch around. (12 stitches)
- Round 3: (1 sc, inc) repeat 6 times. (18 stitches)
- Round 4: (2 sc, inc) repeat 6 times. (24 stitches)
- Rounds 5 to 9: Work 1 sc in every stitch around. (24 stitches)
- Round 10: Work 1 sc in the BLO of every stitch around. (24 stitches) This leaves a little ridge, which makes the fold line for the brim.
- Rounds 11 to 13: Work 1 sc in every stitch around. (24 stitches)
- Join with a sl st to the next stitch and fasten off. Weave in the ends.
- Fold the brim up along the ridge, so the ridge sits at the bottom edge of the hat and the folded brim sits on the outside. For a chunkier ribbed brim like the lilac and tan hats, work Rounds 11 to 13 in hdc, working each stitch in the BLO.
Part 6: The Pom-Pom
Made with white yarn.
- Wrap white yarn about 50 times around a piece of cardboard that is 1.5 inches (4 cm) wide, or around the prongs of a fork.
- Slide the loops off, and tie them tightly in the middle with a long piece of yarn. Leave the tails long for sewing.
- Cut the loops, fluff the pom-pom, and trim it into a round shape. It should be about 1.5 inches (4 cm) across.
Part 7: The Scarf
Worked flat with the scarf color.
- Foundation: Ch 41.
- Row 1: Sc in the 2nd ch from the hook and in each chain across. (40 stitches)
- Rows 2 to 3: Ch 1, turn. Sc in the BLO of every stitch across. (40 stitches)
- Fasten off and weave in the ends.
- Fringe (optional): Cut 3 pieces of yarn, each 2 inches long. Fold them in half and pull the loop through one end of the scarf, then pull the tails through the loop. Trim the ends. Repeat on the other end.
- Ribbed look (optional): For the chunky, knitted look in the photo, work a second scarf strip with the same stitches, but make Rows 2 and 3 in hdc, working each stitch in the BLO.
Part 8: The Hat Decorations
Make one for each hat, or mix and match.
Flower (lilac hat, in pink):
- Work 1 MR. Ch 2, 2 dc in the ring, ch 2, sl st in the ring. Repeat from * 5 times. (5 petals)
- Pull the ring tight and fasten off, leaving a tail for sewing.
- Add a tiny yellow stitch in the center.
Holly (red hat):
- Leaf (make 2, in green): Ch 7. Sl st in the 2nd ch from the hook, sc in the next ch, hdc in the next ch, dc in the next ch, hdc in the next ch, sc in the next ch. Fasten off, leaving a tail for sewing.
- Berry (in red): Work 6 sc into a magic ring. Join with a sl st, pull the ring tight, and fasten off, leaving a tail for sewing.
Star (yellow hat, in green):
- Work 1 MR. Ch 3, sl st in the 2nd ch from the hook, sc in the next ch, sl st in the ring. Repeat from * 5 times. (5 points)
- Pull the ring tight and fasten off, leaving a tail for sewing.
Heart (tan hat): Cut a tiny heart from red felt, or embroider one with red yarn, using two small slanted stitches that meet at the bottom, then two curved stitches on top.
Snowflake (blue hat): Cut one from white felt, or embroider one with white yarn, using 3 long straight stitches crossing at the center, then a tiny stitch across each arm tip.
Button (green hat): Sew a large brown button to the side of the brim.
Assembly and Finishing
This is where your snowmen come to life. Take your time pinning the pieces before you sew.
Making the Face:
- Pin the nose between the eyes, centered and about 1 round lower. Sew it on all the way around with the long tail.
- With black yarn, embroider a small smile below the nose, about 6 stitches wide. Use a few small stitches to make a gentle curve.
- For the rosy cheeks, use a tiny bit of light pink yarn and make 2 or 3 small stitches under each eye, or brush on a little blush.
Attaching the Head:
- Pin the head on top of the body, tilting it very slightly forward.
- Sew all the way around the base of the head, going through the top stitches of the body. Sew firmly, so the head does not wobble.
Attaching the Arms:
- Pin an arm on each side of the body, just below the head, angled slightly down.
- Sew the top of each arm in place and leave the end free, so each arm looks like a tiny mitten.
Adding the Buttons:
- Sew 2 buttons down the center of the body, about 3 stitches apart, using the sewing needle and thread.
- Make the stitches tight, so the buttons stay secure.
Adding the Scarf:
- Wrap the scarf around the neck, where the head meets the body, with one end hanging in front.
- Sew the two ends together at the back with a few small stitches, so the scarf stays in place.
Adding the Hat:
- Pin the beanie on top of the head, with the brim covering the top of the forehead and sitting just above the eyes.
- Sew it on all around the brim with a few small stitches, going through the head.
- Sew the pom-pom to the top of the hat.
- Sew your hat decoration to the side of the brim.
- Weave in all remaining ends.
A Few Friendly Tips
- Keep it snug: Keep your tension tight and even. Loose stitches let the stuffing show through, especially on white yarn.
- Round heads: Stuff the head and body in small pieces, and push the stuffing into the edges, so the spheres stay round and smooth.
- Eye placement: Pin the eyes in place and look at them before you secure them. Placing them lower on the head makes the snowman look younger and sweeter.
- Making them bigger: For a bigger snowman, use a worsted weight yarn and a 4.0 mm (G/6) hook, or a chunky yarn and a larger hook, with the same stitch counts. A bigger snowman needs a bigger pom-pom.
- Make it your own: Try different hat colors, a striped scarf, little earmuffs, a tiny broom, or a ribbon bow for a girl snowman.
- Great uses: They make cute shelf decorations, tree ornaments (add a loop of yarn to the top of the hat), gift toppers, or little gifts for friends.
- Safe for little ones: For babies and toddlers, skip the safety eyes, buttons, and hat decorations. Embroider the eyes and buttons with yarn instead.
I hope you enjoy making this cheerful little snow family. They are such a quick and satisfying project, and every hat makes each one more fun.
If you run into any trouble or just want to share how your snowmen turned out, please reach out. I love seeing what you create.
Happy crocheting!