October 2, 2026
Tiny Cable Sweaters
A whole little wardrobe of cozy cable sweaters in sage green, butter yellow, powder blue, denim, slate, and teal. Each one has a chunky folded collar, a twisting cable down the middle, and stubby sleeves, so they look like they were knitted for a doll. They are crocheted with post stitches, which give you the cable look with just basic stitches. Use them as bottle or mug cozies, doll and plush clothes, gift toppers, or little tree ornaments. Pour something warm, pick your favorite colors, and let us stitch a tiny closet.
Jump to pattern instructions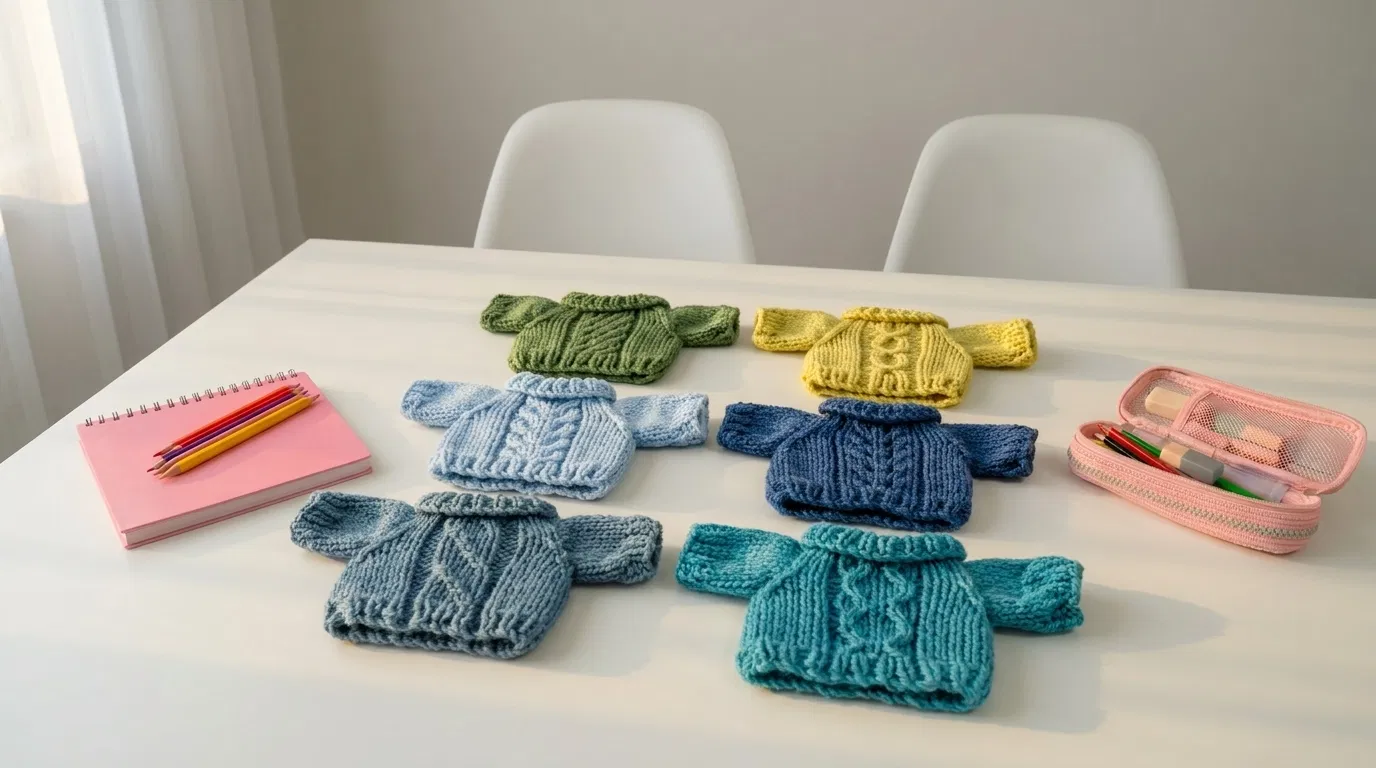
Tiny Cable Sweaters
Difficulty: Easy to intermediate (basic stitches plus post stitches for the ribbing and the cable)
Finished Size: Each sweater is about 4.5 inches wide and 4.5 inches tall, with a total width of about 9 inches across the sleeves.
Time to Complete: About 2 hours per sweater.
What You Will Need
Yarn (one color per sweater):
- Sage green
- Butter yellow
- Powder blue
- Denim blue
- Slate blue
- Teal
- Each sweater uses about 50 yards (45 m).
- Tip: Use a DK weight cotton or cotton blend yarn. Cotton gives the cable crisp definition and the tiny sweater holds its shape. A soft wool blend gives the fluffy, knitted look in the photo.
Tools:
- 3.0 mm (D/3) crochet hook. A smaller hook than usual keeps the fabric firm and neat.
- Yarn needle with a large eye for sewing and weaving in ends
- Stitch markers
- Sharp scissors
- Straight pins
Gauge: 20 stitches = 4 inches (10 cm) in double crochet. Gauge is not critical for a decoration, but if you want to fit a specific doll or bottle, make a swatch and adjust.
The Basics (US Terms)
- ch = chain
- sc = single crochet
- dc = double crochet
- inc = increase (work 2 stitches into the same stitch)
- sl st = slip stitch
- FPdc = front post double crochet (yarn over, insert the hook from front to back to front around the post of the stitch, and work a dc)
- BPdc = back post double crochet (yarn over, insert the hook from back to front to back around the post of the stitch, and work a dc)
- RS / WS = right side / wrong side
- st(s) = stitch(es)
- Unless stated otherwise, ch 2 at the start of each dc row does not count as a stitch, and ch 1 at the start of each sc row does not count as a stitch.
- Post stitches can be worked around any stitch of the row below, even if that stitch was a different kind of post stitch.
The Stitch Patterns
Rib (FPdc and BPdc): This makes the stretchy vertical ribs you see on the hem, cuffs, and collar.
- On RS rows, work (FPdc, BPdc) across.
- On WS rows, work (BPdc, FPdc) across, so the ribs line up from row to row.
The Cable (6 stitches):
- Plain cable rows (RS): FPdc in each of the 6 stitches.
- Plain cable rows (WS): BPdc in each of the 6 stitches.
- Cross row (RS only): Skip the next 3 stitches. FPdc in each of the next 3 stitches. Then work 1 FPdc around each of the 3 skipped stitches, working in front of the 3 stitches you just made. This crosses the cable and gives the twisting rope look.
Let Us Get Started
We will make four flat pieces, the front, the back, and two sleeves, then sew them together and add the collar. The front and the back are worked the same, so the cable will show on both sides.
Part 1: The Front and the Back (Make 2)
The Ribbed Hem:
- Foundation: Ch 23.
- Row 1 (WS): Sc in the 2nd ch from the hook and in each chain across. (22 stitches)
- Row 2 (RS): Ch 2, turn. (FPdc, BPdc) repeat 11 times. (22 stitches)
- Row 3 (WS): Ch 2, turn. (BPdc, FPdc) repeat 11 times. (22 stitches)
- Row 4 (RS): Repeat Row 2. (22 stitches)
- Row 5 (WS): Repeat Row 3. (22 stitches)
The Cable Body:
Each row has 22 stitches, made of 8 rib stitches, the 6 cable stitches, and 8 more rib stitches.
- Row 6 (RS): Ch 2, turn. (FPdc, BPdc) 4 times, FPdc in each of the next 6 stitches, (FPdc, BPdc) 4 times. (22 stitches)
- Row 7 (WS): Ch 2, turn. (BPdc, FPdc) 4 times, BPdc in each of the next 6 stitches, (BPdc, FPdc) 4 times. (22 stitches)
- Row 8 (RS, cross row): Ch 2, turn. (FPdc, BPdc) 4 times. Work the cable cross over the next 6 stitches. (FPdc, BPdc) 4 times. (22 stitches)
- Row 9 (WS): Repeat Row 7.
- Row 10 (RS): Repeat Row 6.
- Row 11 (WS): Repeat Row 7.
- Row 12 (RS, cross row): Repeat Row 8.
- Row 13 (WS): Repeat Row 7.
- Fasten off, leaving a long tail for seaming. Weave in the other ends.
Part 2: The Sleeves (Make 2)
Worked from the cuff up.
The Ribbed Cuff:
- Foundation: Ch 13.
- Row 1 (WS): Sc in the 2nd ch from the hook and in each chain across. (12 stitches)
- Row 2 (RS): Ch 2, turn. (FPdc, BPdc) repeat 6 times. (12 stitches)
- Row 3 (WS): Ch 2, turn. (BPdc, FPdc) repeat 6 times. (12 stitches)
- Row 4 (RS): Repeat Row 2.
- Row 5 (WS): Repeat Row 3.
The Sleeve:
- Row 6 (RS, increase row): Ch 2, turn. 2 dc in the first stitch, dc in each stitch across to the last stitch, 2 dc in the last stitch. (14 stitches)
- Row 7 (WS): Ch 2, turn. Dc in each stitch across. (14 stitches)
- Row 8 (RS, increase row): Repeat Row 6. (16 stitches)
- Rows 9 to 12: Ch 2, turn. Dc in each stitch across. (16 stitches)
- Fasten off, leaving a long tail for seaming. Weave in the other ends.
Part 3: The Collar
Made after the body is sewn together, see Assembly.
Assembly and Finishing
This is where your tiny sweater comes together. Take your time pinning before you sew.
Joining the Shoulders:
- Place the front and back with right sides together, with the top edges matching.
- Using the same yarn, join the first 6 stitches and the last 6 stitches of the top edge with a whip stitch or slip stitch seam. The center 10 stitches stay open for the neck.
Joining the Sides:
- Join the side edges from the hem up through Row 8, which is the hem plus the first 3 rows of the cable body.
- The top 5 rows (Rows 9 to 13) on each side stay open for the armholes.
Making the Sleeves:
- Fold each sleeve in half lengthwise with the right sides together. Seam the long edge, matching the ribs on the cuff.
- Turn the sleeve right side out. The top edge (16 stitches) is the edge you will sew to the armhole.
Attaching the Sleeves:
- Match the sleeve seam to the underarm of the sweater.
- Pin the top edge of the sleeve evenly around the armhole opening.
- Sew the sleeve in with a whip stitch. Repeat for the second sleeve.
Adding the Collar:
- With the right side facing, join the yarn at a shoulder seam.
- Round 1: Ch 1. Sc evenly around the neck opening, working 1 sc in each of the 10 stitches across the front and the 10 stitches across the back. Join with a sl st to the first sc. (20 stitches)
- Round 2: Ch 2. (FPdc, BPdc) repeat 10 times. Join with a sl st to the top of the beginning ch 2. (20 stitches)
- Rounds 3 to 5: Repeat Round 2.
- Fasten off and weave in the end. Fold the collar over to make the cozy turtleneck, as in the photo.
Final Touches:
- Weave in all remaining ends.
- Pin the sweater flat and give it a gentle steam. This makes the cable and the ribs stand out.
A Few Friendly Tips
- Tidy cables: Count your stitches at the end of each row, and use a stitch marker at the start of the cable. A cable worked over 6 stitches is easy to lose track of.
- Loose crossings: Keep the crossing stitches a little loose, so the cable does not pucker the fabric.
- Different sizes: For a bigger sweater, add 4 stitches to the front and back (keeping the cable in the center), and add 2 stitches to the sleeves. Add rows in sets of 4 for the cable repeat.
- Make it your own: Try a two-color set, with a contrast collar and cuffs. A tiny button on the shoulder or a little hanging loop at the back of the neck turns it into a tree ornament.
- Great uses: They fit as little bottle cozies, mug sleeves, plush clothes, and gift toppers. Check the sizing against your doll or bottle, and change the number of rows to fit.
- Care: Machine wash gently on a cool setting and lay flat to dry.
I hope you enjoy making this tiny cable wardrobe. They are quick, satisfying projects, and they make the sweetest handmade gifts.
If you run into any trouble or just want to share how your sweaters turned out, please reach out. I love seeing what you create.
Happy crocheting!