September 26, 2026
Boho Textured Wave Blanket Pattern
There is something deeply comforting about wrapping yourself in a blanket that looks like it took a hundred hours to make, even if you just spent a few cozy weekends on it. This boho textured wave blanket is all about rich, sweeping curves and incredible 3D texture. Featuring dusty roses, warm mustards, and creamy neutrals, it brings a beautiful, earthy vibe to any room. It looks incredibly complex, but we are going to break it down into simple, repeating rows. Grab your favorite yarn, put on a good show, and let us make something truly beautiful together.
Jump to pattern instructions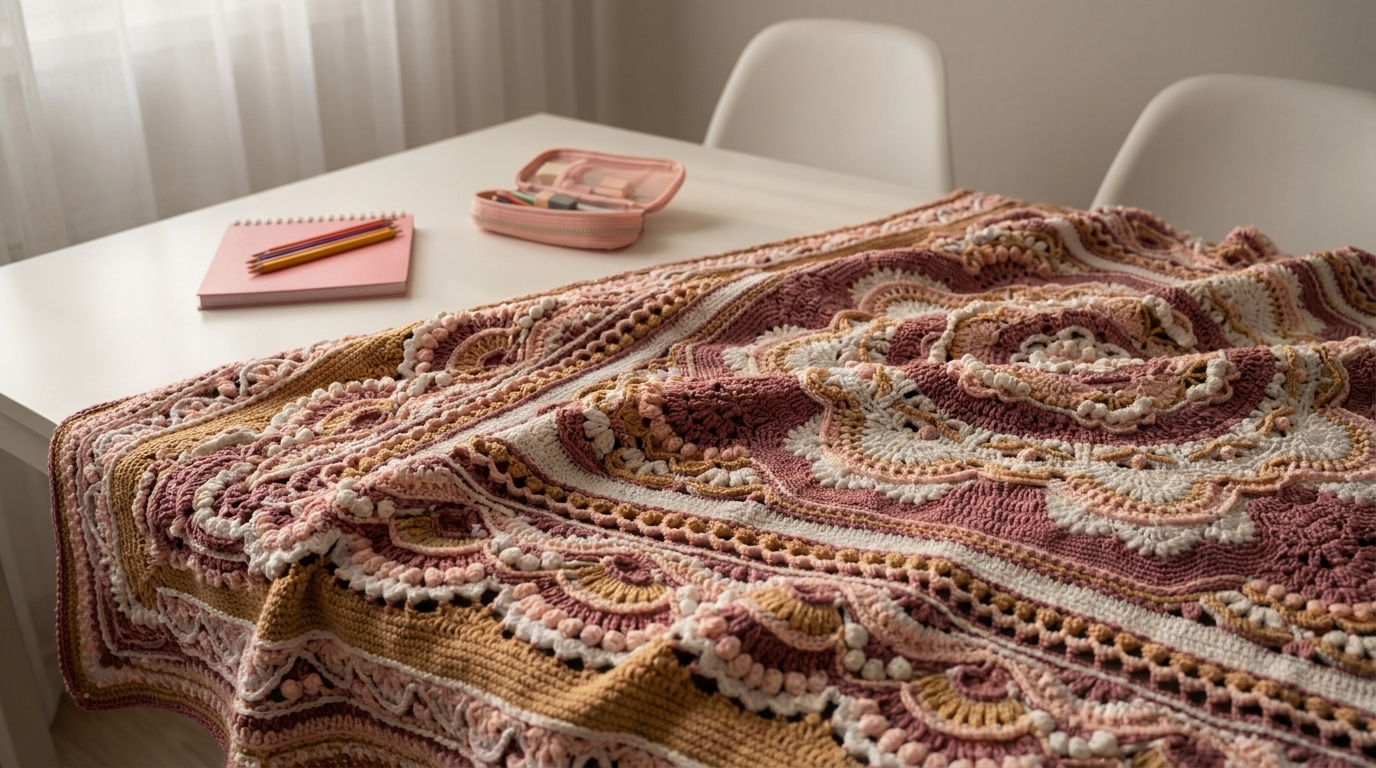
Boho Textured Wave Blanket Pattern
Difficulty: Intermediate (perfect for learning new textured stitches)
Finished Size: Approximately 45 inches wide by 60 inches long (Throw size). Easily adjustable by adding or removing multiples in your foundation chain.
Time to Complete: 3 to 4 weeks of relaxed evening crocheting.
What You Will Need
Yarn:
- Worsted weight (Size 4) yarn. This pattern uses a lot of texture, so a soft acrylic or a cotton-acrylic blend works beautifully.
- You will need about 1,500 to 1,800 yards total.
- Color Palette: To match the photo, grab Dusty Rose (Color A), Mauve (Color B), Cream (Color C), Mustard/Gold (Color D), and Pale Pink (Color E).
- Tip: You do not need to buy full skeins of every color. This is a fantastic scrap-busting project. Use what you have and let the colors blend organically.
Tools:
- 5.0 mm (H/8) or 5.5 mm (I/9) crochet hook. Choose the size that gives you a soft, drapey fabric. If you crochet tightly, go up a hook size.
- Yarn needle for weaving in ends.
- Sharp scissors.
- Stitch markers (very helpful for counting your pattern repeats).
The Basics (US Terms)
- ch = chain
- sc = single crochet
- dc = double crochet
- tr = treble crochet
- sl st = slip stitch
- bob = bobble stitch (yarn over, insert hook, pull up a loop, yarn over, pull through 2 loops. Repeat this 4 more times in the same stitch. You will have 9 loops on your hook. Yarn over and pull through all 9 loops. Chain 1 to lock it).
- sh = shell stitch (work 5 double crochets into the same stitch or space).
- cl = cluster stitch (yarn over, insert hook, pull up a loop, yarn over, pull through 2 loops. Repeat this 2 more times in the same stitch. You will have 4 loops on your hook. Yarn over and pull through all 4 loops).
Let Us Get Started
The magic of this blanket is in the repetition. Once you get the rhythm of the five rows, you will find yourself zoning out and making incredible progress.
Foundation Chain: Chain a multiple of 18, plus 2 extra chains for turning. For a throw blanket, I recommend chaining 110.
Row 1: The Wave Foundation (Color A)
- Double crochet in the 4th chain from the hook and in the next 2 chains.
- Work 2 double crochets in each of the next 3 chains. (This creates the peak of the wave).
- Double crochet in the next 6 chains.
- Skip the next 3 chains. (This creates the valley of the wave).
- Double crochet in the next 6 chains.
- Repeat steps 2 through 5 across the row until you have 3 chains left.
- Work 2 double crochets in each of the last 3 chains. Turn.
Row 2: The Bobble Row (Color B)
- Chain 3 (counts as your first double crochet).
- Work 1 double crochet in the next 2 stitches.
- Work 1 bobble stitch in the next stitch. Work 1 double crochet in each of the next 8 stitches.
- Repeat from * to * across the row.
- Work 1 double crochet in the last 2 stitches, and 1 double crochet in the top of the turning chain. Turn.
Row 3: The Shell Row (Color C)
- Chain 3.
- Work 1 double crochet in the next stitch.
- Skip the next 2 stitches. Work 1 shell (5 dc) in the next stitch. Skip the next 2 stitches. Work 1 double crochet in each of the next 4 stitches.
- Repeat from * to * across the row.
- Work 1 double crochet in the top of the turning chain. Turn.
Row 4: The Cluster Row (Color D)
- Chain 3.
- Work 1 double crochet in the next 3 stitches.
- Work 1 cluster stitch in the center stitch of the shell from the previous row. Work 1 double crochet in each of the next 8 stitches.
- Repeat from * to * across the row.
- Work 1 double crochet in the last 3 stitches, and 1 double crochet in the top of the turning chain. Turn.
Row 5: The Grounding Row (Color E)
- Chain 3.
- Work 1 double crochet in every stitch across the row.
- Work 1 double crochet in the top of the turning chain. Turn.
Changing Colors: To get that beautiful, blended boho look, change your yarn color at the end of every row. When you are about to do the final yarn-over of the last stitch in a row, drop your current color and pull the new color through to finish the stitch. Carry the unused yarn loosely along the side of your work to cut down on weaving in ends.
Repeating: Repeat Rows 1 through 5 until your blanket reaches your desired length. End on Row 5.
The Border
A nice, simple border frames all that beautiful texture without taking away from it.
- Join Color A (or your favorite color) to any corner.
- Chain 1. Work single crochets evenly all the way around the blanket. Aim for about 3 single crochets for every row end, and 1 single crochet for every stitch along the top and bottom.
- Work 3 single crochets in each corner to keep it flat.
- Join with a slip stitch. Fasten off and weave in your ends.
A Few Friendly Tips
- Embrace the imperfections: Textured blankets are incredibly forgiving. If you miss a stitch or your tension shifts a little, the bobbles and shells will hide it beautifully. Do not stress over perfection.
- Managing your yarn: Because you are changing colors frequently, use yarn bowls or small bags to keep your different colors from tangling together. It saves so much frustration.
- Weave as you go: I know it is tempting to leave all the ends for the end, but weaving them in as you finish each color section will make finishing the blanket feel like a breeze instead of a chore.
- Blocking: Once you finish, lightly steam block your blanket. You do not need to pin it aggressively, just hovering a steam iron over the fabric will relax the fibers and make those bobbles and shells pop.
I really hope you enjoy making this blanket. It is a project that rewards your patience with an incredibly rich, tactile result. It is the kind of blanket you will want to keep on the couch forever.
If you run into any trouble or just want to share a picture of your finished colors, please reach out. I love seeing how everyone makes these patterns their own.
Happy crocheting.