October 19, 2026
Cheers Wine Pals
The cutest little wine party you have ever seen, and not a drop is spilled. A pair of dark green bottles with burgundy caps, each wearing a cream label with a sleepy smile, stand next to two stemmed glasses with berry-red wine and cream rims. A round little flask in a tan basket, tied with string, joins in the fun. Every one of them has tiny black dot eyes and a sweet embroidered smile. They are made from simple tubes and spheres, so they are quick to stitch, and they make adorable shelf decor, kitchen display pieces, or gifts for wine lovers. Pour yourself something warm, pick your favorite wine colors, and let us make a toast.
Jump to pattern instructions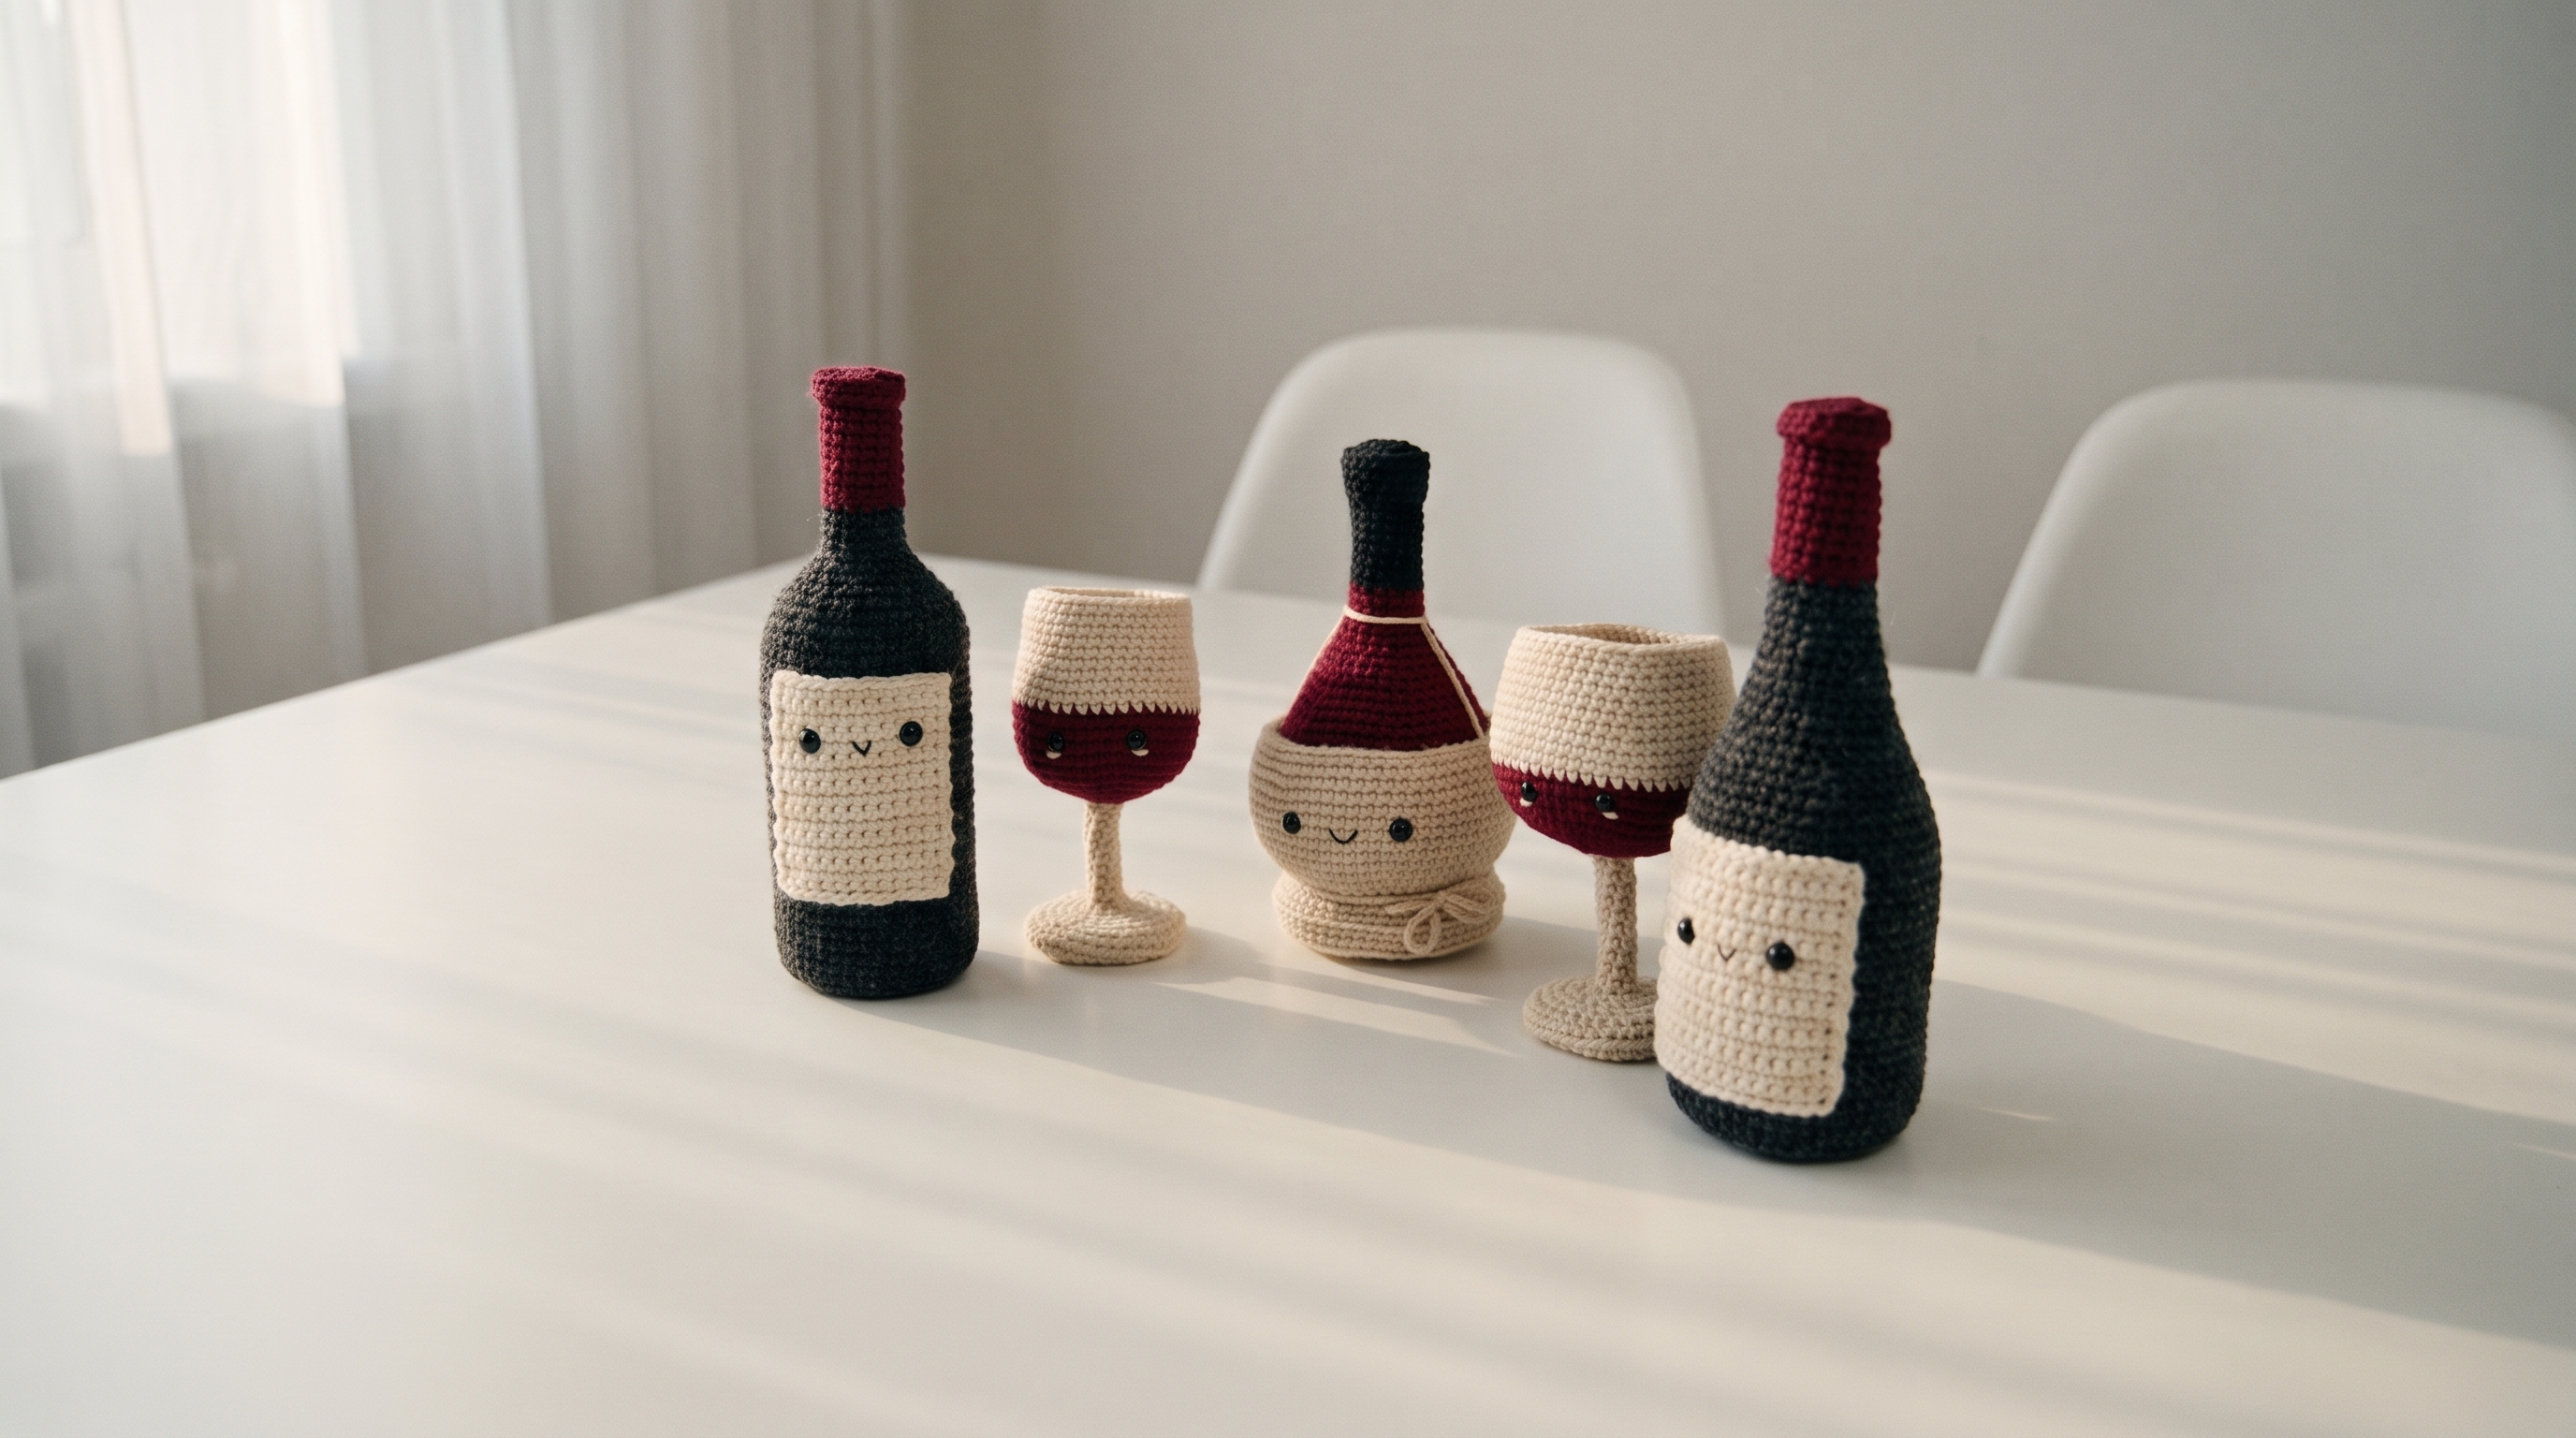
Cheers Wine Pals
Difficulty: Easy (basic shapes, plus a little embroidery for the faces)
Finished Size: The bottle is about 5 inches (13 cm) tall, the glass is about 4 inches (10 cm) tall, and the flask is about 4.5 inches (11 cm) tall, in DK weight yarn.
Time to Complete: About 2 hours per piece, or 5 to 6 hours for the whole set.
What You Will Need
Yarn:
- Dark charcoal green or black (K), about 50 yards (46 m), for the bottle body and the flask neck
- Burgundy (B), about 50 yards (46 m), for the bottle neck, the wine, and the flask shoulder
- Cream (C), about 70 yards (64 m), for the labels, the glass bowls, stems, and bases, and the string
- Tan or straw (T), about 30 yards (27 m), for the flask basket
- Black, a small scrap, for the faces
- Tip: Use a DK weight 100% cotton yarn. Cotton gives crisp stitches that hide the stuffing and make the pieces look neat and firm. Use a smaller hook than usual, so your stitches stay tight.
Tools:
- 3.0 mm (D/3) crochet hook
- Poly-fil or fiberfill stuffing
- Black embroidery thread or yarn, for the eyes and smiles (or 4 mm black beads)
- Yarn needle with a large eye for sewing and embroidering
- Stitch markers
- Sharp scissors
- Straight pins
- Optional: pipe cleaners for the glass stems, and a little blush for the cheeks
The Basics (US Terms)
- MR = magic ring
- ch = chain
- sc = single crochet
- inc = increase (work 2 single crochets into the same stitch)
- dec = decrease (work 2 single crochets together, invisible decrease is best)
- sl st = slip stitch
- BLO = back loop only
- K, B, C, T = charcoal, burgundy, cream, tan
- All pieces are worked in continuous rounds, except the label. Use a stitch marker to mark the first stitch of each round.
- When changing colors, pull the new color through on the last stitch of the previous round.
Let Us Get Started
The set has three parts. You can make just one, or all of them. The bottle is made of a body with a neck, and a label. The glass is made of a bowl, a lid, a stem, and a base. The flask is made of a round body, a stand, and a string.
Part 1: The Wine Bottle
The Bottle Body
Worked with charcoal and burgundy yarn. Start at the bottom.
- Round 1 (K): Work 6 sc into a magic ring. (6 stitches)
- Round 2: Inc in every stitch around. (12 stitches)
- Round 3: (1 sc, inc) repeat 6 times. (18 stitches)
- Round 4: (2 sc, inc) repeat 6 times. (24 stitches)
- Round 5: (3 sc, inc) repeat 6 times. (30 stitches)
- Round 6: Work 1 sc in the BLO of every stitch around. (30 stitches) This leaves a sharp edge at the bottom, so the bottle stands up straight.
- Rounds 7 to 19: Work 1 sc in every stitch around. (30 stitches)
- Round 20: (3 sc, dec) repeat 6 times. (24 stitches)
- Round 21: (2 sc, dec) repeat 6 times. (18 stitches)
- Round 22: (1 sc, dec) repeat 6 times. (12 stitches) This makes the sloping shoulders.
- Stuff the body very firmly, pushing the stuffing right up into the shoulders.
- Rounds 23 to 25: Work 1 sc in every stitch around. (12 stitches)
- Rounds 26 to 30 (B): Change to burgundy. Work 1 sc in every stitch around. (12 stitches) Stuff the neck firmly as you go. This is the burgundy cap.
- Round 31: Work 1 sc in the BLO of every stitch around. (12 stitches) This makes a little ridge at the top of the bottle.
- Round 32: Dec 6 times. (6 stitches)
- Cut the yarn, leaving a long tail. Pull the tail through the front loops of the last 6 stitches and pull tight to close. Weave in the end.
The Label
Worked flat with cream yarn.
- Foundation: Ch 13.
- Row 1: Sc in the 2nd ch from the hook and in each chain across. (12 stitches)
- Rows 2 to 13: Ch 1, turn. Sc in each stitch across. (12 stitches)
- Border round: Do not turn. Ch 1, then work 1 sc around the edge of the label, working 1 sc in each stitch and each row end, and 3 sc in each corner. Join with a sl st and fasten off, leaving a long tail for sewing.
- Press the label flat. It should be about 1.5 inches (4 cm) square. The label is meant to be a little stiff, so the face stays put.
Assembly
- With black embroidery thread, embroider two small round eyes on the label, about 3 stitches apart and a little above the center. Use one or two tiny stitches for each eye, or sew on two small black beads.
- Embroider a tiny smile below the eyes, about 2 stitches wide.
- If you like, brush a little blush on each cheek.
- Pin the label on the front of the bottle, centered, with the bottom edge about 2 rounds above the base ridge.
- Sew the label on with the long tail, using small stitches around the edge. Weave in all remaining ends.
Part 2: The Wine Glass
The Bowl
Worked with burgundy and cream yarn. Start at the bottom of the bowl.
- Round 1 (B): Work 6 sc into a magic ring. (6 stitches)
- Round 2: Inc in every stitch around. (12 stitches)
- Round 3: (1 sc, inc) repeat 6 times. (18 stitches)
- Round 4: (2 sc, inc) repeat 6 times. (24 stitches)
- Rounds 5 to 6: Work 1 sc in every stitch around. (24 stitches) This is the wine. The face will go on the burgundy section.
- Rounds 7 to 10 (C): Change to cream. Work 1 sc in every stitch around. (24 stitches) This is the glass above the wine, in cream.
- Do not fasten off. Stuff the bowl lightly, leaving the top open. Join with a sl st to the next stitch, and fasten off, leaving a long tail for sewing.
The Lid
Worked with cream yarn.
- Round 1: Work 6 sc into a magic ring. (6 stitches)
- Round 2: Inc in every stitch around. (12 stitches)
- Round 3: (1 sc, inc) repeat 6 times. (18 stitches)
- Round 4: (2 sc, inc) repeat 6 times. (24 stitches)
- Join with a sl st to the next stitch and fasten off, leaving a long tail for sewing.
- Pin the lid on top of the bowl, and sew it on all the way around with the tail, through the front loops of the last round of the bowl. Add a little more stuffing before you close the last few stitches.
The Stem
Worked with cream yarn.
- Round 1: Work 6 sc into a magic ring. (6 stitches)
- Rounds 2 to 12: Work 1 sc in every stitch around. (6 stitches)
- Stuff very firmly, or slide in a pipe cleaner wrapped in a little stuffing, so the stem stays straight.
- Cut the yarn, leaving a long tail for sewing. Leave the end open.
The Base
Worked with cream yarn.
- Round 1: Work 6 sc into a magic ring. (6 stitches)
- Round 2: Inc in every stitch around. (12 stitches)
- Round 3: (1 sc, inc) repeat 6 times. (18 stitches)
- Round 4: Work 1 sc in the BLO of every stitch around. (18 stitches)
- Round 5: (1 sc, dec) repeat 6 times. (12 stitches)
- Stuff the base lightly, so it is a flat, sturdy disc.
- Cut the yarn, leaving a long tail for sewing. Pull the tail through the front loops of the last 12 stitches and pull tight to close.
Assembly
- Flatten the base, and sew one end of the stem to the center, going around twice, so it stands up straight.
- Pin the other end of the stem to the bottom of the bowl, in the center, and sew it on firmly.
- With black embroidery thread, embroider two small round eyes on the burgundy section of the bowl, about 3 stitches apart. Add a tiny smile between and below them.
- If you like, brush a little blush on each cheek. Weave in all remaining ends.
Part 3: The Round Flask
The Body
Worked with tan, burgundy, and charcoal yarn. Start at the bottom.
- Round 1 (T): Work 6 sc into a magic ring. (6 stitches)
- Round 2: Inc in every stitch around. (12 stitches)
- Round 3: (1 sc, inc) repeat 6 times. (18 stitches)
- Round 4: (2 sc, inc) repeat 6 times. (24 stitches)
- Round 5: (3 sc, inc) repeat 6 times. (30 stitches)
- Round 6: (4 sc, inc) repeat 6 times. (36 stitches)
- Rounds 7 to 11: Work 1 sc in every stitch around. (36 stitches) This is the round basket. The face will go on this section.
- Round 12 (B): Change to burgundy. (4 sc, dec) repeat 6 times. (30 stitches)
- Round 13: (3 sc, dec) repeat 6 times. (24 stitches)
- Round 14: (2 sc, dec) repeat 6 times. (18 stitches)
- Round 15: (1 sc, dec) repeat 6 times. (12 stitches)
- Stuff the body firmly, so it is nice and round.
- Rounds 16 to 21 (K): Change to charcoal. Work 1 sc in every stitch around. (12 stitches) Stuff the neck as you go. This is the neck of the flask.
- Round 22: Dec 6 times. (6 stitches)
- Cut the yarn, leaving a long tail. Pull the tail through the front loops of the last 6 stitches and pull tight to close. Weave in the end.
The Stand
Worked with tan yarn.
- Round 1: Work 6 sc into a magic ring. (6 stitches)
- Round 2: Inc in every stitch around. (12 stitches)
- Round 3: (1 sc, inc) repeat 6 times. (18 stitches)
- Round 4: (2 sc, inc) repeat 6 times. (24 stitches)
- Round 5: (3 sc, inc) repeat 6 times. (30 stitches)
- Round 6: Work 1 sc in the BLO of every stitch around. (30 stitches)
- Round 7: Work 1 sc in every stitch around. (30 stitches)
- Join with a sl st to the next stitch and fasten off, leaving a long tail for sewing. The stand is a shallow dish, about 1.5 inches (4 cm) across. Stuff it very lightly.
The String
Worked with cream yarn.
- Ch 40. Fasten off, leaving a 3 inch (7.5 cm) tail at each end.
- This is the string that ties around the flask.
Assembly
- Pin the flask body into the stand, so the bottom of the basket sits in the dish. Sew them together around the base with the tail, going through the front loops of the last round of the stand.
- With black embroidery thread, embroider two small round eyes on the tan basket section, about 3 stitches apart. Add a tiny smile below them.
- Wrap the string around the base of the neck, where the black meets the burgundy, and tie it in a small bow. Tack the string to the flask with a few small stitches, so it stays put.
- Weave in all remaining ends.
A Few Friendly Tips
- Keep it snug: Keep your tension tight and even. Loose stitches let the stuffing show through, and tight stitches make the pieces look neat and firm.
- Firm necks: Stuff the bottle neck and the flask neck very firmly. A soft neck makes the bottle flop over.
- Standing strong: If a bottle tips over, add a little more stuffing to the bottom, and push the base out flat. A small round of cardboard or plastic canvas under the stuffing also helps.
- Different wines: Try a pale yellow for white wine, a pink for rosé, or a sparkly gold yarn for champagne. Use a black label and a gold cap for a fancy bottle.
- Different faces: Give each piece its own expression, such as a wink, a tongue-out smile, or tiny rosy cheeks. Make the glass hold a tiny hat or a straw.
- Cozy uses: They look wonderful on a kitchen shelf, as a table centerpiece, or as place-card holders. Add a loop of yarn at the top of each piece to hang them as ornaments.
- Size up: For bigger pieces, use chunky yarn and a larger hook, with the same stitch counts. For a bottle that is big enough to hold a real bottle, see the next tip.
- Real bottle cozy: To make a cover for a real bottle, use worsted weight yarn and a 4.0 mm hook, and work Rounds 1 to 5 with 6 more increases per round, up to 42 stitches. Work 7 inches (18 cm) of even rounds, then decrease the shoulders.
- Safe for little ones: Since all the details are embroidered, these pieces are safe for small children. Skip the beads, and use embroidery thread for the faces.
- Care: Spot clean, or hand wash gently, and lay flat to dry.
I hope you enjoy making this cheerful little wine set. They are such quick, fun projects, and they make wonderful handmade gifts.
If you run into any trouble or just want to share how your set turned out, please reach out. I love seeing what you create.
Happy crocheting, and cheers!