September 17, 2026
Coca-Cola Bottle Keychain – A Retro Crochet Accessory
Add a fizzy touch of nostalgia to your keys or bag with this adorable miniature Coca-Cola bottle keychain! Featuring the iconic red label with white script, a classic brown bottle body, and a red cap, this tiny amigurumi is a quick and satisfying project. Perfect for soda lovers and collectors of cute handmade accessories.
Jump to pattern instructions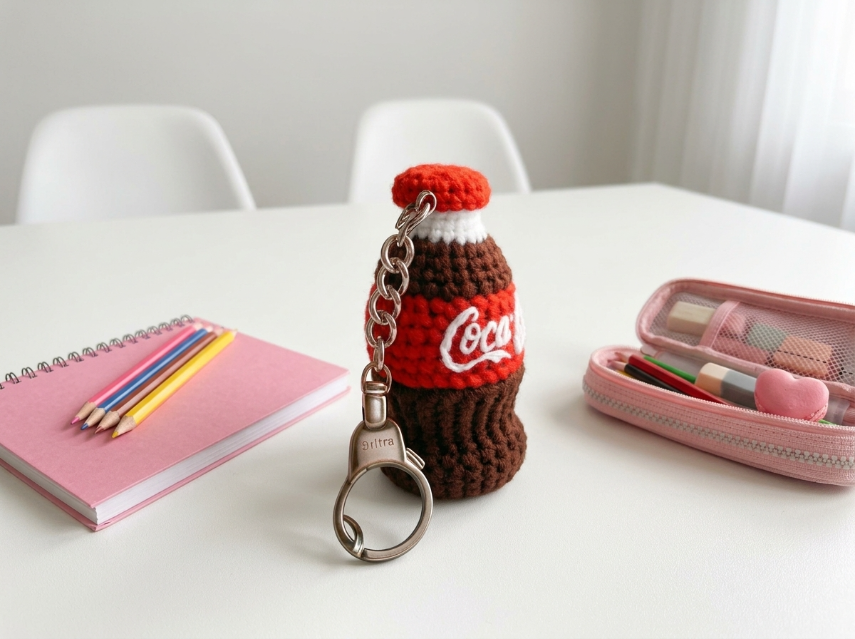
Coca-Cola Bottle Keychain – Complete Step-by-Step Pattern
1. Gathering Your Supplies
To create this iconic bottle, we'll use smooth cotton yarn for crisp stitch definition and that classic bottle shape.
- Yarn: Worsted weight cotton or acrylic blend (e.g., YarnArt Jeans, Catania, or similar). You will need small amounts of:
- Brown: For the bottle body (approx. 20g)
- Red: For the label and cap (approx. 15g)
- White: For the logo and neck ring (tiny amount)
- Hook: 2.5 mm or 3.0 mm (choose a size that gives you a tight, stuff-proof gauge)
- Notions:
- Keychain hardware (split ring and lobster clasp or keychain ring)
- Poly-fil stuffing (small amount)
- Tapestry needle
- Scissors
- Stitch markers
- Optional: Red embroidery floss for the logo details
- Finished Size: Approximately 10-12 cm (4-5 inches) tall including hardware
What you'll master: Working in continuous rounds, surface embroidery for logos, and assembling a multi-colored amigurumi.
2. Abbreviations & Special Techniques
Let's quickly review a few terms. If you're new to any of these, don't worry—you'll be a pro by the time this bottle is ready to pop!
- MR: Magic ring
- ch: Chain
- sc: Single crochet
- inc: Increase (2 sc in one stitch)
- dec: Decrease (2 sc crocheted together invisibly)
- sl st: Slip stitch
- BLO: Back loop only
- st(s): Stitch(es)
3. The Bottle Body (Brown)
We'll work from the bottom up, creating the classic contoured bottle shape.
- R1: 6 sc in MR (6)
- R2: 6 inc (12)
- R3: (1 sc, inc) x 6 (18)
- R4: (2 sc, inc) x 6 (24)
- R5: (3 sc, inc) x 6 (30)
- R6-8: 30 sc (30) [3 rows]
- Note: This creates the wide base of the bottle.
- R9: (3 sc, dec) x 6 (24)
- R10-11: 24 sc (24) [2 rows]
- Note: This is the middle section where the red label will go.
- R12: (2 sc, dec) x 6 (18)
- R13: 18 sc (18)
- Note: This is the neck of the bottle.
- R14 (Switch to White): 18 sc in BLO (18)
- Note: This creates the white ring at the bottle neck.
- Finishing: Fasten off brown, leaving a long tail. Stuff the body firmly but not too tightly.
What you'll master: Shaping a contoured bottle silhouette.
4. The Cap (Red)
A tiny red cap to top off the bottle!
- R1: 5 sc in MR (5)
- R2: 5 inc (10)
- R3: (1 sc, inc) x 5 (15)
- R4: 15 sc (15)
- R5: 15 sc in BLO (15)
- Note: This creates the cap rim.
- R6: 15 sc (15)
- Finishing: Fasten off, leaving a long tail. Stuff lightly and flatten slightly.
What you'll master: Creating a small, cylindrical cap shape.
5. The Red Label
This wraps around the middle of the bottle.
- Instructions: With Red yarn, Ch 20.
- Row 1: Sc in the 2nd ch from the hook and each ch across. (19 sc)
- Rows 2-3: Ch 1, turn. Sc in each st across. (19 sc)
- Finishing: Fasten off, leaving long tails for sewing.
What you'll master: Creating a flat rectangular panel.
6. The Coca-Cola Logo (White)
This is embroidered directly onto the red label.
Instructions:
- Thread your tapestry needle with white yarn or embroidery floss.
- Position the red label around the middle of the brown bottle body (over R10-11).
- Using backstitch or split stitch, embroider "Coca-Cola" in the classic script font across the center of the red label.
- Tip: If you're not confident freehanding the script, you can draw it lightly with a pencil first, or use a simple block letter "Coca" for a cute, simplified look.
- Secure the ends on the back of the label.
What you'll master: Surface embroidery and creating iconic branding details.
7. Assembly & The Magic of Details
Now for the magic moment where your bottle comes to life!
-
Attach the Label: Wrap the red label around the middle of the bottle body. Using your long tails, sew the ends of the label together at the back and sew the top and bottom edges to the brown body.
-
Attach the Cap: Position the red cap on top of the white neck ring. Using your long tail and a tapestry needle, sew it securely in place all the way around.
-
Attach the Keychain Hardware:
- Take your keychain ring or lobster clasp.
- Using the long brown tail from the bottle body (or a new piece of yarn), create a sturdy loop at the very top of the cap or through the side of the cap.
- Attach the keychain hardware to this loop.
- Alternative: You can insert the keychain ring directly through the top of the cap if it's secure enough.
-
Final Touches:
- Weave in all loose ends.
- Adjust the stuffing if needed to make sure the bottle holds its shape.
- Give the label a gentle press to make it lay flat.
What you'll master: Multi-step assembly and attaching functional hardware.
Final Section: Where to Go from Here
Congratulations! You've just crafted an iconic Coca-Cola Bottle Keychain. This project is incredibly satisfying and perfect for adding a retro pop of color to your keys, bag, or zipper.
From here, try experimenting with different soda brands! You could make a Pepsi bottle with blue and red, a Fanta bottle with orange, or even create a whole collection of miniature饮料 bottles. You could also scale this pattern up to make a plush pillow or a pencil case! Happy crocheting, and enjoy your fizzy new accessory!