September 17, 2026
Kawaii Pineapple Storage Basket – A Cute & Functional Crochet Project
Organize your craft supplies (or anything else!) in style with this adorable Kawaii Pineapple Basket. Featuring a textured "pineapple skin" body, a matching lid with a leafy crown, and a sweet embroidered face, this project is a perfect blend of home decor and amigurumi charm. It’s an intermediate-friendly make that results in a sturdy, useful, and incredibly cute storage solution.
Jump to pattern instructions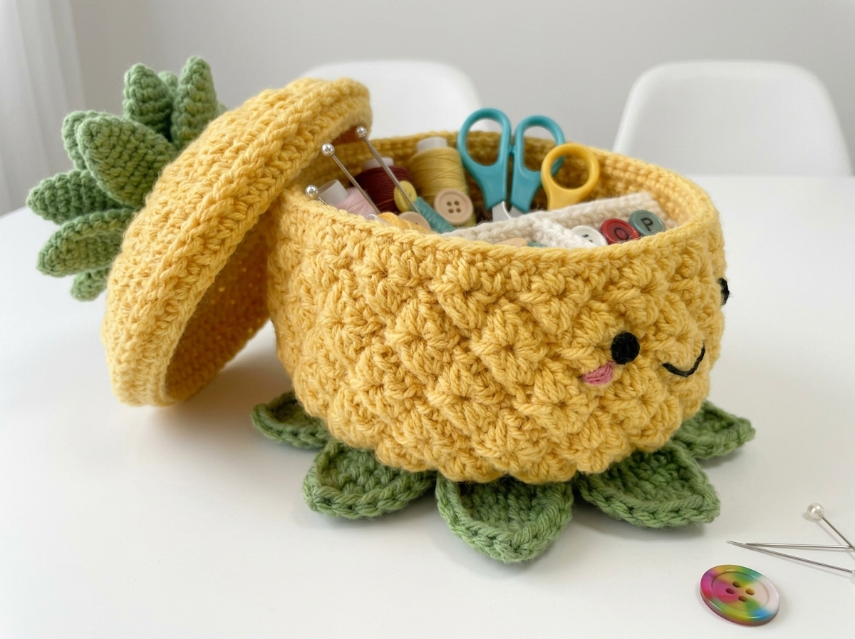
Kawaii Pineapple Storage Basket – Complete Step-by-Step Pattern
1. Gathering Your Supplies
To ensure the basket holds its shape and supports the weight of your items, a sturdy cotton or acrylic blend yarn is essential.
- Yarn: Worsted weight (Size 4) cotton yarn (e.g., Lily Sugar'n Cream, YarnArt Jeans).
- Yellow/Gold: Main color for the body and lid (approx. 200g).
- Green: For the bottom leaves and top crown (approx. 50g).
- Black: Tiny amount for the eyes and mouth.
- Pink: Tiny amount for the cheeks.
- Hook: 4.0 mm or 4.5 mm (US G/7).
- Notions: Tapestry needle for sewing, scissors, stitch markers, and poly-fil stuffing (optional, only if you want to stuff the lid slightly for structure).
- Finished Size: Approximately 15 cm (6 inches) wide and 10 cm (4 inches) tall.
What you'll master: Creating a textured fabric, constructing a lidded container, and adding kawaii facial features.
2. Abbreviations & Special Techniques
Let’s quickly review a few terms. The magic of this basket is the "Pineapple Puff" stitch!
- MR: Magic ring
- ch: Chain
- sc: Single crochet
- dc: Double crochet
- sl st: Slip stitch
- Pineapple Puff (PP): Yarn over, insert hook into stitch, yarn over and pull up a loop. Repeat this 2 more times (you should have 7 loops on hook). Yarn over and pull through all loops. Ch 1 to lock the stitch.
- st(s): Stitch(es)
3. The Basket Body (Yellow)
We start at the bottom and work up, creating a sturdy bowl shape.
- R1 (Base): 6 sc in MR (6)
- R2: 6 inc (12)
- R3: (1 sc, inc) x 6 (18)
- R4: (2 sc, inc) x 6 (24)
- R5: (3 sc, inc) x 6 (30)
- R6: (4 sc, inc) x 6 (36)
- Note: This flat circle is the bottom of your basket.
- R7 (Start of Texture): Ch 1. PP, sc in next st. Repeat around. Join with sl st. (18 Puffs, 18 sc)
- R8: Ch 1. sc in next st, PP in next st. Repeat around. (This staggers the puffs for a diamond look).
- R9-14: Repeat R7 and R8, alternating the pattern to build up the height of the basket.
- R15 (Top Edge): Ch 1. Sc in each st and each ch-1 space around to create a smooth rim. Join.
- Finishing: Fasten off and weave in ends.
What you'll master: Working textured stitches in the round and shaping a container.
4. The Bottom Leaves (Green)
These leaves act as the "feet" of the pineapple.
- Instructions (Make 6-8):
- Ch 10.
- Sc in 2nd ch from hook, hdc in next 2, dc in next 3, hdc in next 2, sc in last ch.
- Working down the opposite side of the chain: sc, hdc, dc (3 times), hdc, sc. Sl st to join.
- Finishing: Fasten off, leaving a long tail for sewing.
What you'll master: Creating organic leaf shapes.
5. The Lid (Yellow)
The lid needs to fit snugly over the top of the basket body.
- R1: 6 sc in MR (6)
- R2: 6 inc (12)
- R3: (1 sc, inc) x 6 (18)
- R4: (2 sc, inc) x 6 (24)
- R5: (3 sc, inc) x 6 (30)
- R6: (4 sc, inc) x 6 (36)
- Check Fit: This circle should match the opening of your basket body.
- R7-9 (Sides of Lid): Work 3 rows of sc evenly around the edge (without increasing) to create a small "wall" that fits inside the basket rim.
- Texture Option: You can continue the Pineapple Puff pattern here if you want the lid to match perfectly, or just use sc for a smoother look. The photo shows the texture continuing. Let's do R7: PP, sc around.
- Finishing: Fasten off.
What you'll master: Creating a fitted lid.
6. The Top Crown (Green)
A cluster of leaves for the top of the lid.
- Instructions: Make 5-6 leaves similar to the bottom leaves, but slightly larger (Ch 12 instead of Ch 10).
- Assembly: Sew them all together at the base to form a bunch.
What you'll master: Grouping motifs for a 3D effect.
7. Assembly & The Magic of Details
Now for the most rewarding part: bringing your pineapple to life!
- Attach Bottom Leaves: Arrange the green leaves around the bottom edge of the yellow body. Sew them securely in place so the basket sits flat on them.
- Attach Top Crown: Sew the cluster of green leaves to the very center top of the lid.
- The Face: This is the kawaii magic!
- Eyes: Using black yarn, embroider two small, vertical oval shapes (or use safety eyes). Space them about 4-5 stitches apart.
- Mouth: Embroider a small, curved "L" shape or a tiny smile to the right of the eyes.
- Cheeks: Using pink yarn, embroider two small horizontal lines or ovals under the eyes for blush.
- Hinge (Optional): If you want the lid to stay attached, sew a small strip of yarn connecting the back of the lid to the back rim of the basket body.
What you'll master: Multi-step assembly and expressive surface embroidery.
Final Section: Where to Go from Here
Congratulations! You’ve just crafted a delightful Kawaii Pineapple Storage Basket. This project is incredibly satisfying and perfect for organizing sewing kits, jewelry, or desk supplies.
From here, try experimenting with different colors! You could make a "Strawberry" version with a red body and green seeds, or a "Watermelon" basket. You could even make a set of different fruit baskets for a whole kitchen display. Happy crocheting, and enjoy your sweet new storage!