September 18, 2026
Dreamy Fairy Doll with Lace Wings – A Delicate Crochet Pattern
Create a magical keepsake with this enchanting Fairy Doll! Featuring a serene sleeping face, flowing yarn hair, a voluminous scalloped petal dress, and intricate lace wings, this project is a beautiful blend of amigurumi and delicate lacework. Perfect for a nursery shelf or a special gift.
Jump to pattern instructions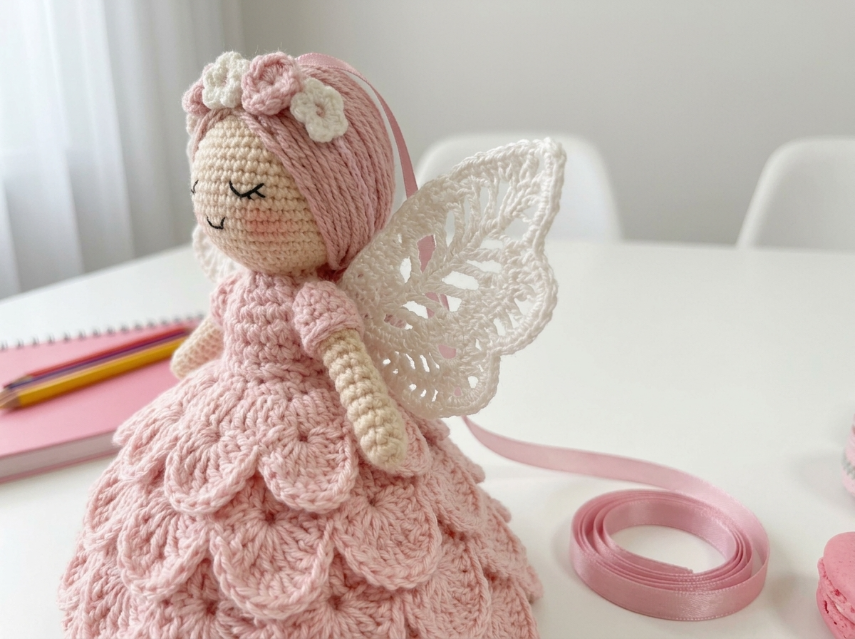
Dreamy Fairy Doll – Complete Step-by-Step Pattern
1. Gathering Your Supplies
To achieve the soft, dreamy look, use a high-quality cotton or acrylic blend yarn.
- Yarn: Worsted weight (Size 4) or DK weight.
- Dusty Pink: Main color for the dress, hair, and flower crown (approx. 100g).
- Cream/White: For the wings and flower accents (approx. 30g).
- Skin Tone (Peach/Beige): For the head and arms (approx. 20g).
- Hooks:
- 3.0 mm or 3.5 mm for the doll body and dress.
- 2.0 mm or 2.5 mm for the delicate lace wings.
- Notions:
- Poly-fil stuffing.
- Tapestry needle.
- Scissors.
- Black embroidery floss (for the sleeping face).
- Pink ribbon (approx. 50 cm).
- Stitch markers.
What you'll master: Creating a doll with yarn hair, working textured dress stitches, and crocheting delicate lace wings.
2. Abbreviations & Special Techniques
- MR: Magic ring
- ch: Chain
- sc: Single crochet
- dc: Double crochet
- tr: Treble crochet
- sl st: Slip stitch
- Puff St: (Yarn over, insert hook, pull up loop) 3 times in same stitch. Yarn over, pull through all loops. Ch 1 to lock.
- Shell St: (2 dc, ch 2, 2 dc) in the same stitch.
3. The Head & Body (Skin Tone)
We start with a standard amigurumi head and body.
-
Head (Skin Tone):
- R1: 6 sc in MR (6)
- R2: 6 inc (12)
- R3: (1 sc, inc) x 6 (18)
- R4: (2 sc, inc) x 6 (24)
- R5: (3 sc, inc) x 6 (30)
- R6-11: 30 sc (30) [6 rows]
- R12: (3 sc, dec) x 6 (24)
- R13: (2 sc, dec) x 6 (18)
- Stuffing: Stuff firmly.
- R14: (1 sc, dec) x 6 (12)
- Finishing: Fasten off. Do not close completely yet; attach body.
-
Body (Skin Tone - Simple Cone):
- R1: 12 sc (continuing from head)
- R2-10: 12 sc (12) [9 rows] - This creates a long neck/upper body to hide inside the dress.
- Finishing: Fasten off.
What you'll master: Basic doll shaping.
4. The Face & Hair
The Sleeping Face:
- Using black embroidery floss, stitch two curved lines for closed eyes (like upside-down U's).
- Add tiny eyelashes at the outer corners.
- Stitch a small, serene smile.
- Use pink yarn or blush for rosy cheeks.
The Hair (Pink):
- Method: Cut 30-40 strands of pink yarn, each about 15-20 cm long.
- Application: Thread a strand onto a tapestry needle. Insert needle into the top of the head (parting line), pull through so the strand is centered. Tie a simple knot close to the scalp (or use a lark's head knot).
- Styling: Arrange the hair to flow down the back and sides. You can braid it or leave it loose.
What you'll master: Adding realistic yarn hair to a doll.
5. The Scalloped Petal Dress (Pink)
This is the showstopper! We will create a cone base and attach layers of "petals".
The Base Cone:
- R1: 6 sc in MR (6)
- R2: 6 inc (12)
- R3: (1 sc, inc) x 6 (18)
- ... Continue increasing by 6 sc each round until the base is wide enough (approx. R15: 90 sc).
- Work even rounds (sc in each st) until the dress is the desired length (approx. 10-15 rows).
The Petal Layers (Shell Stitch):
- Row 1 (Bottom Edge): Join pink yarn. Skip 2 sts, Shell St (2 dc, ch 2, 2 dc) in next st, skip 2 sts, sl st in next st. Repeat around.
- Row 2: Work another row of shells into the ch-2 spaces of the row below, offset slightly to create a scale/petal effect.
- Repeat: Continue adding rows of shells up the dress until the bodice is covered.
What you'll master: Creating a textured, voluminous skirt.
6. The Lace Wings (White)
Use the smaller hook (2.0 mm) for fine detail.
- Instructions: Ch 20 (center spine).
- Top Wing:
- Row 1: Sc in 2nd ch from hook. Ch 3, skip 1 ch, sc in next ch. Repeat to end.
- Row 2 (The Lace): Work into the ch-3 spaces. In first space: (sc, 2 dc, tr, 2 dc, sc). In next space: sl st. Repeat to create a wing shape.
- Bottom Wing: Mirror the top wing on the other side of the foundation chain.
- Finishing: Fasten off. Make 2 wings.
What you'll master: Filet crochet and lace patterns.
7. The Flower Crown
- Flowers (Make 3-5):
- Center (Pink): MR, 6 sc.
- Petals (White): Join white yarn. Ch 3, dc, ch 3, sl st in same st. Repeat 5 times around the center.
- Assembly: Sew the flowers together in a small cluster or a ring to fit the doll's head.
8. Assembly & The Magic of Details
- Dress the Doll: Slide the pink dress cone over the doll's body. Sew the top of the dress to the neck/shoulders to secure it.
- Attach Wings: Sew the white lace wings to the back of the doll, just below the neck.
- Hair & Crown: Arrange the yarn hair. Sew the flower crown to the top of the head, nestled in the hair.
- Ribbon: Tie the pink ribbon around the neck or waist for a finishing touch.
What you'll master: Final assembly of a complex doll.
Final Section: Where to Go from Here
Congratulations! You’ve just crafted a magical Dreamy Fairy Doll. This project is a labor of love that results in a stunning heirloom piece.
From here, try experimenting with different colors! You could make a "Winter Fairy" with white and silver yarn, or a "Garden Fairy" with green and yellow. Happy crocheting!