September 23, 2026
Haunted Manor C2C Halloween Graphghan Blanket
Ready to add some spooky coziness to your fall? This haunted mansion blanket is like Halloween magic you can wrap yourself in. Picture this: you, a cup of hot cider, a good scary movie, and this gorgeous blanket featuring a mysterious Victorian manor against a moonlit sky. Whether you are decorating your home for Halloween or making a gift that will seriously impress, this pattern is your ticket to creating something truly special. Let us make some Halloween magic together.
Jump to pattern instructions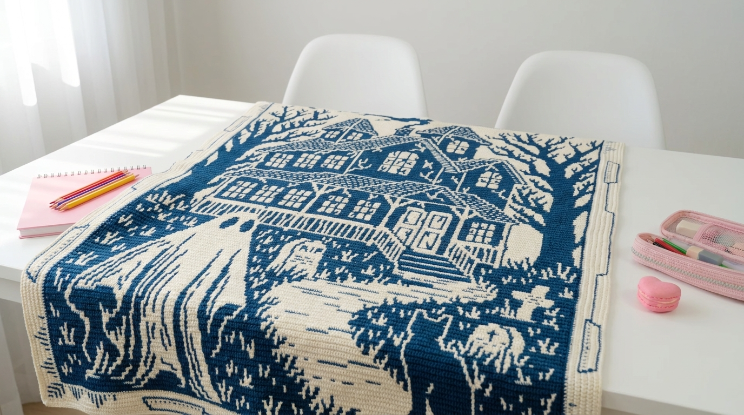
Difficulty: Intermediate (but do not worry, I will guide you through it)
Finished Size: About 45 x 60 inches (perfect for couch snuggling)
Technique: Corner to Corner (C2C) Crochet
Time to Complete: 2 to 3 weeks of cozy evening crocheting
What You Will Need
Yarn (Worsted Weight / Size 4):
- Cream or Off-White (Color A): Approximately 1,000 yards. This is your moonlit sky.
- Black (Color B): Approximately 900 yards. For that spooky mansion silhouette.
- Deep Purple or Orange (Color C): Approximately 200 yards. Optional pops of Halloween color.
- Pro tip: I love using acrylic or acrylic blends. They are affordable, easy to work with, and perfect for blankets.
Tools:
- 5.0 mm (H/8) crochet hook (or whatever feels comfortable with your yarn)
- Yarn needle (get the big-eyed ones, trust me on this)
- Stitch markers (absolute lifesavers)
- Sharp scissors
- The pixel graph (I will provide this as a separate download)
Before We Start
Okay, real talk: C2C (corner-to-corner) might sound intimidating if you have never tried it, but I promise it is so much fun once you get the hang of it. It is basically just chains and double crochets repeated in a clever way. If you can do those two stitches, you can totally do this pattern.
Take your time with the first few rows, and do not stress if it looks weird at first. It all comes together beautifully, I promise.
The Basics (US Terms)
- ch = chain (your foundation)
- dc = double crochet (your best friend in this pattern)
- sl st = slip stitch (for joining and moving around)
- Bob or Block = one C2C square (ch 3, 3 dc in the chain space)
- inc = increase (adding a block)
- dec = decrease (finishing off a block)
Let Us Make This Magic Happen
Phase 1: Building Up (The Fun Part)
We are working diagonally from the bottom right corner, so grab your Cream yarn and let us go.
Row 1: Chain 6, then double crochet into the 4th chain from your hook and the next 2 chains. That is your first block. Turn your work. (1 block total)
Row 2: Chain 6 again, dc into the 4th chain from hook and next 2 chains. Now slip stitch into the chain-3 space of that first block from Row 1. Chain 3, then 3 dc into that same space. Turn. (2 blocks total)
Row 3 and Beyond: Keep adding one block at the start of each row until you hit the widest part of the graph.
Color Changing Made Easy: Here is my secret: when you are about to finish the last double crochet of a block, pull through with your NEW color instead of the old one. And do not cut that old yarn. Just carry it loosely along the top of your blocks. It keeps things tidy and saves you from weaving in a million ends. You are welcome.
Phase 2: Tapering Off (We Are Almost Done)
Once you have reached the widest part of your graph (you will know when you get there), it is time to decrease.
How to Decrease: Slip stitch across the top of your first block, then chain 3 and work 3 dc into the next chain-3 space. Keep going across like normal. You are basically just not adding a new block at the start anymore.
Keep decreasing until you have just one block left. Fasten off, weave in those ends (I know, I know, but you have got this), and take a moment to admire what you have created.
Reading Your Graph (It Is Easier Than It Looks)
Think of it like this: you are reading the graph diagonally, starting from the bottom right corner.
- Row 1 = just that one square in the bottom right
- Row 2 = the two squares diagonal to it
- And so on.
Each square equals one C2C block.
- White square = Cream yarn
- Black square = Black yarn
- Purple or Orange square = Your accent color
My honest tip: Print out the graph and use a highlighter to mark off rows as you finish them. I learned this the hard way after losing my place way too many times.
The Border (Where It Really Comes Together)
Okay, you have finished the main part, high five. Now let us make it look professional with a beautiful border.
Round 1: Getting Ready Grab your Black yarn and join it to any corner chain-3 space. Chain 1, then work 3 single crochets in that same corner. Work 1 sc in every chain-3 space and along the sides. Put 3 sc in each corner to keep things flat. Join with a slip stitch.
Round 2: The Fancy Bit (Crab Stitch) I know, working backwards feels weird. But crab stitch (also known as reverse single crochet) creates this gorgeous twisted rope effect that is so worth it.
Here is how: Instead of working right to left like normal, you are going left to right. Insert your hook into the next stitch, yarn over, pull up a loop, yarn over, and pull through both loops. It feels awkward for about 10 stitches, then you will get it and feel like a crochet wizard.
Put 3 crab stitches in each corner to keep it flat. Join, fasten off, and weave in that last end.
Bonus Round (Optional but Gorgeous) Want to make it extra Halloween-y? Add one more round of crab stitch in Orange around that black border. It is absolute perfection.
Make It Your Own
Here are some fun ways to customize this pattern:
- Go Full Halloween: Swap cream for orange, use black and purple, make it your own spooky vision.
- Glow-Up: Use glow-in-the-dark yarn for the windows so your manor lights up at night (kids love this).
- Add Critters: Sew on some plastic spiders or bats after you finish.
- Embroider Ghosts: Add little ghost faces in the windows with white yarn.
- Make It Bigger or Smaller: Use thicker yarn and a bigger hook for a chunky version, or go finer for a delicate throw.
Real Talk: Tips From My Mistakes
-
Tension matters: If your blanket is curling, your tension might be too tight. Relax your grip, breathe, and remember, you can always block it at the end.
-
Yarn tangles are real: Use yarn bowls, ziplock bags, or even coffee mugs to keep your skeins from rolling away and tangling. Yes, I have been there.
-
Count your blocks: I cannot stress this enough. Use a row counter or highlight your graph. It is so easy to lose count, especially when you are binge-watching your favorite show.
-
Start early: If you want this done for Halloween, start in early September. Life happens, and you will thank yourself for the buffer time.
-
It does not have to be perfect: Seriously. A few wonky blocks just add character. This is handmade with love, and that is what matters.
This Pattern Is Perfect For
- Creating Halloween memories and maybe a new tradition
- Making a statement piece for your fall decor
- Gifting someone who loves all things spooky
- Challenging yourself to learn C2C
- Cozy Halloween movie nights
- Photos that will make everyone ask where you got that
I Want to See Your Creation
When you finish (and I know you will), please share it. Tag me on social media or join our cozy crochet community. Seeing your makes is literally the best part of my day.
You have got this. Take it one block at a time, be patient with yourself, and remember, every expert crocheter was once a beginner who just kept going.
Now grab your hook, put on some spooky music or your favorite podcast, and let us make some Halloween magic.
Happy Haunting and Happy Crocheting.
With love and yarn,
Your crochet friend
P.S. If you have any questions while working on this, do not hesitate to reach out. I am here to help. No question is too silly, I promise.