September 16, 2026
Kawaii Soot Sprite Beanie – A Cute & Cozy Crochet Hat
Stay warm and whimsical with this adorable pink beanie decorated with cute soot sprite characters and colorful flowers! Featuring a cozy ribbed texture and playful 3D embellishments, this hat is a fun, intermediate-friendly project that's perfect for adding a touch of magic to your winter wardrobe.
Jump to pattern instructions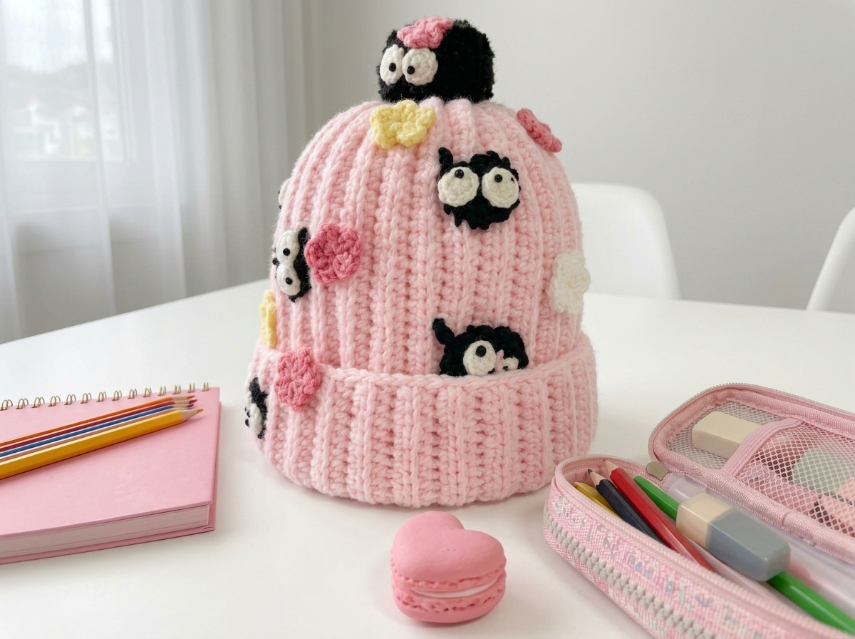
Kawaii Soot Sprite Beanie – Complete Step-by-Step Pattern
1. Gathering Your Supplies
To achieve that soft, ribbed texture seen in the photo, a soft acrylic or wool blend yarn works beautifully.
- Yarn: Worsted weight (Size 4) yarn.
- Pink (Light/Pastel): Main color for the hat (approx. 150–200g).
- Black: For the soot sprite bodies (small amount).
- White: For the eyes (tiny amount).
- Pink (Darker): For flowers/bows (small amount).
- Yellow: For accent flowers (tiny amount).
- Cream/Off-White: For additional flowers (tiny amount).
- Hook:
- 5.0 mm (US H/8) for the main hat body.
- 3.0 mm or 3.5 mm for the small character details.
- Notions:
- Tapestry needle for sewing.
- Scissors.
- Stitch markers.
- Small amount of poly-fil stuffing (for the sprites).
- Optional: 6-8 mm black safety eyes or black beads for the sprite eyes.
What you'll master: Creating a ribbed beanie, working small amigurumi characters, and assembling multi-textured embellishments.
2. Abbreviations & Special Techniques
Let's quickly review a few terms. If you're new to any of these, don't worry—you'll be a pro by the time your hat is complete!
- MR: Magic ring
- ch: Chain
- sc: Single crochet
- hdc: Half double crochet
- sl st: Slip stitch
- BLO: Back loop only (creates the ribbed texture).
- FLO: Front loop only.
- inc: Increase (2 sc in one stitch).
- dec: Decrease (2 sc crocheted together invisibly).
- st(s): Stitch(es).
3. The Hat Body (Pink)
We'll work the hat in continuous rounds from the crown down, creating a ribbed texture.
- R1: 6 sc in MR (6)
- R2: 6 inc (12)
- R3: (1 sc, inc) x 6 (18)
- R4: (2 sc, inc) x 6 (24)
- R5: (3 sc, inc) x 6 (30)
- R6: (4 sc, inc) x 6 (36)
- R7: (5 sc, inc) x 6 (42)
- R8: (6 sc, inc) x 6 (48)
- R9: (7 sc, inc) x 6 (54)
- R10: (8 sc, inc) x 6 (60)
- Check Fit: The flat circle should measure about 18-20 cm across. Adjust increases if needed for your head size.
- R11-25: 60 sc (60) [15 rows]
- Note: This creates the main body depth. Work more rows for a slouchy hat, fewer for a snug fit.
- R26-32 (The Brim): 60 sc in BLO (60) [7 rows]
- Pro Tip: Working in BLO creates a beautiful ribbed texture for the folded brim!
- Finishing: Fasten off and weave in the end.
What you'll master: Creating a seamless beanie with a textured ribbed brim.
4. The Soot Sprites (Black & White)
These adorable little characters are the stars of the show! Make 5-7 of them.
Sprite Body (Black, Make 5-7):
- R1: 6 sc in MR (6)
- R2: 6 inc (12)
- R3: (1 sc, inc) x 6 (18)
- R4-6: 18 sc (18) [3 rows]
- R7: (1 sc, dec) x 6 (12)
- Stuffing: Stuff lightly to make it round and fluffy.
- Finishing: Fasten off, leaving a long tail for sewing.
Eyes (White, Make 10-14):
- R1: 4 sc in MR (4)
- R2: 4 inc (8)
- Finishing: Fasten off, leaving a tail.
Pupils (Black or use beads):
- Option 1: Embroider tiny black dots in the center of each white eye.
- Option 2: Sew small black beads or safety eyes onto the white circles.
What you'll master: Creating tiny amigurumi characters and detailed facial features.
5. The Flowers & Bows
Add pops of color with these cute little flowers!
Pink Flowers (Make 3-4):
- R1 (Pink): 5 sc in MR (5)
- R2: In each st: (Ch 3, dc, ch 3, sl st). (5 petals).
- Finishing: Fasten off, leaving a tail.
Yellow Flowers (Make 2-3):
- R1 (Yellow): 5 sc in MR (5)
- R2: In each st: (Ch 3, dc, ch 3, sl st). (5 petals).
- Finishing: Fasten off.
Cream Flowers (Make 2-3):
- Same as above, using cream yarn.
What you'll master: Creating simple floral appliqués.
6. Assembly & The Magic of Details
Now for the most rewarding part: bringing your hat to life!
-
Prepare the Sprites:
- Sew two white eyes onto each black sprite body, spacing them evenly.
- Add black pupils to the center of the white eyes.
- You can vary the eye placement slightly on each sprite to give them different personalities (looking up, down, sideways)!
-
Position the Embellishments:
- Lay the hat flat.
- Arrange the sprites randomly across the hat body, avoiding the ribbed brim area.
- Scatter the flowers between the sprites for a balanced, whimsical look.
- Pin everything in place before sewing!
-
Sew Everything Down:
- Using your tapestry needle and matching yarn, sew each sprite securely to the hat. Make sure to stitch through the body and the hat fabric well so they don't flop around.
- Sew the flowers in place, stitching through the center.
- Pro Tip: For the top sprite, sew it extra securely since it will get the most attention!
-
Final Touches:
- Weave in all loose ends on the inside of the hat.
- Give the hat a gentle steam block to help the ribbed brim lay flat and the embellishments sit smoothly.
- Fold up the ribbed brim for that classic beanie look!
What you'll master: Multi-step assembly and strategic placement of decorative elements.
Final Section: Where to Go from Here
Congratulations! You've just crafted an adorable Kawaii Soot Sprite Beanie. This project is a fantastic way to practice your amigurumi skills and create a truly unique, handmade accessory that's sure to bring smiles.
From here, try experimenting with different characters! You could make a hat decorated with mini mushrooms, stars, hearts, or even tiny animals. You could also change the hat color to match different seasons—a mint green hat with spring flowers, or a navy hat with snowflakes and snowmen. Happy crocheting, and stay cozy and cute!