September 14, 2026
Lily of the Valley Necklace – A Delicate Floral Accessory
Bring the freshness of spring to your wardrobe with this elegant Lily of the Valley necklace! Featuring delicate sage-green leaf clusters, tiny white bell-shaped flowers, and classic pearl accents, this project is a beautiful blend of nature and vintage style. It’s a perfect intermediate project for creating a unique, handmade piece of jewelry.
Jump to pattern instructions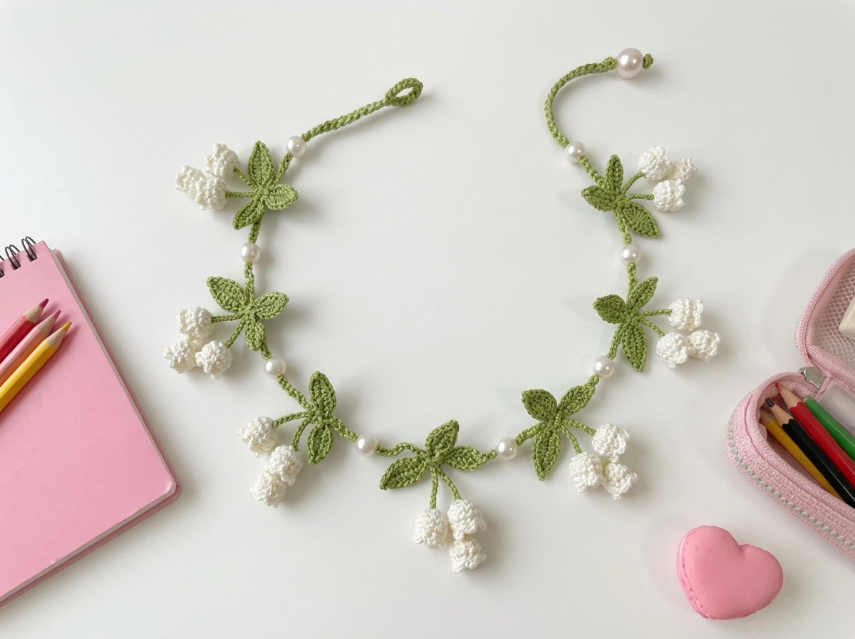
Lily of the Valley Necklace – Complete Step-by-Step Pattern
1. Gathering Your Supplies
To achieve the fine, detailed look of the leaves and tiny flower bells, a thin, smooth cotton yarn is essential.
- Yarn: Sport weight or Fine Cotton yarn (e.g., YarnArt Jeans, Catania, or similar lace weight).
- Sage Green: Approx. 20g (for leaves and cord).
- White: Approx. 10g (for flowers).
- Hook: 2.0 mm or 2.5 mm (choose a small hook to keep the stitches tight and the motifs small).
- Notions:
- 6-8 mm Pearl beads (approx. 7-9 beads).
- 1 larger Pearl bead (10-12 mm) for the button closure.
- Tapestry needle for sewing.
- Scissors.
- Stitch marker.
What you'll master: Creating miniature motifs, working with beads, and assembling a professional-looking jewelry piece.
2. Abbreviations & Special Techniques
Let’s quickly review a few terms. The "Bobble Stitch" is key for creating those round, 3D flower buds!
- ch: Chain
- sc: Single crochet
- hdc: Half double crochet
- dc: Double crochet
- sl st: Slip stitch
- Bobble St (3-dc cluster): Yarn over, insert hook, pull up a loop (3 loops on hook). Yarn over, insert hook into same stitch, pull up a loop (5 loops on hook). Yarn over, insert hook into same stitch, pull up a loop (7 loops on hook). Yarn over and pull through all 7 loops. Ch 1 to lock.
- Leaf Stitch: A pointed shape created by working increasing stitches into a chain.
3. The Leaf Cluster (Make 6-8)
The base of each motif is a cluster of three pointed green leaves.
- Instructions (Green Yarn):
- Ch 1 (this is your base ring).
- Leaf 1: Ch 5. Sc in 2nd ch from hook, hdc in next, dc in next, 3 dc in last ch. Working down the opposite side of the chain: dc in next, hdc in next, sc in next. Sl st into the base Ch 1.
- Leaf 2: Ch 5. Repeat the leaf sequence above, attaching the sl st to the same base Ch 1.
- Leaf 3: Ch 5. Repeat the leaf sequence above, attaching the sl st to the same base Ch 1.
- Finishing: You should now have a fan of 3 leaves. Fasten off, leaving a long tail for sewing.
What you'll master: Creating uniform, pointed leaf shapes and clustering them.
4. The Flower Bells (Make 6-8)
Now we add the signature white lily bells. These hang from the center of the leaf cluster.
- Instructions (White Yarn):
- Attach yarn to the center base of a Green Leaf Cluster (where all the leaves meet).
- Stem: Ch 4.
- Bud 1: In the 2nd ch from hook, work a Bobble St. Ch 1.
- Bud 2: In the next ch, work a Bobble St. Ch 1.
- Bud 3: In the last ch, work a Bobble St.
- Finishing: Sl st back into the center of the leaf cluster to secure the flower stem. Fasten off and weave in ends.
- Note: The flowers should dangle slightly below the leaves.
What you'll master: Creating 3D texture with bobble stitches and attaching motifs seamlessly.
5. The Necklace Cord & Assembly
Now we bring it all together with a delicate chain and pearl accents.
- The Cord: With Green yarn, Ch 100 (or measure around your neck and add 10 cm). Fasten off. This is your main necklace string.
- Layout: Lay out your 6-8 Leaf/Flower motifs along the chain. Space them evenly.
- Attaching Motifs & Beads:
- Thread your tapestry needle with the long tail from a motif.
- Sew the first motif to one end of the chain (leave about 10 cm of chain free for the closure).
- Thread a Pearl Bead onto the chain.
- Sew the next motif to the chain, right next to the bead, so the bead sits between the two leaf clusters.
- Repeat this process: Motif -> Bead -> Motif -> Bead, until all motifs are attached.
- The Closure:
- Loop: At one end of the chain, create a small loop (Ch 10, sl st to base) large enough to fit over your large pearl button.
- Button: At the other end, sew the large Pearl Bead securely to the end of the chain to act as a button.
What you'll master: Strategic placement of elements and creating a functional clasp.
Final Section: Where to Go from Here
Congratulations! You’ve just crafted a stunning Lily of the Valley Necklace. This project is a wonderful way to practice fine motor skills with small hooks and yarn, resulting in a piece of jewelry that looks like it came from a boutique.
From here, try experimenting with different color palettes! You could make a "Winter Berry" version with dark green leaves and red bead berries, or a "Lavender" version with purple yarn and tiny purple beads. You could even turn these motifs into a bracelet or a hair vine. Happy crocheting, and enjoy your beautiful new accessory!