August 30, 2026
Little Doll Amigurumi – A Sweet & Stylish Crochet Pattern
Meet this adorable little doll! Featuring a charming outfit with a detailed dress, cute shoes, and even a tiny puppy companion, this pattern is a delightful project for intermediate crafters ready to master seamless construction, wire armatures, and intricate doll accessories.
Jump to pattern instructions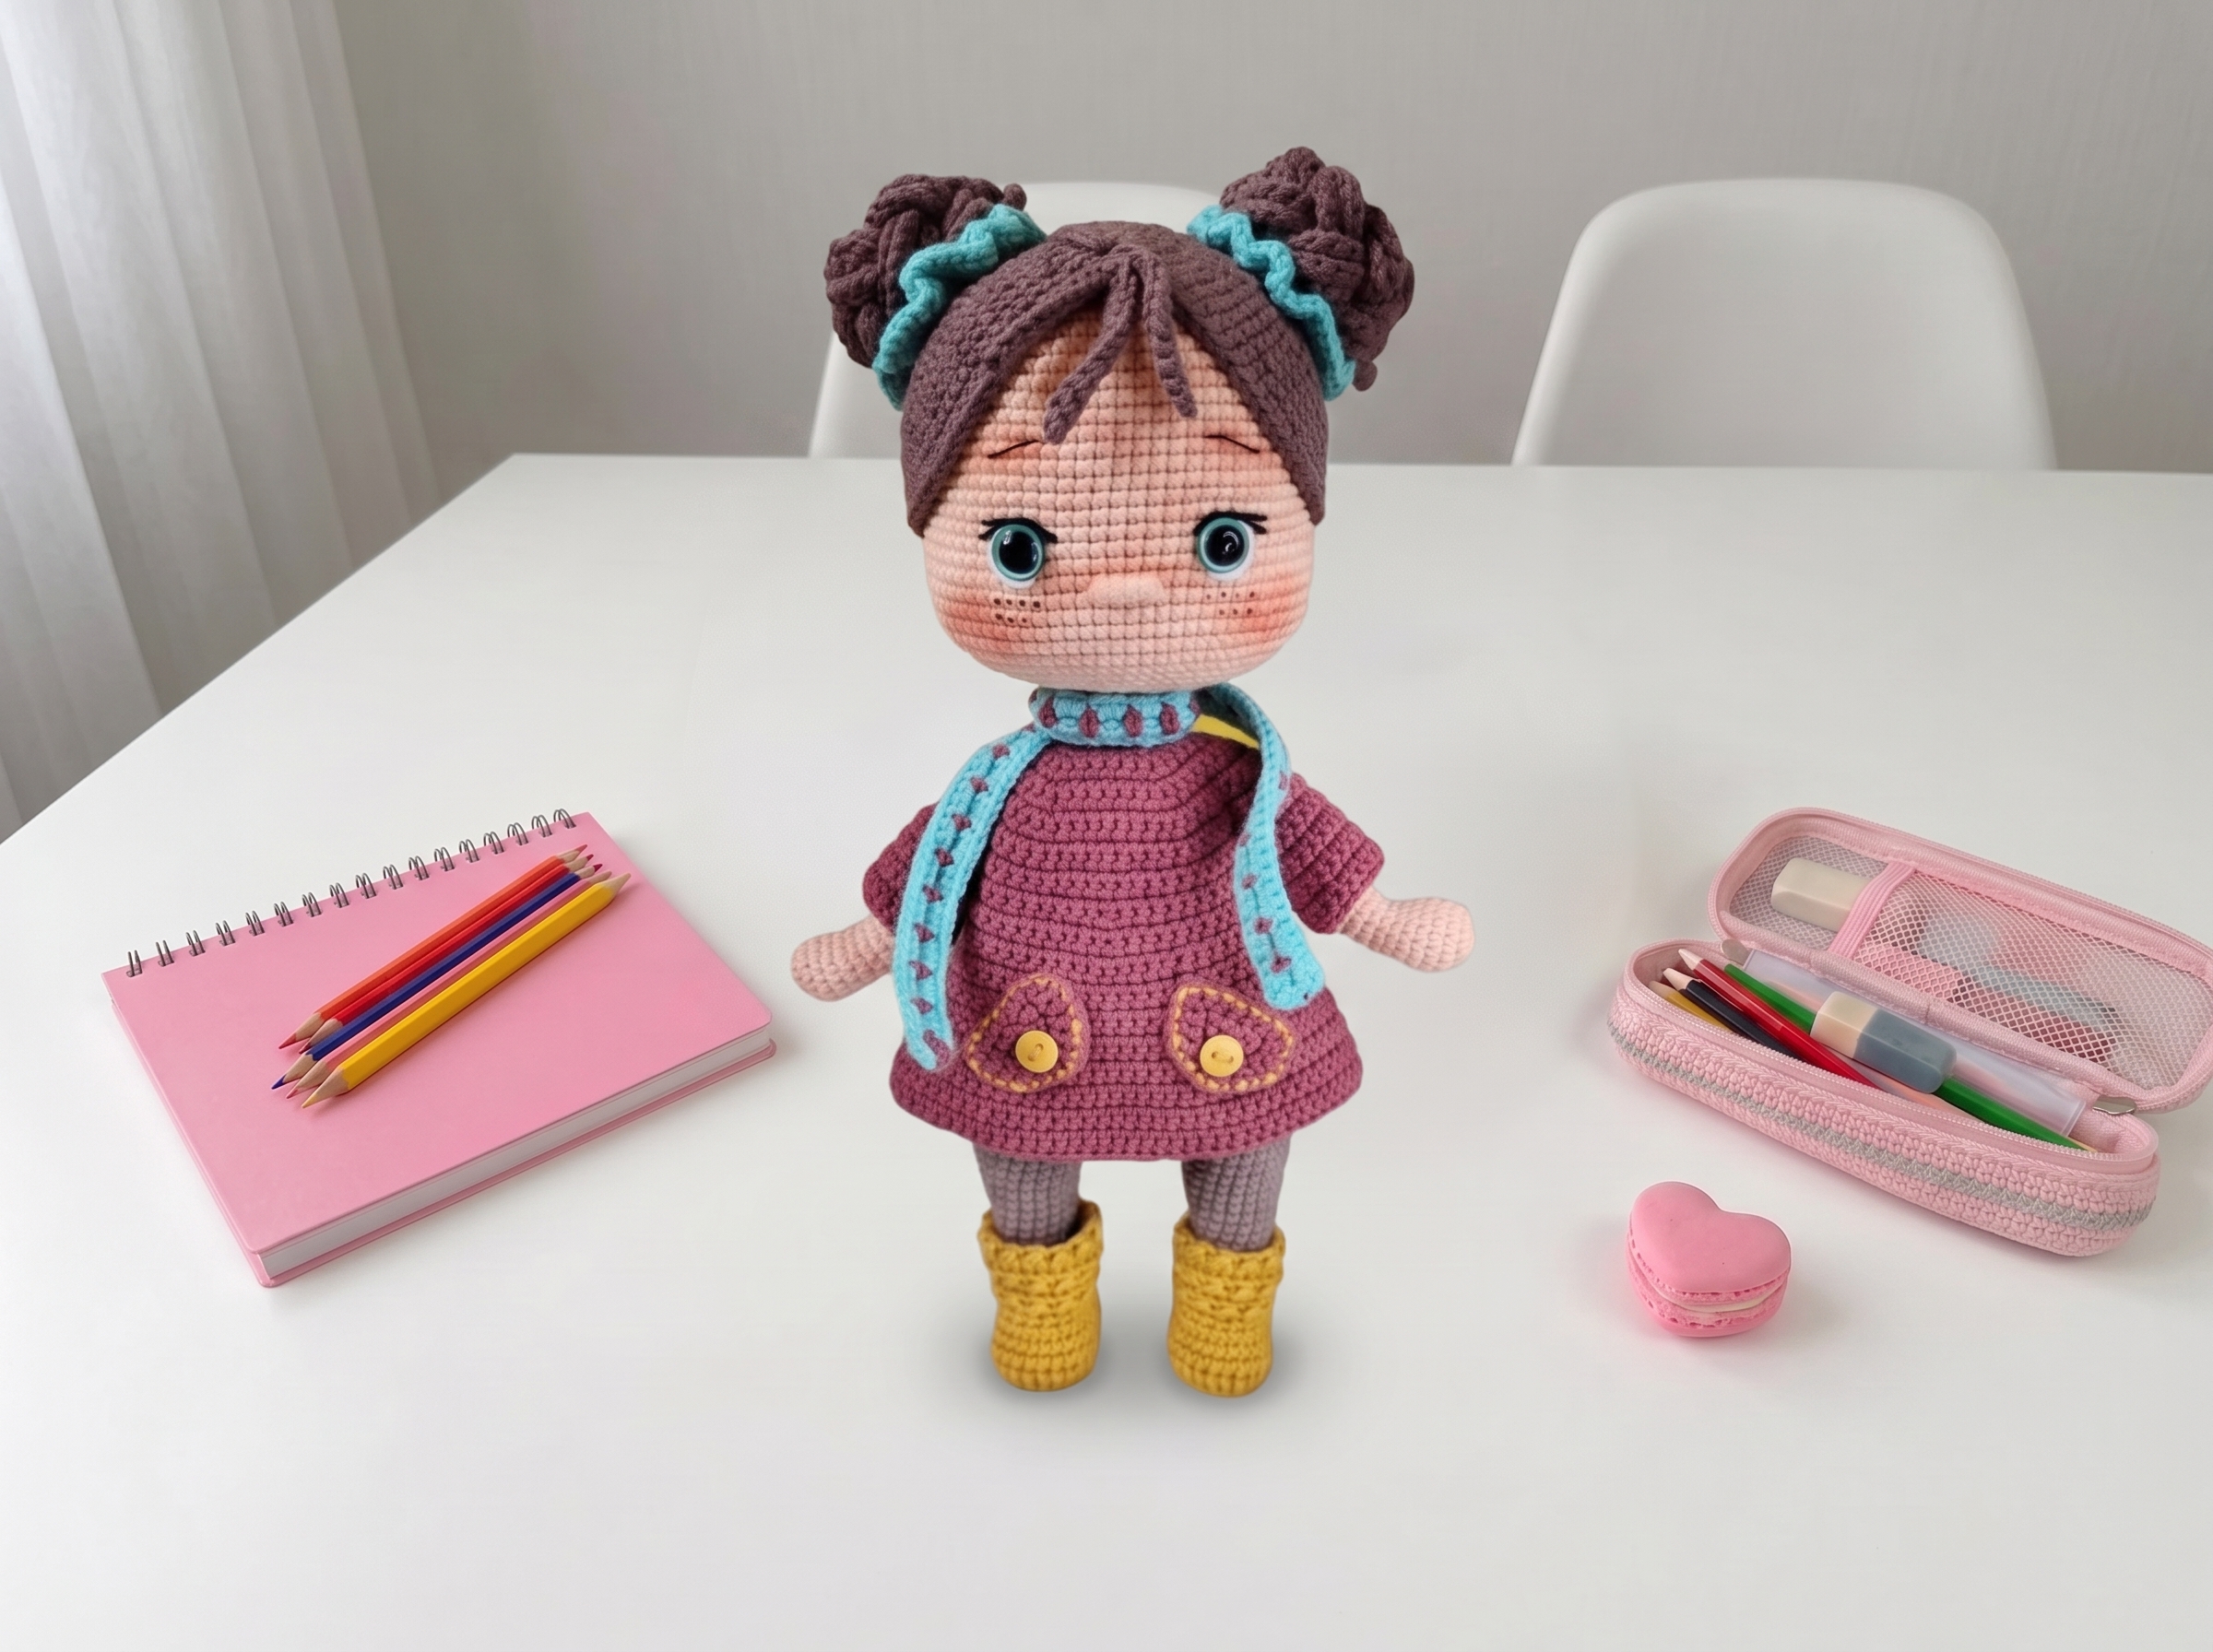
Little Doll Amigurumi – Complete Step-by-Step Pattern
1. Materials & Abbreviations
Let's gather our supplies! Using high-quality cotton blend yarns will give your doll beautiful stitch definition, making her tiny outfit details truly pop.
- Yarn: Gazzal Baby Cotton (or similar semi-cotton).
- Skin Tone: #3412
- Dress: Marrido Baby Fine #16
- Shoes: Gazzal Baby Cotton #3447
- Socks: Gazzal Baby Cotton #3434
- Hair: Gazzal Baby Cotton #3455
- Elastic & Scarf: Gazzal Baby Cotton #3452
- Hook: 2.00 mm (or size needed to achieve a tight, stuff-proof gauge).
- Notions: 10 mm safety eyes, two 8 mm mustard buttons, four 10 mm pink buttons, 17 cm of wire (cut into two pieces), poly-fil stuffing, tapestry needle, scissors, and plastic soles for the shoes.
- Abbreviations:
- MR – magic ring
- ch – chain
- sc – single crochet
- hdc – half double crochet
- dc – double crochet
- sl st – slip stitch
- inc – increase (2 sc in one stitch)
- dec – decrease (2 sc crocheted together)
- BLO – back loop only
- FLO – front loop only
What it teaches: Proper tool selection for fine cotton yarns, gauge management, and familiarization with standard international crochet abbreviations.
2. Arms (Make 2)
The arms are simple, un-stuffed tubes designed to be poseable with an internal wire frame.
- R1 (Skin color): 7 sc in MR (7)
- R2: 7 inc (14)
- R3: (6 sc, inc) x 2 (16)
- R4-5: 16 sc (16) [2 rows]
- R6: (6 sc, dec) x 2 (14)
- R7: (5 sc, dec) x 2 (12)
- R8-25: 12 sc (12) [18 rows]
- Finishing: Fasten off. Do not stuff. Bend the ends of the wire and insert it into the arms for posability.
What it teaches: Creating uniform, slender appendages and preparing for internal wire framing.
3. Legs & Body
The legs feature a shaped foot with a plastic sole for stability, then transition seamlessly into the torso. We'll join the legs to crochet the body in one continuous piece.
Left Leg:
- R1 (Skin color): Ch 6. Starting in the 2nd ch from hook: inc, 3 sc, 4 sc in one st, 3 sc, inc (14)
- R2: inc, 4 sc, 4 inc, 4 sc, inc (20)
- R3: sc, inc, 5 sc, (inc, sc) x 4, 4 sc, inc (26)
- R4: 26 sc in BLO (26)
- R5-6: 26 sc (26) [2 rows]
- Important detail: Insert the plastic sole before starting decreases.
- R7: 7 sc, 6 dec, 7 sc (20)
- R8: 4 sc, 6 dec, 4 sc (14)
- R9-11: 14 sc (14) [3 rows]
- R12: 12 sc, inc, sc (15)
- R13: sc, inc, 13 sc (16)
- R14: 16 sc (16)
- R15: 14 sc, inc, sc (17)
- R16: sc, inc, 15 sc (18)
- R17: 18 sc (18)
- R18: 15 sc, dec, sc (17)
- R19: sc, dec, 14 sc (16)
- R20: 13 sc, dec, sc (15)
- R21: sc, dec, 5 sc, 3 inc, 4 sc (17)
- R22: 16 sc, inc (18)
- R23: inc, 14 sc, inc, 2 sc (20)
- R24: 3 sc, inc, 16 sc (21)
- R25-33: 21 sc (21) [9 rows]
- Change to White Yarn.
- R34: 21 sc (21)
- R35: 18 sc (Note: The last stitch should end on the inner side of the leg).
Right Leg:
- Work exactly the same as the Left Leg through R34.
- R35: 21 sc. Do not fasten off. We will continue directly into the body.
Joining & Body:
- R36: 8 sc on the right leg, ch 3, 21 sc starting from the last stitch of the left leg, 3 sc along the chain, 21 sc on the right leg, 3 sc along the chain. Place a marker at the back center. (58 sts total)
- R37-43: 48 sc (Note: Original text says 48, but math suggests checking your tension; maintain the round count). [7 rows]
- R44: 36 sc, (dec, 2 sc) x 3 (45)
- R45: (dec, 2 sc) x 3, 33 sc (42)
- R46: 33 sc, (dec, sc) x 3 (39)
- R47: (dec, sc) x 3, 30 sc (36)
- Change to Skin Color.
- R48-56: 36 sc (36) [9 rows]
- R57: 5 sc, dec, (10 sc, dec) x 2, 5 sc (33)
- R58-59: 33 sc (33) [2 rows]
- R60: (9 sc, dec) x 3 (30)
- R61: 30 sc (30)
Attaching Arms:
- R62: 6 sc on body, 5 sc through left arm and body together, 9 sc on body, 5 sc through right arm and body together, 5 sc on body (30)
- R63: 6 sc on body, 5 sc on left arm, 9 sc on body, 5 sc on right arm, 5 sc on body (30)
- Tip: Twist the wire from the arms to form shoulders and secure with tape.
- R64: (3 sc, dec) x 6 (24)
- R65: (2 sc, dec) x 6 (18)
- R66: (sc, dec) x 6 (12)
- R67-70: 12 sc (12) [4 rows]
- Finishing: Fasten off, leaving a long tail for attaching the head.
What it teaches: Complex foot shaping with plastic inserts, seamless multi-piece joining, and mid-round limb attachment.
4. Head
The head is worked in a continuous spiral, featuring clever chain-skip techniques to create openings for the eyes, followed by structured decreases.
- R1 (Skin color): 8 sc in MR (8)
- R2: 8 inc (16)
- R3: (sc, inc) x 8 (24)
- R4: sc, inc, (2 sc, inc) x 7, sc (32)
- R5: (3 sc, inc) x 8 (40)
- R6: 2 sc, inc, (4 sc, inc) x 7, 2 sc (48)
- R7: (7 sc, inc) x 6 (54)
- R8: 4 sc, inc, (8 sc, inc) x 5, 4 sc (60)
- R9-17: 60 sc (60) [9 rows]
- R18: 4 sc, dec, (8 sc, dec) x 5, 4 sc (54)
- R19: 21 sc, 2 ch, skip 2 sts, 7 sc, 2 ch, skip 2 sts, 22 sc (54)
- R20: 21 sc, 2 sc in each ch space, 7 sc, 2 sc in each ch space, 22 sc (54)
- R21: 17 sc, 6 inc, 7 sc, 6 inc, 18 sc (66)
- R22-27: 66 sc (66) [6 rows]
- Important detail: Insert 10 mm safety eyes before starting decreases.
- R28: (9 sc, dec) x 6 (60)
- R29: 4 sc, dec, (8 sc, dec) x 5, 4 sc (54)
- R30: (7 sc, dec) x 6 (48)
- R31: 3 sc, dec, (6 sc, dec) x 5, 3 sc (42)
- R32: (5 sc, dec) x 6 (36)
- R33: 2 sc, dec, (4 sc, dec) x 5, 2 sc (30)
- R34: (3 sc, dec) x 6 (24)
- R35: (2 sc, dec) x 6 (18)
- R36: (sc, dec) x 6 (12)
- Finishing: Fasten off, leaving a long tail. Stuff the head firmly. Embroider eyebrows, eyelashes, and nose as shown in the pattern photos. Sew the nose between rows 21 and 22.
What it teaches: Spiral increase sequences, creating intentional openings with chain spaces, and structured decreasing for spherical shaping.
5. Hair
The hair is built on a radial base with long, flowing strands attached seamlessly in the round.
- R1 (Hair color): 8 sc in MR, sl st (8)
- R2: 2 ch, 8 hdc-inc, sl st (16)
- R3: 2 ch, 16 hdc-inc, sl st (32)
- R4: BLO: 2 ch, (1 dc, 1 dc-inc) x 16 (48)
- Strands: Without cutting yarn, work strands:
- (47 ch, starting in 3rd ch from hook: 45 hdc, skip 1 st on base, sl st to base) x 18 times.
- (10 ch, starting in 3rd ch from hook: 8 hdc, skip 1 st on base, sl st to base) x 6 times.
- Inner Layer: Move to FLO of R3.
- (47 ch, starting in 3rd ch from hook: 45 hdc, skip 1 st on base, sl st to base) x 12 times.
- Finishing: Fasten off. Sew the wig base to the head, starting 5 rows above the eyes. Pin hair at eye level and sew securely.
What it teaches: Radial expansion, chaining long textured strands, and attaching multiple repetitive elements seamlessly in the round.
6. The Outfit: Dress, Shoes & Accessories
No doll is complete without a fabulous wardrobe!
Dress:
- Worked in turning rows. Ch 31, starting in 8th ch from hook.
- Features a fitted bodice with strategic increases for a flared skirt, and chain spaces for armholes.
- Sleeves: Attached to the armholes, worked in rounds with a decorative puff-stitch cuff.
Shoes:
- R1 (Mustard color): Ch 8. Starting in 2nd ch from hook: inc, 5 sc, 4 sc in one st, 5 sc, inc, sl st (18)
- R2: 1 ch, inc, 6 sc, 4 inc, 6 sc, inc, sl st (24)
- R3: 1 ch, sc, inc, 7 sc, (inc, sc) x 4, 6 sc, inc, sl st (28)
- R4: BLO: 1 ch, 28 hdc, sl st.
- Change to Cream Color.
- R5: BLO: 28 sl st.
- R6: BLO: 1 ch, 28 sc, sl st.
- R7-8: 1 ch, 28 sc, sl st.
- R9: 1 ch, 9 sc, 6 dec, 9 sc, sl st (22)
- R10: 1 ch, 22 sc, sl st, turn.
- R11-13: Work alternating rows of sl st and sc to create a strap across the top of the foot.
Puppy Companion:
- A tiny, quick-to-make puppy with a cute bow and collar. Perfect for holding in her hand or sitting by her side!
What it teaches: Flat-panel garment construction, creating functional armholes, and assembling multi-part accessories.
7. Assembly & Finishing
Now for the magic moment where your doll truly comes to life!
- Head to Body: Sew the head securely to the top of the body using the long tail. Ensure the neck is stuffed firmly so the head doesn't wobble.
- Facial Details: Embroider the nose, mouth, and delicate eyelashes. Add a hint of blush to the cheeks with pastel chalk or acrylic paint.
- Hair: Pin the wig in place, styling the bangs and securing the back strands.
- Dress Up: Slide the dress over her head, fasten the buttons, and put on her tiny shoes. Don't forget her adorable puppy friend!
What it teaches: Multi-step structural assembly, surface embroidery for expressive facial features, and professional finishing techniques for wearable doll accessories.
Final Section: Where to Go from Here
Congratulations! By completing this Little Doll, you have mastered foundational spiral shaping, complex foot construction with inserts, and intricate garment detailing. This project is a fantastic confidence-builder and makes an absolutely heartwarming gift.
From here, try experimenting with different yarn colorways to create a whole "friend group" of dolls, or adapt the dress and shoe patterns to design custom outfits for other amigurumi figures in your collection. Happy crocheting!