September 14, 2026
Ocean Wave Ripple Bracelet – A Serene Crochet Accessory
Capture the calming rhythm of the sea with this beautiful Ocean Wave Ripple Bracelet! Featuring a soothing gradient of deep navy, soft blues, and crisp white, this quick project uses a simple, elegant ripple stitch to create a stunning, textured cuff. It’s a perfect beginner-friendly make and a fantastic way to use up scrap yarn.
Jump to pattern instructions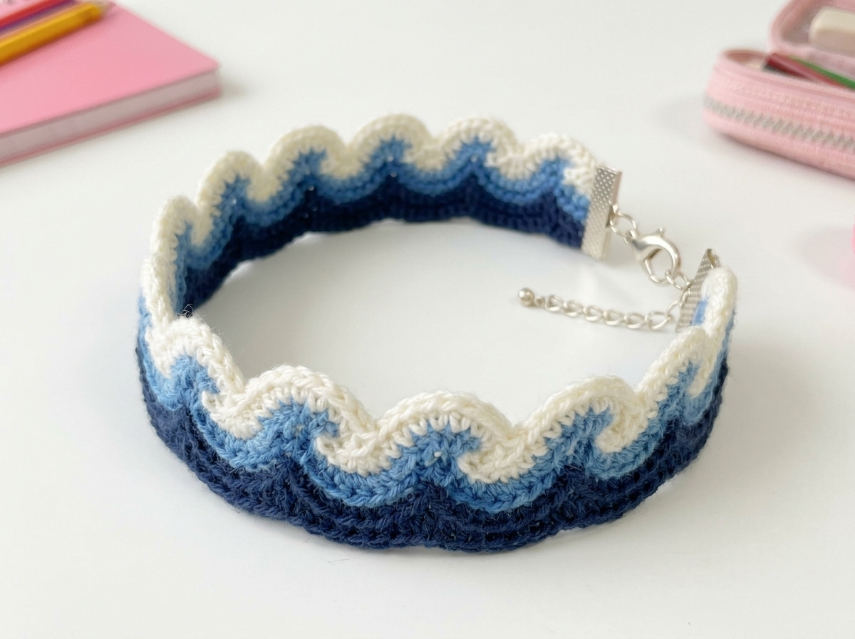
Ocean Wave Ripple Bracelet – Complete Step-by-Step Pattern
1. Gathering Your Supplies
To get that crisp, defined wave texture, a smooth, fine cotton yarn is your best friend. It holds its shape beautifully and feels comfortable against the skin.
- Yarn: Sport weight (Size 2) or fine cotton yarn (e.g., YarnArt Jeans, Catania, or similar). You will need small scraps of:
- Navy Blue (approx. 10g)
- Medium/Denim Blue (approx. 10g)
- Light/Sky Blue (approx. 10g)
- White (approx. 10g)
- Hook: 2.5 mm (US C/2) or the size needed to achieve a firm, dense fabric.
- Notions:
- Tapestry needle for weaving in ends.
- Scissors.
- Jewelry Findings: 2 ribbon crimp ends (approx. 10-12mm wide to fit the bracelet), 1 lobster clasp, 1 jump ring, and about 2 inches of extension chain.
- Strong fabric glue (like E6000) or a needle and thread to secure the crimp ends.
- Finished Size: Approximately 17 cm (6.7 inches) long and 2.5 cm (1 inch) wide (easily adjustable).
What you'll master: Creating a seamless gradient effect, working a rhythmic ripple stitch, and assembling professional-looking jewelry findings.
2. Abbreviations & Special Techniques
Let’s quickly review a few terms. If you're new to any of these, don't worry—you'll be a pro by the time you reach the clasp!
- ch: Chain
- sc: Single crochet
- inc: Increase (2 sc in one stitch)
- dec: Decrease (sc 2 together invisibly)
- sl st: Slip stitch
- st(s): Stitch(es)
3. The Wave Strip (The Ripple Stitch)
The magic of this bracelet is the ripple stitch, which naturally creates a beautiful scalloped wave on both the top and bottom edges of your fabric!
- Foundation Chain (Navy Blue): Ch 32.
- Row 1: Sc in the 2nd ch from the hook and in each ch across. (31 sc)
- Row 2: Ch 1, turn. 5 sc, inc in next st, 5 sc, dec over next 2 sts, 5 sc, inc in next st, 5 sc, dec over next 2 sts, 5 sc. (31 sts)
- Pro Tip: The increases create the peaks of the wave, and the decreases create the valleys!
- Rows 3-6: Repeat Row 2 in Navy Blue.
- Row 7: Change to Medium Blue. Repeat Row 2.
- Rows 8-10: Repeat Row 2 in Medium Blue.
- Row 11: Change to Light Blue. Repeat Row 2.
- Rows 12-14: Repeat Row 2 in Light Blue.
- Row 15: Change to White. Repeat Row 2.
- Rows 16-18: Repeat Row 2 in White.
- Finishing: Fasten off, leaving a long tail. Weave in all your color-change tails securely on the back of the work.
What you'll master: Maintaining consistent stitch counts while shaping, and executing clean color changes for a gradient effect.
4. Sizing & Blocking
Before we attach the hardware, let's make sure it fits perfectly!
- Measure: Wrap the strip around your wrist. It should fit snugly but comfortably. If it's too long, you can simply trim a row or two off the white end (just make sure you re-weave the end). If it's too short, add a few more rows of white!
- Block (Optional but recommended): Dampen the bracelet with water, lay it flat on a towel, and gently stretch the waves so they sit evenly. Pin the peaks and valleys if needed, and let it dry completely. This makes the waves pop beautifully.
What you'll master: Customizing a pattern to fit your exact measurements and finishing techniques for a polished look.
5. Assembly & The Magic of Hardware
Now for the final touches that turn your crochet strip into a professional piece of jewelry!
- Prepare the Ends: Trim any stray fibers from the short ends of your bracelet so they are perfectly straight and flat.
- Attach the Crimp Ends: Apply a tiny drop of strong fabric glue to the inside of a ribbon crimp end. Carefully slide one end of the bracelet into the crimp end, ensuring the crochet fabric is centered.
- Secure: Use flat-nose pliers to gently but firmly squeeze the crimp end closed over the fabric. Optional: For extra security, you can use a needle and thread to whip stitch through the holes in the crimp end and the crochet fabric. Repeat for the other side.
- Add the Clasp: Using your pliers, open a jump ring. Slide it through the loop on one of the crimp ends, add your lobster clasp, and close the jump ring securely.
- Add the Extension Chain: Open another jump ring. Slide it through the loop on the opposite crimp end, add your extension chain, and close it. This allows you to adjust the fit perfectly!
What you'll master: Working with jewelry findings and creating durable, wearable art.
Final Section: Where to Go from Here
Congratulations! You’ve just crafted a stunning, serene Ocean Wave Ripple Bracelet. This project is incredibly fast, making it perfect for crafting last-minute gifts, party favors, or adding a touch of handmade elegance to your own everyday style.
From here, try experimenting with different color palettes! You could make a "Sunset" version with oranges, pinks, and yellows, a "Forest" version with various shades of green, or even a "Monochrome" version using different textures of black and white yarn. Happy crocheting, and enjoy your beautiful new accessory!