August 28, 2026
Snowman Amigurumi – A Cozy Winter Friend with a Candy Cane!
Bring a touch of winter magic to your handmade collection with this adorable Snowman! Featuring a cute textured jacket, a cozy hat, and a sweet striped candy cane, this pattern is a joyful, intermediate-friendly project that’s perfect for the holiday season.
Jump to pattern instructions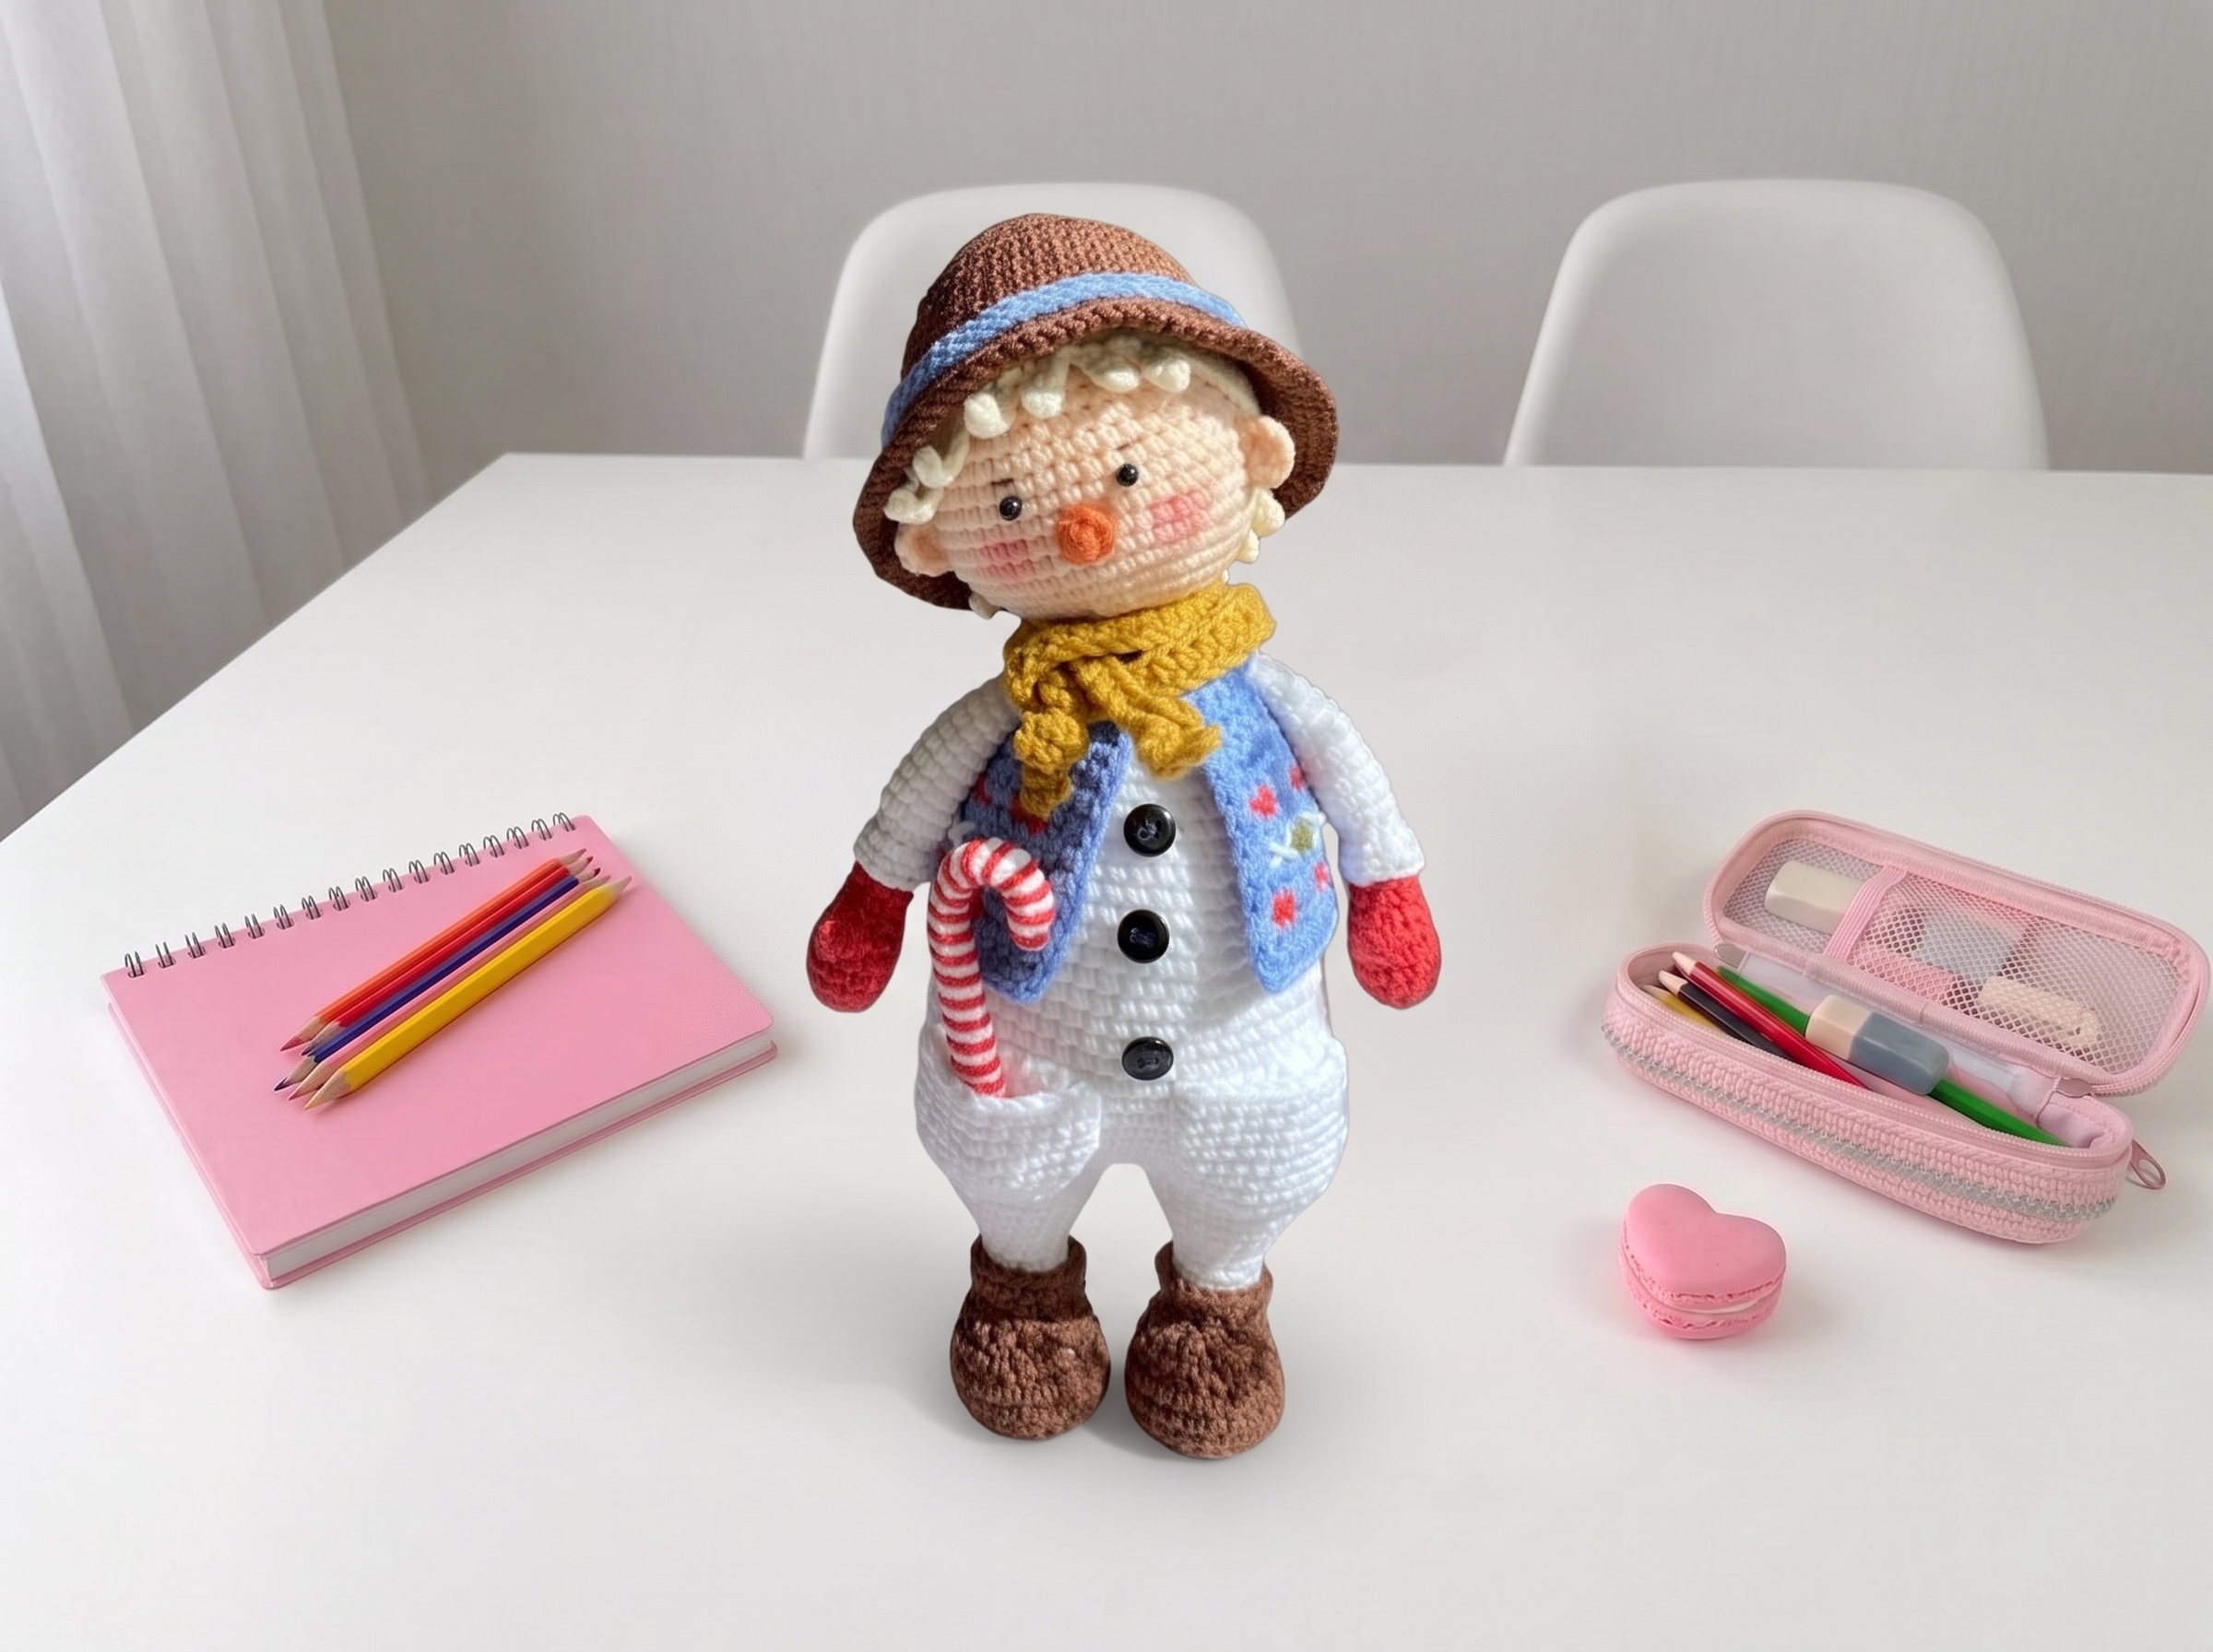
Snowman Amigurumi – Complete Step-by-Step Pattern
1. Gathering Your Winter Supplies
Let’s get ready to build a snowman! Using a smooth cotton blend will give your snowman beautiful stitch definition, making all those tiny outfit details truly pop.
- Yarn: YarnArt Jeans (55% cotton, 45% acrylic, 160m / 50g).
- Light Blue (#15) – for the jacket and hat stripes (approx. 7g)
- Red (#26) – for mittens and vest pattern (approx. 2g)
- White (#62) – for the body and overalls (approx. 20g)
- Brown (#70) – for boots and hat (approx. 10g)
- Skin tone (#73) – for the head (approx. 4g)
- Green (#82) – for the jacket pattern (a little)
- Mustard (#84) – for the scarf (a little)
- Terracotta (#85) – for the nose (a little)
- Cream (#01) – for the hair (approx. 3g)
- Hooks: 2.0 mm (for main details) and 2.5 mm (for the jacket and scarf).
- Notions: Two 4 mm safety eyes, poly-fil stuffing, large-eye tapestry needle, scissors, stitch marker, 3 small black buttons (8 mm), 2-3 cotton swabs (for neck reinforcement), and an 8 cm piece of craft wire (for the candy cane).
- Finished Size: Approximately 22 cm (8.5 inches) from head to toe, excluding the hat.
What you'll master: Working with multiple colors, integrating wire armatures safely, and executing clever flat-folding techniques for seamless limb closures.
2. Arms (Make 2)
We’ll start with the arms in red yarn. They feature a cute little "mitten" shape created with a cluster stitch!
- R1: 8 sc in MR (8)
- R2: (1 sc, inc) x 3, 2 sc (11)
- R3-5: 11 sc (3 rows)
- R6: 5 sc, 1 cluster (3 dc with a common top), 5 sc (11)
- R7: 4 sc, dec 3 sc together, 4 sc (9)
- R8-9: 9 sc
- Color Change: Switch to White yarn.
- R10: 9 sc
- R11: (2 sc, inc) x 3 (12)
- Pro Tip: Stuff the hand firmly, but leave the rest of the arm completely empty so it drapes naturally.
- R12: 12 sc in BLO (12)
- R13-24: 12 sc (12 rows)
- Finishing: Fasten off, leaving a long tail.
3. Legs, Body, and Head (Worked as One Piece!)
This is where the magic happens! We’ll build the legs, seamlessly join them to the arms, and crochet all the way up to the head in one continuous piece.
Legs (Make 2, Brown Yarn):
- R1: 6 sc in MR (6)
- R2: 6 inc (12)
- R3: (1 sc, inc) x 6 (18)
- R4: 1 sc, inc, (2 sc, inc) x 5, 1 sc (24)
- Pro Tip: Cut two small, dense cardboard or plastic insoles to match the shape of R4.
- R5: 24 sc in BLO (24)
- R6-7: 24 sc (2 rows)
- R8: 6 sc, (1 sc, dec) x 4, 6 sc (20)
- R9: 6 sc, 4 dec, 6 sc (16)
- Assembly: Insert your cardboard insoles into the boots to give them a sturdy, flat base.
Attaching Arms to Legs:
- Left Leg: Fold the top opening of the left arm flat (make sure the "thumb" cluster is facing the right way). Crochet 6 sc through both layers of the arm to close it flat. Fasten off.
- Right Leg: Repeat R1-9. For R10, attach brown yarn to the FLO of R10 of the right arm.
- R10 (on arm): (1 sc, inc) x 6, 1 sc (19)
- R11 (on arm): 19 sc. Fasten off and sew neatly.
- Joining: Fold the top of the right leg in half and place a marker in the center of the inner side. Crochet additional stitches to reach that marker (the original designer used 9 sc, but adjust to fit your tension). Do not cut the yarn.
Joining Legs & Starting the Body (White Yarn):
- R21: Take the left leg, position it so the heel faces you, and insert your hook into the center inner stitch. Crochet 24 sc around the left leg, then 24 sc around the right leg. Place your BOR marker. (48)
- R22: (7 sc, inc) x 6 (54)
- R23-31: 54 sc (9 rows)
- R32: (25 sc, dec) x 2 (52)
- R33: 52 sc
- R34: 12 sc, dec, 24 sc, dec, 12 sc (50)
- R35: 50 sc
- R36: (23 sc, dec) x 2 (48)
- R37: 7 sc, dec, (14 sc, dec) x 2, 7 sc (45)
- R38-39: 45 sc (2 rows)
- R40: (13 sc, dec) x 3 (42)
- R41: 6 sc, dec, (12 sc, dec) x 2, 6 sc (39)
- R42: 39 sc
- R43: (11 sc, dec) x 3 (36)
- R44: 36 sc
- R45: 5 sc, dec, (10 sc, dec) x 2, 5 sc (33)
- R46: 33 sc
- R47: (9 sc, dec) x 3 (30)
- R48: (3 sc, dec) x 6 (24)
Attaching Arms to Body:
- Check your BOR marker: It should be exactly at the center of the back. Adjust with a few shift stitches if needed.
- Mark arm placement: The arms should be centered on the sides, taking up 6 sc each, with a 6 sc gap at the front and back.
- R49: 3 sc on body, then 6 sc through the body and left arm together, 6 sc on body, then 6 sc through the body and right arm together, 3 sc on body (24).
- R50: 1 sc, dec, (2 sc, dec) x 5, 1 sc (18)
- R51: (1 sc, dec) x 6 (12)
Head (Switch to Skin Tone Yarn):
- R52: 12 sc in BLO (12)
- R53-54: 12 sc (2 rows)
- R55: 12 inc (24)
- R56: (1 sc, inc) x 12 (36)
- R57: (5 sc, inc) x 6 (42)
- R58: 3 sc, inc, (6 sc, inc) x 5, 3 sc (48)
- R59-68: 48 sc (10 rows)
- Pro Tip for Neck Stability: Take 2-3 cotton swabs and cut the cotton off one end of each. Insert the plastic ends through the neck opening down into the body stuffing to create a sturdy internal skeleton!
- R69: 3 sc, dec, (6 sc, dec) x 5, 3 sc (42)
- R70: (5 sc, dec) x 6 (36)
- R71: 2 sc, dec, (4 sc, dec) x 5, 2 sc (30)
- R72: (3 sc, dec) x 6 (24)
- R73: (2 sc, dec) x 6 (18)
- R74: (1 sc, dec) x 6 (12)
- Stuffing: Stuff the head firmly, paying special attention to plumping up the cheeks for that classic snowman charm.
- R75: 6 dec (6)
- Finishing: Fasten off and weave the tail through the front loops to cinch the hole closed.
4. Facial Features & Hair
This is where your snowman’s personality truly shines!
Ears (Make 2, Skin Tone):
- R1: 5 sc in MR, 1 ch, turn (5). Pull the ring tight and fasten off.
- R2: 5 sc. Fasten off, leaving a long tail for sewing.
Nose (Terracotta):
- R1: 5 sc in MR (5)
- R2: 4 sc, inc (6)
- R3: (2 sc, inc) x 2 (8)
- R4: 8 sc, sl st (8)
- Finishing: Fasten off, leaving a long tail. Stuff very lightly with yarn scraps.
Wig/Hair (Cream):
- Work in continuous spiral rounds.
- R1: 6 sc in MR (6)
- R2: 6 inc (12)
- R3: (1 sc, inc) x 6 (18)
- R4: (2 sc, inc) x 6 (24)
- R5: (3 sc, inc) x 6 (30)
- R6: 2 sc, inc, (4 sc, inc) x 5, 2 sc (36)
- R7: (5 sc, inc) x 6 (42)
- R8: 3 sc, inc, (6 sc, inc) x 5, 3 sc (48)
- R9-14: 48 sc (6 rows)
- R15 (Strands): 1 sc, (4 ch, starting from 2nd ch from hook: 3 sc, 2 sc into R14) x 4 times, 9 hdc, (7 ch, starting from 2nd ch from hook: 6 sc, 2 sc into R14) x 3 times, (5 ch, starting from 2nd ch from hook: 4 sc, 2 sc into R14) x 3 times, 9 hdc, 2 sc, (4 ch, starting from 2nd ch from hook: 3 sc, 2 sc into R14) x 3 times, 4 ch, starting from 2nd ch from hook: 3 sc, 1 sc into R14.
- Finishing: Fasten off, leaving a long tail for sewing.
5. Assembly & Finishing
Now for the magic moment where your snowman truly comes to life!
- Face: Pin the nose between R13 and R15 from the top of the head. Sew around it, catching both head and nose stitches for a seamless look. (Tip: split your yarn or use thin sewing thread for a neater seam!). Sew or glue the safety eyes one row above the nose, spaced 5 sc apart.
- Ears & Embroidery: Sew the ears between R13 and R16, about 7 sc away from the eyes. Embroider sweet little brown eyebrows, a cute mouth, and add a hint of blush to the cheeks with pastel chalk or acrylic paint.
- Hair: Pin the wig to the head (aligning the MR of the wig with the MR of the head). Distribute the strands: long strands at the back between the ears, short strands above the ears, and style the bangs as desired. Sew or hot-glue each strand securely at the base.
- Pockets (Make 2, White):
- R1: Ch 7. From 2nd ch from hook: inc, 4 sc, 3 sc in last st, 4 sc, inc (15)
- R2: (2 sc, inc) x 5 (20)
- R3-4: 20 sc
- R5: 10 sc, inc, 8 sc, inc (22)
- R6-9: 22 sc. Fasten off.
- Assembly: Pin pockets to the white overalls. The bottom edge should align with the leg join. Sew with small stitches. (Sewing the smaller top edge to the larger bottom edge creates a lovely 3D pouch effect!). Sew 3 small black buttons to the front.
- Jacket (Light Blue, 2.5 mm hook, worked flat):
- R1: Ch 21. From 2nd ch from hook: 20 sc, 1 ch, turn.
- R2: (1 sc, inc) x 5, (inc, 1 sc) x 5, 1 ch, turn (30)
- R3: 4 sc, 6 ch, skip 6 sc, 10 sc, 6 ch, skip 6 sc, 4 sc, 1 ch, turn (30)
- R4: 30 sc (working 6 sc into each chain space), 1 ch, turn.
- R5: 4 sc, (1 sc, inc) x 5, 2 sc, (inc, 1 sc) x 5, 4 sc, 1 ch, turn (40)
- R6: 40 sc, 1 ch, turn.
- R7 (Colorwork): 2 sc in Red, 2 sc in Light Blue, 1 ch, turn. Cut Red.
- R8: 40 sc in Light Blue, 1 ch, turn.
- R9 (Colorwork): 2 sc in Light Blue, 2 sc in Green, 1 ch, turn. Cut Green. (Embroider a few white cross-stitches between the green sc for a festive pattern!)
- R10: 2 sc, inc, 34 sc, inc, 2 sc, 1 ch, turn (42)
- R11 (Colorwork): 2 sc in Red, 2 sc in Light Blue, 1 ch, turn. Cut Red.
- R12: 9 sc, inc, 22 sc, inc, 9 sc, 1 ch, turn (44)
- R13: 44 sc, 1 ch, turn.
- Edging: Turn work clockwise. 1 ch, 13 sc down the side, (1 sc, 1 ch, 1 sc) in the corner, 18 sc across the collar, (1 sc, 1 ch, 1 sc) in the corner, 13 sc down the other side. Fasten off.
- Hat (Brown, 2 mm hook): Work in continuous rounds, increasing steadily to R17 (48 sc), then expanding rapidly for the brim: R18: (3 sc, inc) x 12 (60), R19: (9 sc, inc) x 6 (66), R20: 5 sc, inc, (10 sc, inc) x 5, 5 sc (72), R21: (11 sc, inc) x 6 (78), R22: 6 sc, inc, (12 sc, inc) x 5, 6 sc (84). Fasten off and sew neatly.
- Hat Band (Light Blue): Ch 59, sc across. Adjust length to fit, then sew neatly around R16-17 of the hat.
- Scarf (Mustard, 2.5 mm hook): Ch 100, hdc across starting from 3rd ch from hook. Tie cute, loose knots at both ends.
- Candy Cane: Wrap red yarn spirally around your white crocheted cane (or wire), securing it at the top. Bend the top into a classic hook shape.
Final Section: Where to Go from Here
Congratulations! By completing this Snowman, you’ve mastered some fantastic intermediate amigurumi techniques: seamless multi-piece joining, internal wire structuring, and intricate colorwork.
This project is a wonderful confidence-builder and makes an absolutely heartwarming holiday gift. From here, try experimenting with different yarn colorways to create a whole "Winter Wonderland" collection, or adapt the jacket pattern to design custom outfits for other amigurumi dolls in your collection. Happy crocheting, and enjoy your cozy new friend!