October 1, 2026
Sunny Side Breakfast Hot Pads
Good morning! This sweet little set has everything you need for a perfect breakfast: a slice of golden toast, a sunny-side-up egg, a crisp grid-patterned waffle, and a cheerful blue mug of coffee. Each one is a quick, simple flat project, so they are wonderful for using up scrap yarn and for practicing basic stitches. Use them as trivets, hot pads, coasters, or just a cute kitchen display. Pour yourself a cup of something warm, and let us stitch up a breakfast table.
Jump to pattern instructions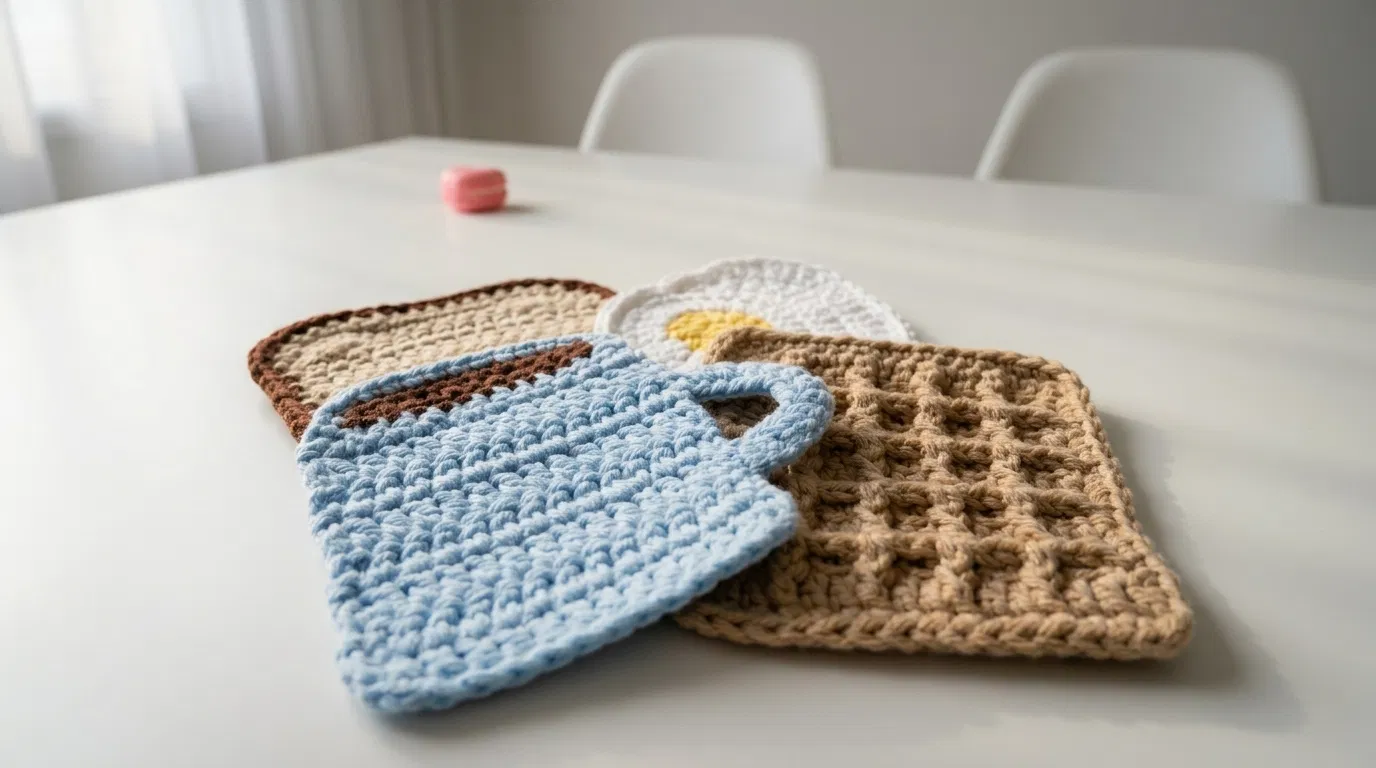
Sunny Side Breakfast Hot Pads
Difficulty: Beginner friendly (all four pieces use only basic stitches)
Finished Size: Each piece is about 6 to 7 inches across.
Time to Complete: 5 to 6 hours for the whole set, or about 1 to 1.5 hours per piece.
What You Will Need
Yarn:
- Light blue (for the mug)
- Brown (for the toast crust and the coffee)
- Beige or cream (for the toast)
- White (for the egg)
- Sunny yellow (for the yolk)
- Tan or light brown (for the waffle)
- Tip: Use a worsted weight cotton yarn. Cotton is heat resistant, washes well, and gives the stitches a crisp, textured look. Avoid acrylic if you plan to use these around hot dishes.
Tools:
- 4.0 mm (G/6) crochet hook. Use a smaller hook if you want a denser, sturdier fabric.
- Yarn needle with a large eye for sewing and weaving in ends
- Stitch markers
- Sharp scissors
- Straight pins
The Basics (US Terms)
- ch = chain
- sc = single crochet
- hdc = half double crochet
- dc = double crochet
- inc = increase (work 2 single crochets into the same stitch)
- dec = decrease (work 2 single crochets together)
- sl st = slip stitch
- MR = magic ring
- The mug, toast, and waffle are worked flat in rows. The egg is worked in rounds.
- Unless stated otherwise, ch 1 at the start of each row does not count as a stitch.
Let Us Get Started
We will make four pieces, each one a breakfast favorite.
Part 1: The Toast
Worked with beige yarn, finished with a brown crust.
- Foundation: Ch 29.
- Row 1: Sc in the 2nd ch from the hook and in each chain across. (28 stitches)
- Rows 2 to 26: Ch 1, turn. Sc in each stitch across. (28 stitches)
- Row 27: Ch 1, turn. Sl st in the first 2 stitches, sc in the next 24 stitches. Leave the last 2 stitches unworked. (24 sc) This starts rounding the top corners of the bread slice.
- Row 28: Ch 1, turn. Sl st in the first stitch, sc in the next 22 stitches. Leave the last stitch unworked. (22 sc)
- Rows 29 to 30: Ch 1, turn. Sc in each stitch across. (22 stitches) Do not fasten off.
- Crust: Switch to brown yarn. Ch 1, then work 1 sc evenly around the entire edge of the toast, placing 1 sc in each stitch along the top and 1 sc in each row along the sides. Work 3 sc in each of the two bottom corners. Join with a sl st to the first sc.
- Crust Round 2: Ch 1. Sc in each stitch around, with 3 sc in each bottom corner. Join with a sl st and fasten off.
- Weave in all ends.
Part 2: The Fried Egg
Worked in rounds with white yarn.
- Round 1: Work 6 sc into a magic ring. (6 stitches)
- Round 2: Inc in every stitch around. (12 stitches)
- Round 3: (1 sc, inc) repeat 6 times. (18 stitches)
- Round 4: (2 sc, inc) repeat 6 times. (24 stitches)
- Round 5: (3 sc, inc) repeat 6 times. (30 stitches)
- Round 6: (4 sc, inc) repeat 6 times. (36 stitches)
- Round 7: (5 sc, inc) repeat 6 times. (42 stitches)
- Round 8: (6 sc, inc) repeat 6 times. (48 stitches)
- Round 9: (7 sc, inc) repeat 6 times. (54 stitches)
- Round 10: (8 sc, inc) repeat 6 times. (60 stitches)
- Round 11: (9 sc, inc) repeat 6 times. (66 stitches)
- Round 12: (10 sc, inc) repeat 6 times. (72 stitches)
- Round 13 (wavy edge): (2 sc, 2 hdc, 2 dc, 2 hdc) repeat 9 times. (72 stitches) For a more natural, wobbly egg shape, change some of the repeats. Work 3 sc in one section, or 3 dc in another. Keep the total at 72 stitches.
- Join with a sl st and fasten off. Weave in the end.
The Yolk (worked with yellow yarn):
- Round 1: Work 6 sc into a magic ring. (6 stitches)
- Round 2: Inc in every stitch around. (12 stitches)
- Round 3: (1 sc, inc) repeat 6 times. (18 stitches)
- Round 4: Work 1 sc in every stitch around. (18 stitches)
- Join with a sl st and fasten off, leaving a long tail for sewing.
Part 3: The Waffle
Worked with tan yarn.
- Foundation: Ch 30.
- Row 1: Sc in the 2nd ch from the hook and in each chain across. (29 stitches)
- Rows 2 to 29: Ch 1, turn. Sc in each stitch across. (29 stitches)
- Border: Do not fasten off. Ch 1, then work 1 sc evenly around the entire edge, placing 3 sc in each corner. Join with a sl st and fasten off. Weave in the ends.
- Grid lines (surface slip stitch): Use the same tan yarn, or a slightly lighter tan for extra contrast.
- Vertical lines: Insert your hook from the front at the bottom of the 6th stitch from the left edge. Pull up a loop. Then work 1 sl st in each row going straight up the stitch column, keeping your stitches loose. Repeat the same way in stitches 12, 18, and 24. (4 vertical lines)
- Horizontal lines: Do the same going across, starting at the right edge on rows 6, 12, 18, and 24. (4 horizontal lines) Keep the stitches evenly spaced and slightly loose so the grid lines sit on top and do not pucker the fabric. This creates the deep, waffle-like squares.
- Fasten off, and weave in all ends on the back.
Part 4: The Coffee Mug
Worked with light blue and brown yarn.
The Mug Body (light blue):
- Foundation: Ch 19.
- Row 1: Sc in the 2nd ch from the hook and in each chain across. (18 stitches)
- Row 2: Ch 1, turn. Sc in each stitch across. (18 stitches)
- Row 3: Ch 1, turn. Inc in the first stitch, sc in each stitch across to the last stitch, inc in the last stitch. (20 stitches)
- Row 4: Ch 1, turn. Sc in each stitch across. (20 stitches)
- Row 5: Repeat Row 3. (22 stitches)
- Row 6: Ch 1, turn. Sc in each stitch across. (22 stitches)
- Row 7: Repeat Row 3. (24 stitches)
- Rows 8 to 20: Ch 1, turn. Sc in each stitch across. (24 stitches) Do not fasten off.
- Border: Ch 1, then work 1 sc evenly around the entire edge, placing 3 sc in each corner. Join with a sl st and fasten off. Weave in the ends.
The Coffee (brown):
- Foundation: Ch 19.
- Row 1: Sc in the 2nd ch from the hook and in each chain across. (18 stitches)
- Rows 2 to 4: Ch 1, turn. Sc in each stitch across. (18 stitches)
- Fasten off, leaving a long tail for sewing.
The Handle (light blue):
- Foundation: Ch 16.
- Row 1: Sc in the 2nd ch from the hook and in each chain across. (15 stitches)
- Rows 2 to 3: Ch 1, turn. Sc in each stitch across. (15 stitches)
- Fasten off, leaving a long tail for sewing.
Assembly and Finishing
This is where your breakfast comes together. Take your time pinning before you sew.
Finishing the Egg:
- Pin the yolk slightly off center on the egg white.
- Using the long tail, whip stitch the yolk around the edge. Add a tiny bit of stuffing under it if you want a puffy yolk.
Finishing the Mug:
- Pin the coffee strip across the top of the mug, about 1 row below the top edge, leaving 3 stitches of blue on each side. This leaves a little blue rim above the coffee, just like in the photo.
- Sew the coffee strip in place with the brown tail.
- Fold the handle into a loop. Pin it to the right side of the mug, near the top, with one end near the top edge and the other end about 8 rows down.
- Sew both ends of the handle firmly in place with the blue tail.
Optional Hot Pad Version:
- For heat protection, make two of each piece (without the yolk, coffee, or handle on the second one).
- Place the two pieces together with wrong sides facing, then join them with sc through both layers all the way around.
- Add the yolk, coffee, and handle on the front.
A Few Friendly Tips
- Keep it even: Keep your tension consistent so the edges stay straight and the pieces lie flat.
- Block it: A light steam and gentle pressing make the edges neat and crisp.
- Waffle lines: Pin the grid lines first with a strand of yarn, so you can adjust them before stitching.
- Make it your own: Try a bacon strip, a tiny pat of butter on the toast, a pink mug, or add a tiny strawberry on the waffle.
- Size up or down: For coasters, use a lighter yarn with a smaller hook and fewer stitches. For placemats, add more rows and stitches.
- Care: Machine wash gently on a cool setting and lay flat to dry.
I hope you enjoy making this cozy little breakfast set. It is such a sweet project and makes a wonderful housewarming gift.
If you run into any trouble or just want to share how your breakfast turned out, please reach out. I love seeing what you create.
Happy crocheting!