September 24, 2026
Sweet Little Amigurumi Turtle Pattern
There is nothing quite as charming as a little turtle carrying its home on its back. This sweet amigurumi friend is the perfect project for a cozy afternoon. With its gentle smile and cute little shell, it makes a wonderful companion for a desk, a nursery, or a special gift for someone who loves nature. Grab your favorite green yarn, and let us bring this little guy to life together.
Jump to pattern instructions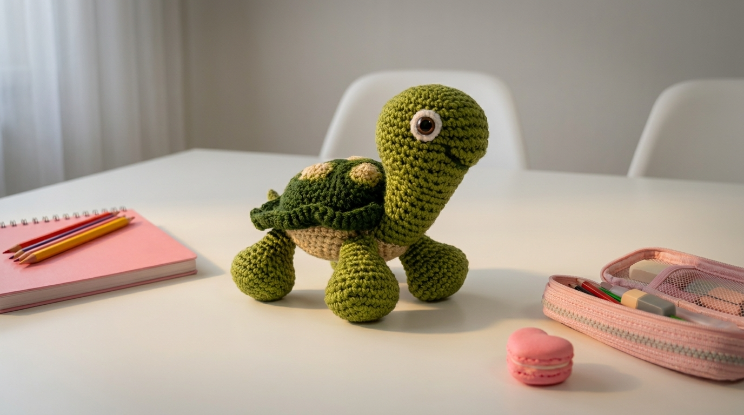
Difficulty: Beginner friendly (a great introduction to sewing amigurumi parts together)
Finished Size: About 4 to 5 inches tall and 5 inches long, depending on your yarn and tension.
Time to Complete: 3 to 4 hours of relaxed crocheting and assembly.
What You Will Need
Yarn:
- Medium green (for the head, neck, legs, and tail). You will need about 50 yards.
- Dark forest green (for the top of the shell). About 40 yards.
- Light cream or beige (for the bottom of the shell). About 20 yards.
- Light lime green or pale yellow (for the spots on the shell). Just a few scraps.
- Tip: Using a soft cotton or acrylic yarn works beautifully for this. Try to keep the yarn weight consistent across all colors so your turtle looks uniform.
Tools:
- 3.5 mm (E/4) or 4.0 mm (G/6) crochet hook. Use a size that gives you tight, even stitches so the stuffing does not peek through.
- 10 mm or 12 mm black safety eyes.
- Poly-fil or fiberfill stuffing.
- Yarn needle with a large eye for sewing.
- Stitch markers to keep track of your rounds.
- Sharp scissors.
The Basics (US Terms)
- MR = magic ring
- ch = chain
- sc = single crochet
- inc = increase (work 2 single crochets into the same stitch)
- dec = decrease (work 2 single crochets together, invisible decrease is best)
- sl st = slip stitch
- BLO = back loop only
Let Us Get Started
We will make this turtle in a few separate pieces and then sew them together. Take your time with the sewing part, as that is what really gives the turtle its personality.
Part 1: Head and Neck (Make 1)
Worked with medium green yarn.
- Round 1: Work 6 sc into a magic ring. (6 stitches)
- Round 2: Inc in every stitch around. (12 stitches)
- Round 3: (1 sc, inc) repeat 6 times. (18 stitches)
- Round 4: (2 sc, inc) repeat 6 times. (24 stitches)
- Round 5: (3 sc, inc) repeat 6 times. (30 stitches)
- Rounds 6 to 10: Work 1 sc in every stitch around. (30 stitches) Place your safety eyes between rounds 8 and 9, about 6 stitches apart. Secure them tightly on the inside before you stuff the head.
- Round 11: (3 sc, dec) repeat 6 times. (24 stitches)
- Round 12: (2 sc, dec) repeat 6 times. (18 stitches) Start stuffing the head firmly now. Make sure the face is nice and round.
- Round 13: (1 sc, dec) repeat 6 times. (12 stitches)
- Round 14: Dec 6 times. (6 stitches)
- Cut the yarn, leaving a long tail. Thread it onto your needle and pull through the front loops of the last 6 stitches to close the hole. Do not cut the tail yet; we will use it to sew the head to the body later.
Part 2: Top Shell (Make 1)
Worked with dark forest green yarn.
- Round 1: Work 6 sc into a magic ring. (6 stitches)
- Round 2: Inc in every stitch around. (12 stitches)
- Round 3: (1 sc, inc) repeat 6 times. (18 stitches)
- Round 4: (2 sc, inc) repeat 6 times. (24 stitches)
- Round 5: (3 sc, inc) repeat 6 times. (30 stitches)
- Round 6: (4 sc, inc) repeat 6 times. (36 stitches)
- Rounds 7 to 10: Work 1 sc in every stitch around. (36 stitches)
- Round 11: (4 sc, dec) repeat 6 times. (30 stitches)
- Round 12: (3 sc, dec) repeat 6 times. (24 stitches)
- Round 13: (2 sc, dec) repeat 6 times. (18 stitches)
- Cut the yarn, leaving a long tail for sewing. Lightly stuff the shell so it holds a nice dome shape, but do not overstuff it, or it will be hard to sew to the bottom shell.
Part 3: Bottom Shell (Make 1)
Worked with light cream or beige yarn.
- Round 1: Work 6 sc into a magic ring. (6 stitches)
- Round 2: Inc in every stitch around. (12 stitches)
- Round 3: (1 sc, inc) repeat 6 times. (18 stitches)
- Round 4: (2 sc, inc) repeat 6 times. (24 stitches)
- Round 5: (3 sc, inc) repeat 6 times. (30 stitches)
- Round 6: (4 sc, inc) repeat 6 times. (36 stitches)
- Round 7: Work 1 sc in the BLO of every stitch around. (36 stitches) Working in the back loop only creates a nice little ridge that makes sewing the two shells together much easier.
- Cut the yarn, leaving a long tail. Do not stuff this piece; it should remain relatively flat.
Part 4: Legs (Make 4)
Worked with medium green yarn.
- Round 1: Work 6 sc into a magic ring. (6 stitches)
- Round 2: Inc in every stitch around. (12 stitches)
- Round 3: Work 1 sc in the BLO of every stitch around. (12 stitches)
- Rounds 4 to 6: Work 1 sc in every stitch around. (12 stitches)
- Cut the yarn, leaving a long tail for sewing. Stuff the legs lightly so they are squishy but hold their shape. Flatten the open end slightly.
Part 5: Tail (Make 1)
Worked with medium green yarn.
- Round 1: Work 6 sc into a magic ring. (6 stitches)
- Round 2: Work 1 sc in every stitch around. (6 stitches)
- Cut the yarn, leaving a tail for sewing. Do not stuff. Pinch it flat.
Part 6: Shell Spots (Make 3 to 5)
Worked with light lime green or pale yellow yarn.
- Round 1: Work 6 sc into a magic ring. (6 stitches)
- Round 2: Inc in every stitch around. (12 stitches)
- Cut the yarn, leaving a long tail for sewing. Keep these flat.
Assembly and Finishing
This is where your turtle really comes to life. Take your time and pin everything in place before you start sewing.
Sewing the Shell: Place the dark green top shell and the cream bottom shell together, with the right sides facing out. Use your long yarn tails and a needle to whip stitch them together around the edge. Leave a small opening at the back. Insert a little bit of stuffing through the opening to give the body some volume, then sew the opening closed.
**