August 21, 2026
Timka the Kitten – A Sweet & Snuggly Amigurumi Crochet Pattern
Meet Timka, an irresistibly cute little kitten in a tiny blue jumpsuit! This charming pattern features clever integrated shaping, adorable details like a peek-a-boo tongue, and a fully customized outfit. It’s a joyful, intermediate-friendly project perfect for gifting or adding to your handmade collection.
Jump to pattern instructions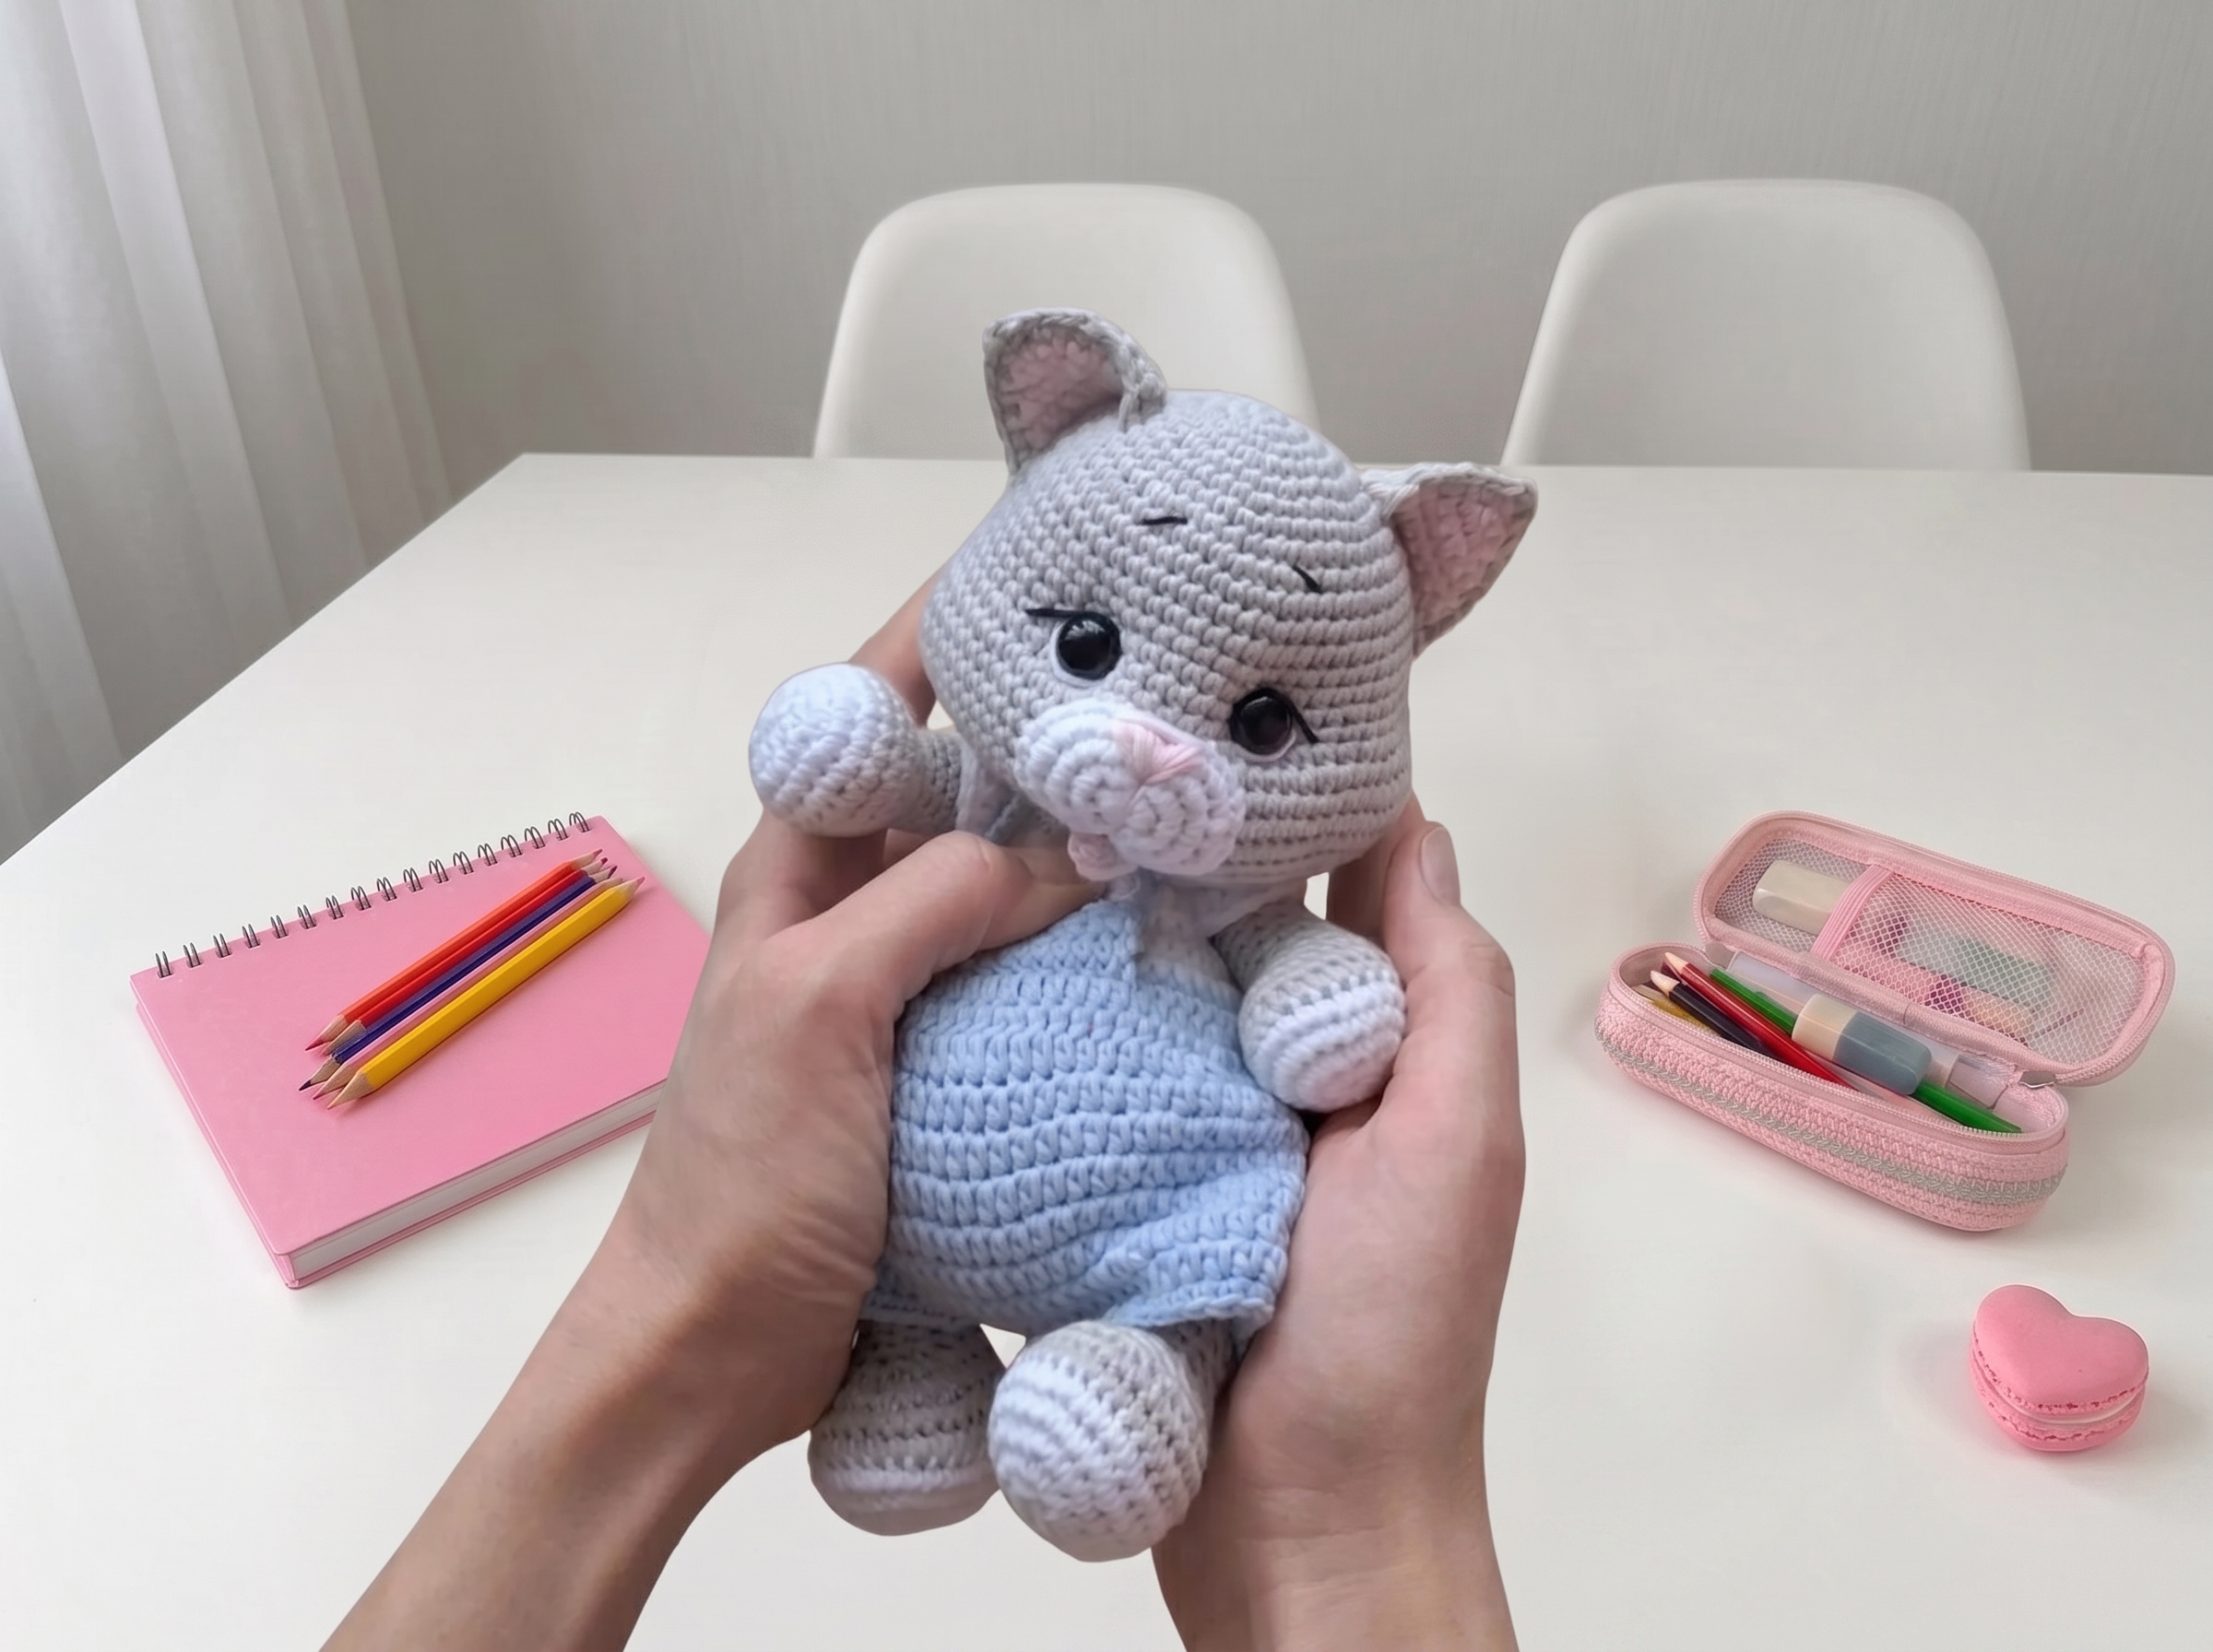
Timka the Kitten – Complete Step-by-Step Pattern
1. Materials & Abbreviations
Let's gather our supplies! Using a soft cotton blend will give Timka beautiful stitch definition and a lovely, huggable feel.
- Yarn: YarnArt Jeans (160m / 50g, 100% cotton).
- Color 49 (Gray) – Main body
- Color 01 (White) – Paws, tail tip, and overalls
- Color 74 (Pink) – Inner ears and tongue
- Color 53 (Dark Brown) – Nose, eyelashes, and eyebrows
- Colors 01 & 75 (White & Light Blue) – Overalls details
- Hook: 1.75 mm or 2.0 mm (or size needed to achieve a tight, stuff-proof gauge)
- Notions: 12 mm safety eyes, two 10 mm buttons, poly-fil stuffing, tapestry needle, scissors, and stitch markers.
- Abbreviations:
- MR – magic ring
- ch – chain
- sc – single crochet
- hdc – half double crochet
- inc – increase (2 sc in one stitch)
- dec – decrease (2 sc crocheted together)
- BLO – back loop only
What you'll master: Proper tool selection for fine cotton yarns, gauge management, and familiarization with standard international crochet abbreviations.
2. Head
The head is worked in a continuous spiral, building up to a beautifully rounded shape with defined cheeks, then gradually decreasing to form the neck.
- R1: 7 sc in MR (7)
- R2: 7 inc (14)
- R3: (1 sc, inc) x 7 (21)
- R4: 1 sc, inc, (2 sc, inc) x 6, 1 sc (28)
- R5: (3 sc, inc) x 7 (35)
- R6: 2 sc, inc, (4 sc, inc) x 6, 2 sc (42)
- R7: 42 sc (42)
- R8: (5 sc, inc) x 7 (49)
- R9: 3 sc, inc, (6 sc, inc) x 6, 3 sc (56)
- R10-16: 56 sc (56) [7 rows]
- R17: (3 sc, inc) x 14 (70)
- R18: 15 sc, (1 sc, inc) x 3, 28 sc, (1 sc, inc) x 3, 15 sc (76)
- R19: 15 sc, (inc, 2 sc) x 3, inc, 27 sc, inc, (2 sc, inc) x 3, 14 sc (84)
- R20-21: 84 sc (84) [2 rows]
- Important detail: Insert 12 mm safety eyes between R15 and R16, spaced exactly 10 stitches apart.
- R22: 15 sc, (dec, 2 sc) x 3, dec, 27 sc, dec, (2 sc, dec) x 3, 14 sc (76)
- R23: 16 sc, (dec, 1 sc) x 3, 28 sc, (dec, 1 sc) x 3, 14 sc (76)
- R24: 4 sc, dec, (8 sc, dec) x 6, 4 sc (63)
- R25: (7 sc, dec) x 7 (56)
- R26: 3 sc, dec, (6 sc, dec) x 6, 3 sc (49)
- R27: (5 sc, dec) x 7 (42)
- R28: (1 sc, dec) x 14 (28)
- R29: 1 sc, dec, (2 sc, dec) x 6, 1 sc (21)
- Finishing: Fasten off, leaving a long tail. Stuff the head firmly, paying special attention to rounding out the cheeks for that classic chubby kitten look.
What you'll master: Spiral increase sequences, strategic safety eye placement, and structured decreasing for smooth, spherical shaping.
3. Body
The body is worked from the bottom up, featuring gentle decreases to create a cute, rounded tummy that perfectly supports the head.
- R1: 7 sc in MR (7)
- R2: 7 inc (14)
- R3: (1 sc, inc) x 7 (21)
- R4: 1 sc, inc, (2 sc, inc) x 6, 1 sc (28)
- R5: (3 sc, inc) x 7 (35)
- R6: 2 sc, inc, (4 sc, inc) x 6, 2 sc (42)
- R7: (5 sc, inc) x 7 (49)
- R8: 3 sc, inc, (6 sc, inc) x 6, 3 sc (56)
- R9: 3 sc, inc, (6 sc, inc) x 7, 3 sc (64)
- R10-14: 64 sc (64) [5 rows]
- R15: 21 sc, dec, (1 sc, dec) x 7, 20 sc (56)
- R16-17: 56 sc (56) [2 rows]
- R18: 18 sc, dec, (1 sc, dec) x 6, 18 sc (49)
- R19-20: 49 sc (49) [2 rows]
- R21: (5 sc, dec) x 7 (42)
- R22-23: 42 sc (42) [2 rows]
- R24: 2 sc, dec, (4 sc, dec) x 6, 2 sc (35)
- R25-26: 35 sc (35) [2 rows]
- R27: (3 sc, dec) x 7 (28)
- R28: 28 sc (28)
- R29: 1 sc, dec, (2 sc, dec) x 6, 1 sc (21)
- R30-31: 21 sc (21) [2 rows]
- Finishing: Fasten off, leaving a long tail for sewing the head to the body. Stuff the body firmly, especially the tummy area, to give Timka a sturdy, seated posture.
What you'll master: Building a symmetrical, weight-distributed body shape with balanced increase and decrease sequences.
4. Upper Paws (Arms)
The arms feature a cute, tapered shape with a white "mitten" tip, finished with a clever fold-and-sew technique for a natural drape.
- R1 (White): Ch 5. Starting in 2nd ch from hook: 3 sc, 4 sc in last st, 2 sc, inc (11)
- R2: inc, 2 sc, 4 inc, 2 sc, 2 inc (18)
- R3: 1 sc, inc, 2 sc, (1 sc, inc) x 4, 2 sc, (1 sc, inc) x 2 (25)
- R4: 25 sc. Change to gray yarn.
- R5-6: 25 sc (25) [2 rows]
- R7: 6 sc, dec, (1 sc, dec) x 3, 8 sc (21)
- R8: 3 sc, 3 dec, 1 sc, 3 dec, 5 sc (15)
- R9: (3 sc, dec) x 3 (12)
- R10-20: 12 sc (12) [10 rows]
- Finishing: To close, work 2 sc, fold the opening in half, and crochet through both layers: 1 sc, 2 dec, 1 sc (4 sts total). Fasten off, leaving a long tail. Sew between R29 and R30 of the body.
What you'll master: Creating uniform tubular limbs and using flat-folding techniques for seamless, articulated closures.
5. Lower Paws (Legs)
The legs feature a structured, rounded paw base that transitions smoothly into a sturdy gray leg, finished with the same neat fold-and-sew method.
- R1 (White): Ch 5. Starting in 2nd ch from hook: 3 sc, 4 sc in last st, 2 sc, inc (11)
- R2: inc, 2 sc, 4 inc, 2 sc, 2 inc (18)
- R3: 1 sc, inc, 2 sc, (1 sc, inc) x 4, 2 sc, (1 sc, inc) x 2 (25)
- R4: 2 sc, inc, 2 sc, (2 sc, inc) x 4, 2 sc, (2 sc, inc) x 2 (32)
- R5: 32 sc. Change to gray yarn.
- R6-7: 32 sc (32) [2 rows]
- R8: 6 sc, dec, (1 sc, dec) x 5, 9 sc (26)
- R9: 3 sc, 4 dec, 1 sc, 4 dec, 6 sc (18)
- R10: (4 sc, dec) x 3 (15)
- R11: 5 sc, 2 dec, 6 sc (13)
- R12-22: 13 sc (13) [11 rows]
- Finishing: To close, work 3 sc, fold the opening in half, and crochet 6 sc through both layers. Fasten off, leaving a long tail. Sew between R12 and R13 of the body.
What it teaches: Oval foundation chaining, progressive limb decreasing, and partial stuffing for a natural, floppy drape.
6. Muzzle, Tongue & Ears
These small, expressive features bring Timka's sweet personality to life.
Muzzle:
- R1: 8 sc in MR (8)
- R2: 8 inc (16)
- R3: 2 sc, 4 inc, 4 sc, 4 inc, 2 sc (24)
- R4: 3 sc, 6 inc, 6 sc, 6 inc, 3 sc (36)
- Finishing: Fasten off, leaving a long tail. Sew centrally between R17 and R23 of the head.
Tongue:
- Instructions: With pink yarn, work 6 sc in MR. Do not join in a round; leave it as a flat, open circle. Fasten off, leaving a tail. Tuck and sew this under the muzzle after stuffing the head.
Ears (Make 2 sets of 2 parts):
- Work in turning rows, chaining 1 at the end of each row.
- R1: Ch 2. In 2nd ch from hook: 1 inc (2)
- R2: 2 inc (4)
- R3: inc, 2 sc, inc (6)
- R4: 6 sc
- R5: inc, 4 sc, inc (8)
- R6: 8 sc
- R7: inc, 6 sc, inc (10)
- Assembly: For the pink inner part, fasten off and cut yarn. For the gray outer part, do not cut yarn. Place the pink piece on top of the gray piece, and single crochet around the entire outer edge to join them. Leave a long tail for sewing to the head at R6–R14.
What you'll master: Rapid radial expansion, working flat pieces with turning chains, and layering colors for dimensional facial features.
7. Tail
A classic kitten tail with a charming white tip, worked in a simple, tapered tube.
- R1 (White): 6 sc in MR (6)
- R2: (1 sc, inc) x 3 (9)
- R3-6: 9 sc (9) [4 rows]
- Change to gray yarn.
- R7-18: 9 sc (9) [12 rows]
- Finishing: Fasten off, leaving a long tail for sewing. Attach securely between R12 and R13 of the body.
What you'll master: Clean mid-project color changes and simple tapered cylinder shaping.
8. The Outfit: Overalls & Shorts
Timka’s tiny blue jumpsuit is worked flat, then joined in the round, complete with armholes, a tail opening, and an adorable bib!
Overalls (Start with White Yarn):
- R1: Ch 31. Starting in 2nd ch from hook: 30 sc
- R2: (1 sc, inc) x 15 (45)
- R3: 1 sc, inc, (2 sc, inc) x 14, 1 sc (60)
- R4-5: 60 sc (60) [2 rows]
- R6 (Armholes): 7 sc, ch 8, skip 16 sts, 14 sc, ch 8, skip 16 sts, 7 sc (44)
- R7: 44 sc
- R8: 6 sc, inc, 8 sc, inc, 12 sc, inc, 8 sc, inc, 6 sc (48)
- R9: 48 sc
- R10: (7 sc, inc) x 6 (54)
- Change to Light Blue yarn.
- R11: 54 sc
- R12: 4 sc, inc, (8 sc, inc) x 5, 4 sc (60)
- R13: 25 sc, ch 3, 10 sc, ch 3, 25 sc (60)
- R14: (9 sc, inc) x 6 (66)
- R15: 66 sc
- Join in the round: Sl st to join, then work only in sc. Ch 2 at the start of each round.
- R16: 66 sc
- R17 (Tail Hole): 3 sl st, ch 2, 62 sc, ch 4, skip 4 sts, sl st. Place marker for new BOR.
- R18-22: 66 sc (66) [5 rows]
- Finishing: Fasten off and weave in ends.
Shorts & Bib Details:
- Shorts: Work 27 sc, sl st to join. Fasten off and sew the small opening between the legs closed.
- Bib: In R13 of the overalls, you left chain spaces. Join white yarn to one of these spaces and work:
- R1-2: 10 sc, turn
- R3: 10 sc
- Straps: Chain 25 for each strap. Attach to the top corners of the bib and sew buttons to the back of the overalls to fasten them.
What you'll master: Flat-to-round transitions, creating functional armholes and tail openings, and adding custom garment details.
9. Final Assembly & Finishing
Now for the magic moment where Timka truly comes to life!
- Head to Body: Sew the head securely to the top of the body using the long tail. Ensure the stuffing is firm and evenly distributed.
- Facial Details: Using dark brown embroidery floss, stitch a tiny nose on the muzzle (R24-25). Add delicate eyelashes and diagonal eyebrows above the eyes.
- Cheeks: Lightly tone the cheeks with pink pastel chalk or acrylic paint for an extra blush of cuteness.
- Ears & Tail: Sew the ears securely in place, and attach the tail to the lower back.
- Dress Up: Slide the overalls onto Timka, fasten the straps with the tiny buttons, and admire your handiwork!
What you'll master: Multi-step structural assembly, surface embroidery for expressive facial features, and professional finishing techniques for wearable doll accessories.
Final Section: Where to Go from Here
Congratulations! By completing Timka the Kitten, you have mastered foundational spiral shaping, clever integrated limb construction, and intricate garment detailing. This project is a fantastic confidence-builder for working with fine cotton yarns. From here, try experimenting with different yarn colorways to create a whole "barnyard friends" collection, or adapt the overall pattern to design custom outfits for other amigurumi dolls in your collection. Happy crocheting!