August 31, 2026
Yumi the Doll – A Charming & Stylish Amigurumi Crochet Pattern
Bring this stylish, sweet little doll to life! Featuring a beautifully detailed dress, gorgeous hair with floral buns, and clever integrated limbs, this pattern is a joyful, intermediate-friendly project perfect for crafters ready to master doll construction and custom accessories.
Jump to pattern instructions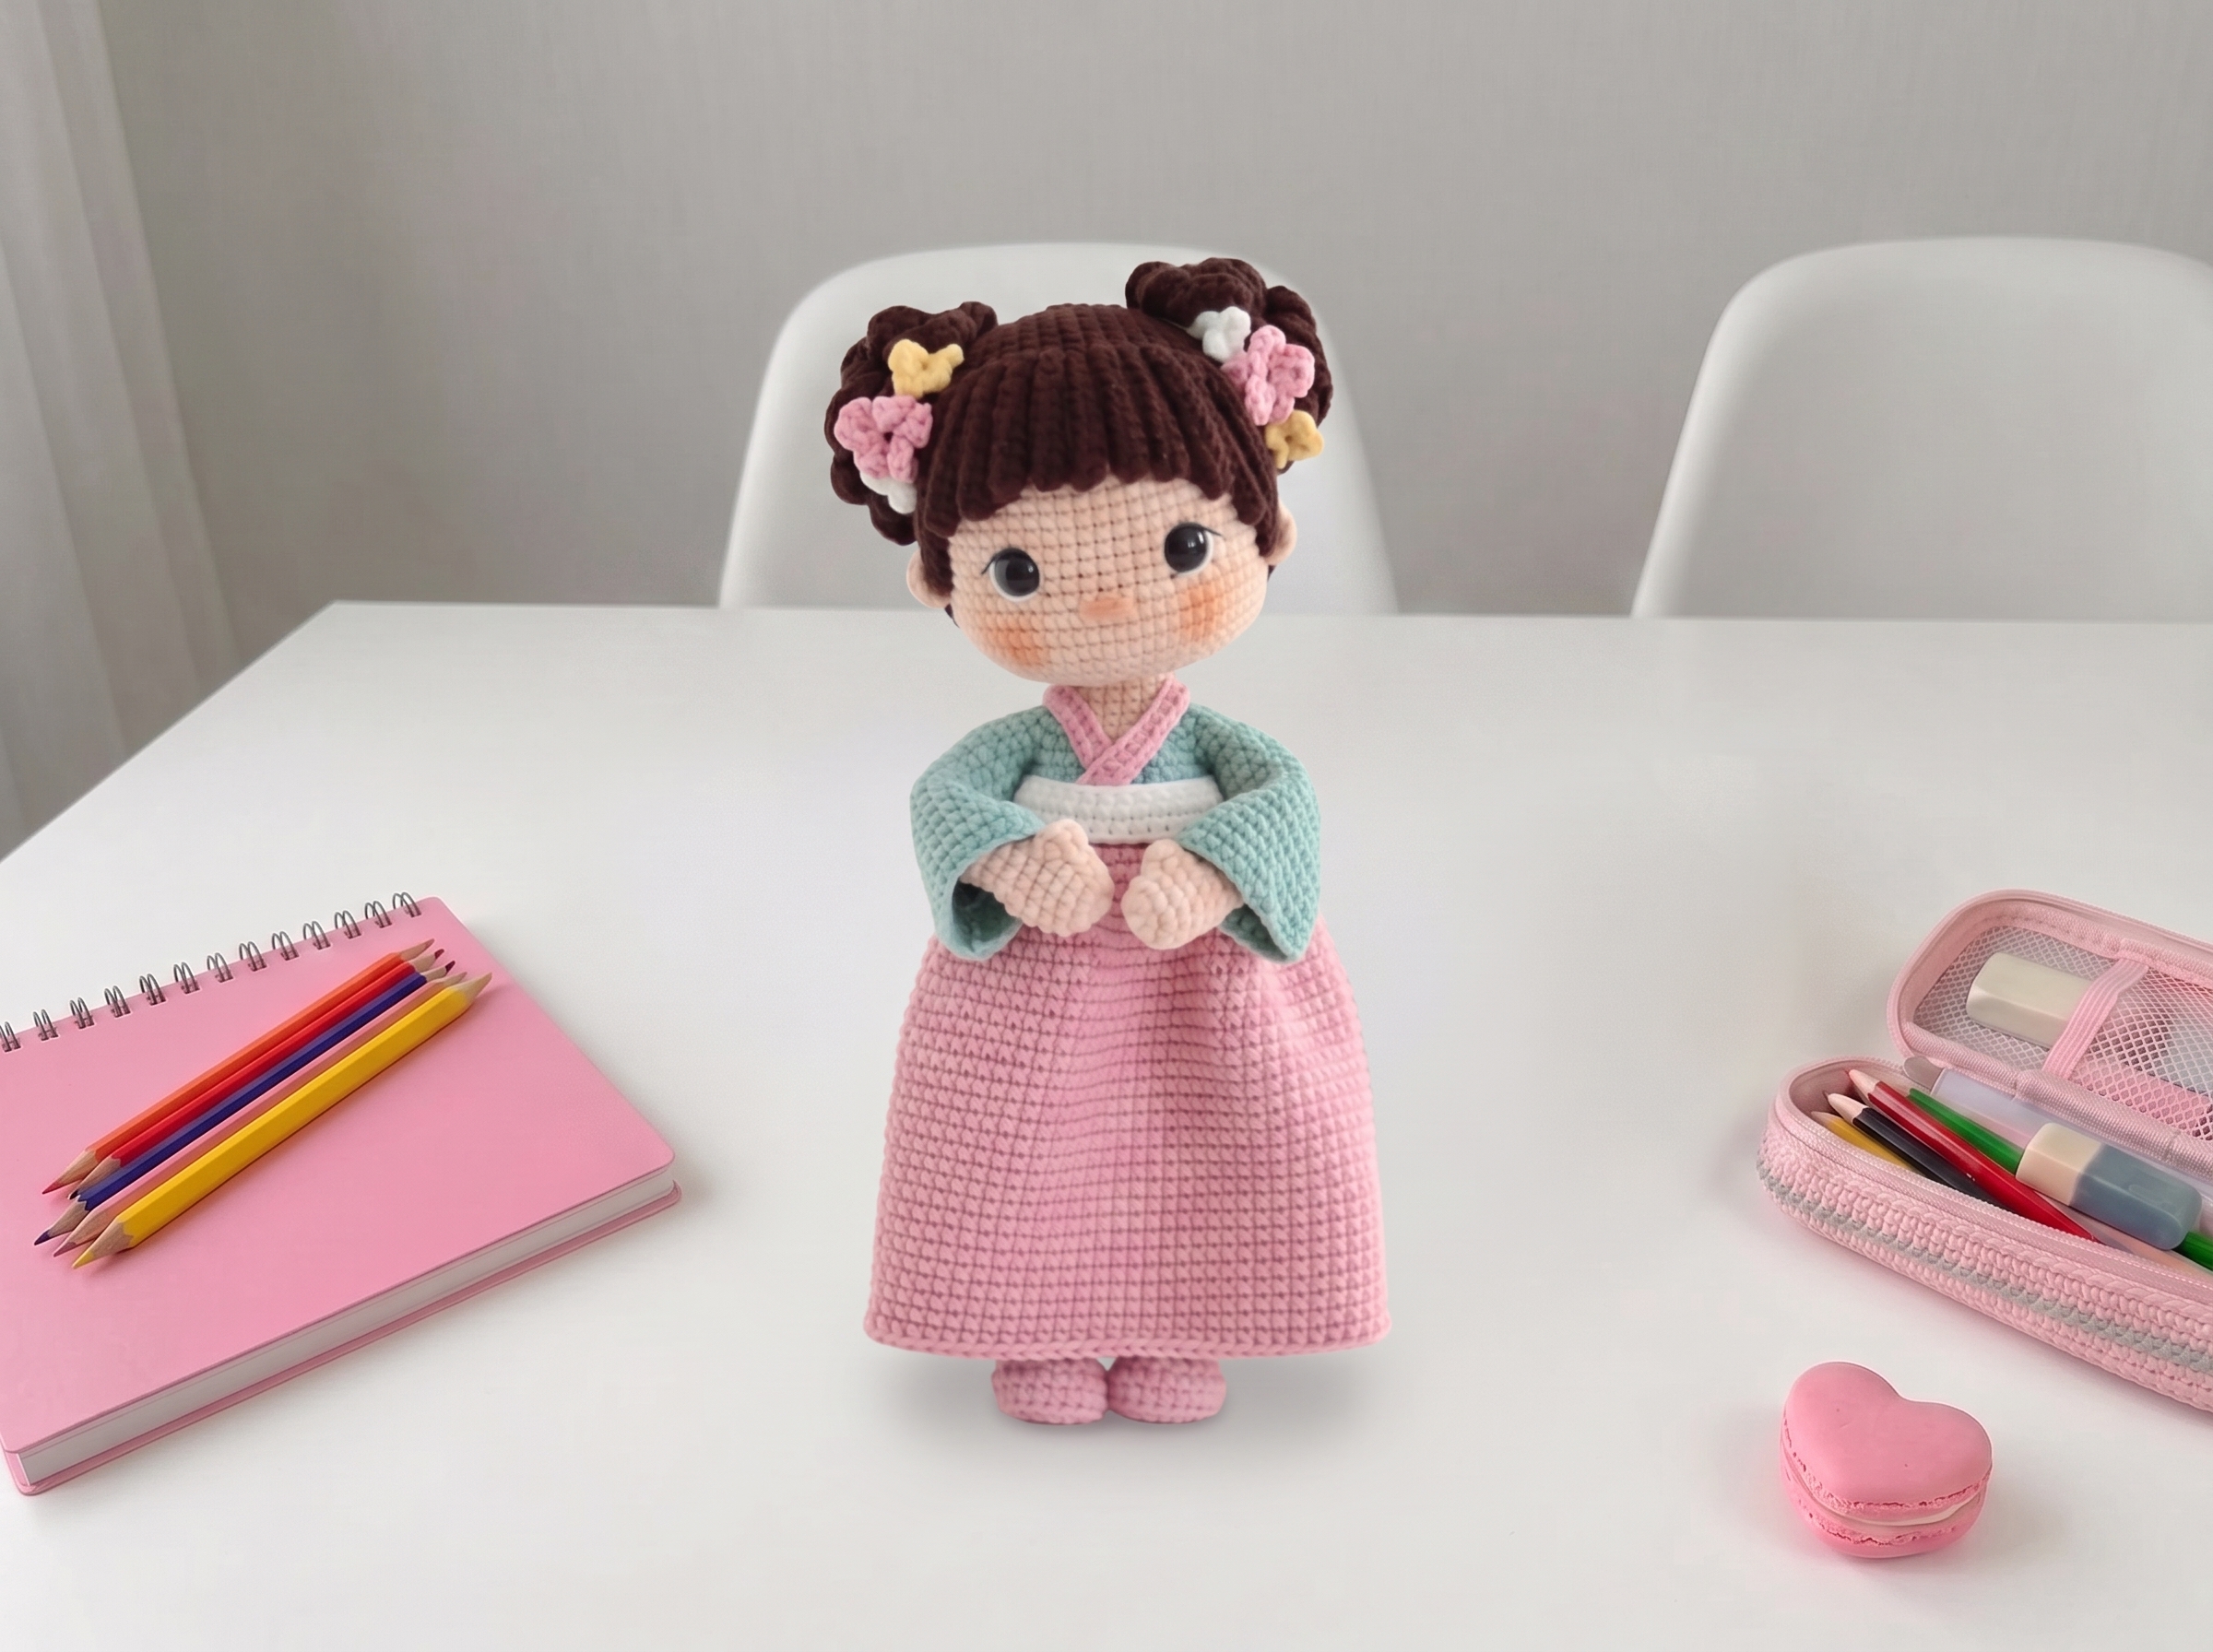
Yumi the Doll – Complete Step-by-Step Pattern
Original design by Sevgili Ilmkler (@sevgili_ilmkler). Let’s grab our hooks and bring this lovely doll to life!
1. Materials & Abbreviations
Let’s gather our supplies! Using a smooth, fine cotton yarn will give Yumi beautiful stitch definition, making all those lovely clothing and hair details truly pop.
- Yarn: Sport weight yarn (e.g., Lanosa Alara or YarnArt Jeans). You'll need approx. 50g of each:
- Body/Skin: Color 73 (or 937)
- Hair: Color 70 (or 992)
- Dress: Dark Red (Color 24) and Dark Green (Color 32 or 1915)
- Accents: Pink (Color 20), White (Color 03), Yellow (Color 88), Black (Color 53)
- Hook: 1.60 mm (or size needed to achieve a tight, stuff-proof gauge).
- Notions:
- 10 mm safety eyes (or glue-on eyes)
- Thin black embroidery floss (for eyes) and thin brown floss (for eyebrows)
- Soft wire (~70 cm total, for arm/leg armatures)
- Poly-fil stuffing, tapestry needle, scissors, stitch markers
- Fabric glue/hot glue, and a small piece of stiff plastic (e.g., yogurt lid) for shoe soles.
Abbreviations:
- MR: Magic ring
- ch: Chain
- sc: Single crochet
- hdc: Half double crochet
- dc: Double crochet
- inc: Increase (2 sc in 1 stitch)
- d.inc: Double increase (3 sc in 1 stitch)
- dec: Decrease (invisible decrease recommended)
- sl st: Slip stitch
- BLO: Back loop only
- FLO: Front loop only
What you'll master: Working with fine cotton yarns, gauge management, and familiarization with standard international crochet abbreviations.
2. Head & Facial Features
The head is worked in a continuous spiral, building up to a beautifully rounded shape before gradually decreasing to form the neck.
- Rnd 1 (Skin color): 6 sc in MR (6)
- Rnd 2: 6 inc (12)
- Rnd 3: (1 sc, inc) x 6 (18)
- Rnd 4: (2 sc, inc) x 6 (24)
- Rnd 5: (3 sc, inc) x 6 (30)
- Rnd 6: (4 sc, inc) x 6 (36)
- Rnd 7: (5 sc, inc) x 6 (42)
- Rnd 8: (6 sc, inc) x 6 (48)
- Rnd 9: (7 sc, inc) x 6 (54)
- Rnd 10: (17 sc, inc) x 3 (57)
- Rnd 11-18: 57 sc (57) [8 rounds]
- Rnd 19: 23 sc, ch 1, skip 1 sc, 9 sc, ch 1, skip 1 sc, 23 sc (57)
- Important detail: These chain spaces create the openings for the eyes!
- Rnd 20: 57 sc (work 1 sc into each ch space)
- Rnd 21: 20 sc, (inc, 2 sc) x 6, 19 sc (63)
- Rnd 22-24: 63 sc (63) [3 rounds]
- Eye Placement: Insert 10 mm safety eyes into the chain spaces of Rnd 19. Space them 8 stitches apart before inserting, which will become 6 stitches apart after insertion.
- Rnd 25: 20 sc, (dec, 2 sc) x 6, 19 sc (57)
- Rnd 26: 2 sc, (7 sc, dec) x 6, 1 sc (51)
- Rnd 27: 5 sc, dec, (6 sc, dec) x 5, 4 sc (45)
- Rnd 28: 2 sc, (5 sc, dec) x 6, 1 sc (39)
- Rnd 29: (3 sc, dec) x 6, (sc, dec) x 3 (30)
- Rnd 30: (3 sc, dec) x 6 (24)
- Rnd 31: 1 sc, dec, (2 sc, dec) x 5, 1 sc (18)
- Finishing: Stuff the head firmly. Fasten off, leaving a long tail. Weave the tail through the front loops of the remaining 18 stitches and pull tight to close the hole.
Face Decoration:
- Eyebrows: Embroider on Rnd 15 using thin brown floss.
- Nose: Embroider between Rnd 21 and 22 using skin-colored yarn.
- Blush: Use peach-colored dry pastel or cosmetic blush to tint the cheeks and nose.
What you'll master: Spiral increase sequences, precise safety eye placement, and structured decreasing for spherical shaping.
3. Ears, Hair & Accessories
These small details add so much personality and style to Yumi’s look!
Ears (Make 2, Skin color):
- Instructions: In MR, work: 2 ch, 4 dc, 2 ch, sl st.
- Finishing: Pull the tail tight to form a neat semi-circle. Leave a long tail for sewing. Attach to Rnd 20-21 of the head, 7 stitches away from the eyes.
Hair Base (Hair color):
- Rnd 1-10: Work increases from 6 sc up to 57 sc, matching the head's circumference (similar to Head Rnd 1-10).
- Rnd 11-17: 57 sc (57) [7 rounds]
- Rnd 18: 23 sc.
- Strands: Now, work the hair strands directly into Rnd 18:
- Chain 14, turn, starting in 3rd ch from hook work 12 hdc, sl st to base, skip 1 st on base.
- Repeat with varying chain lengths: Chain 13 (11 hdc), Chain 12 (10 hdc), Chain 11 (9 hdc) x 5 times, then reverse the lengths back up to Chain 14.
- Inner Layer (FLO of Rnd 3): Work longer strands: Chain 36 (35 hdc) x 34 times, then Chain 37 (36 hdc) x 9 times.
Hair Buns (Make 2, Hair color):
- Rnd 1: 6 sc in MR (6)
- Rnd 2: 6 inc (12)
- Rnd 3: (Chain 25, turn, work 2 hdc in each of the remaining 22 chains, join to next stitch with 1 sc) x 6 times around the base.
- Finishing: Pin the buns to the sides of the head and sew securely.
Flowers:
- Big Flowers (Make 2, Pink): In MR, work: (2 ch, 2 dc, 2 ch, sl st) x 5.
- Small Flowers (Make 4, White/Yellow): In MR, work: (ch, hdc, ch, sl st) x 5.
- Assembly: Attach the flowers to the hair buns using fabric glue or by sewing.
What you'll master: Radial expansion, chaining long textured strands, and attaching multiple repetitive elements seamlessly in the round.
4. Arms & Sleeves
The arms feature a cute little "thumb" detail created with a bobble stitch, and they are designed to be inserted into custom crocheted sleeves.
Arms (Make 2, Skin color):
- Rnd 1: 6 sc in MR (6)
- Rnd 2: 6 inc (12)
- Rnd 3-4: 12 sc (12) [2 rounds]
- Rnd 5: 3 sc, 1 bobble stitch (3 dc with a common top), 8 sc (15)
- Rnd 6: 3 sc, bobble stitch closed, 8 sc (12)
- Rnd 7: (1 sc, dec) x 4 (8)
- Rnd 8-18: 8 sc (8) [11 rounds]
- Rnd 19: (1 sc, inc) x 4 (12)
- Finishing: Fasten off. Do not stuff. Leave a long tail. Insert wire (15-20 cm) when attaching to the body.
Dress Sleeves (Make 2, Dark Green):
- Rnd 1: Chain 25, starting in 2nd ch from hook, work 24 sc, join with sl st to form a ring (24)
- Rnd 2-13: Work decrease rounds to taper the sleeve down to 12 sc.
- Rnd 14: Insert the pre-made arm into the sleeve and crochet 12 sc through both the sleeve and the arm simultaneously to join them.
- Rnd 15: 12 sc.
- Rnd 16: 3 sc, sl st. Fasten off, leaving the remaining 8 sc unworked to create a thumbhole.
What you'll master: Creating uniform tubular limbs, clean color changes, and flat-folding techniques for seamless closures.
5. Legs, Feet & Body
The legs feature a shaped foot with a plastic sole for stability, then transition seamlessly into the torso. We'll join the legs to crochet the body in one continuous piece.
Feet & Legs (Make 2, start with Pink):
- Rnd 1: Chain 5, starting in 2nd ch from hook: 3 sc, 1 d.inc (3 sc in last st), 3 sc, 1 d.inc (12)
- Rnd 2: 1 inc, 3 sc, 3 inc, 3 sc, 2 inc (18)
- Rnd 3: 1 sc, inc, 4 sc, (1 sc, inc) x 4, 5 sc, inc, 1 sc (23)
- Rnd 4: 23 sc in BLO (23)
- Rnd 5: 23 sc.
- Important detail: Cut a plastic sole to match Rnd 4, and sandwich it between Rnd 4 and 5, securing with a dab of glue.
- Rnd 6: 2 sc, (dec, 1 sc) x 6, 3 sc (17)
- Rnd 7: 4 sc, 3 dec, 7 sc (14)
- Rnd 8: 14 sc. Change to Skin color.
- Rnd 9-28: 14 sc (14) [20 rounds]. Stuff the foot and gradually stuff the leg as you go. Insert wire (~25 cm) at Rnd 10.
- Rnd 29: 11 sc, sl st. Fasten off on the first leg. On the second leg, work 7 sc and do not fasten off.
Joining & Body (Skin color):
- Rnd 1 (Joining): From the last st of the 2nd leg, chain 4. Work 14 sc around the 1st leg, 4 sc along the chain, 14 sc around the 2nd leg, 4 sc along the chain. (36 sts total)
- Rnd 2-10: 36 sc (36) [9 rounds]
- Rnd 11: 36 sc. Change to Pink yarn (for the dress).
- Rnd 12: 36 sc in BLO (36). Fasten off pink yarn.
- Rnd 13-15: Continue with Green yarn (dress body), 36 sc (36) [3 rounds].
Attaching Arms to Body:
- Rnd 16: 8 sc (body), 3 sc (through right arm & body), 14 sc (body), 3 sc (through left arm & body), 8 sc (body) = 36 sc. Ensure thumbs are facing forward!
- Rnd 17: 3 sc, dec, 3 sc (body), 3 sc, dec, 4 sc (arm), 2 sc, dec, 2 sc, change to Skin color, 2 sc, dec, 2 sc (body), 4 sc, dec, 3 sc (arm), 3 sc, dec, 3 sc (body) = 42 sc.
- Rnd 18: (5 sc, dec) x 2, 4 sc, change to Skin, 1 sc, dec, 2 sc, change to Green, 3 sc, dec, (5 sc, dec) x 2 = 36 sc.
- Rnd 19-20: Continue decreasing and color-changing to shape the waist and neck, ending with 18 sc.
- Rnd 21-24: 18 sc (18) [4 rounds].
- Finishing: Fasten off, leaving a long tail. Stuff the body firmly. Twist the arm wires together at the neck for stability.
What you'll master: Complex foot shaping with plastic inserts, seamless multi-piece joining, and mid-round limb attachment.
6. Clothing Details & Assembly
No doll is complete without a fabulous wardrobe and final assembly!
Belt (White):
- Chain 37, starting in 2nd ch from hook, work 36 sc, join with sl st. Work 2 more rounds of 36 sc. Fasten off and wrap around the doll's waist.
Collar (Pink):
- Chain 39, starting in 2nd ch from hook, work 38 sc. Fasten off. Glue around the neck, tucking the ends into the belt.
Final Assembly:
- Head to Body: Sew the head securely to the top of the body using the long tail. Ensure the neck is stuffed firmly so the head doesn't wobble.
- Hair: Pin the hair cap to the head (aligning the MR with the MR of the head). Distribute the strands: long strands at the back, shorter strands over the ears, and style the bangs. Sew or hot-glue in place.
- Face: Embroider the nose, mouth, and delicate eyelashes. Add a hint of blush to the cheeks with pastel chalk.
- Dress Up: Slide the dress and belt onto your doll, and admire your handiwork!
What you'll master: Multi-step structural assembly, surface embroidery for expressive facial features, and professional finishing techniques for wearable doll accessories.
Final Section: Where to Go from Here
Congratulations! By completing Yumi the Doll, you have mastered foundational spiral shaping, complex foot construction with inserts, and intricate garment detailing. This project is a fantastic confidence-builder and makes an absolutely heartwarming gift.
From here, try experimenting with different yarn colorways to create a whole "friend group" of dolls, or adapt the dress and sleeve patterns to design custom outfits for other amigurumi figures in your collection. Happy crocheting!